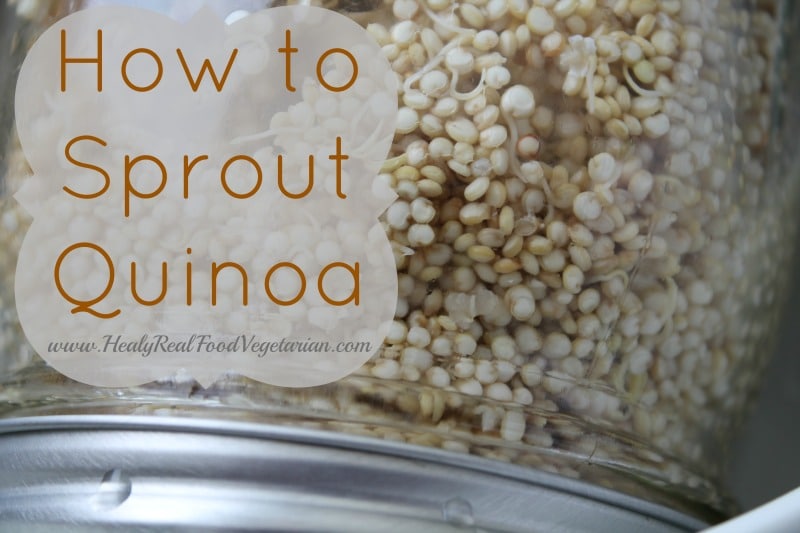
To sprout quinoa, rinse the seeds thoroughly and then soak them in water for 8 to 12 hours. Quinoa is a highly nutritious and versatile grain-like seed that has gained popularity in recent years.
Sprouting quinoa can increase its digestibility and unlock even more of its health benefits. We will explore how to sprout quinoa, step by step. By following these simple instructions, you can enjoy the crunchy texture and nutty flavor of sprouted quinoa in your salads, stir-fries, and other dishes.
Whether you are a seasoned sprouter or a beginner, sprouting quinoa is a quick and easy process that anyone can do at home. Read on to learn how to add this nutritious powerhouse to your culinary repertoire.
Credit: healyeatsreal.com
Why Sprouting Quinoa Is Beneficial
- Increased bioavailability of nutrients: Sprouting quinoa increases the absorption of essential nutrients such as vitamins and minerals. The sprouting process breaks down anti-nutrients, making these nutrients more accessible and easier for the body to assimilate.
- Enhanced digestibility: Sprouted quinoa is easier to digest compared to unsprouted quinoa. The sprouting process initiates enzyme activity, which aids in the breakdown of complex proteins and carbohydrates, facilitating better digestion and nutrient absorption.
So, sprouting quinoa not only enhances its nutritional profile but also improves its digestibility. By incorporating sprouted quinoa into your diet, you can maximize the health benefits it offers.
How to Sprout Quinoa: Step by Step Guide
Selecting And Preparing Quinoa
Selecting and preparing high-quality quinoa seeds is crucial for successful sprouting. Start by choosing seeds that are organic and free from any signs of damage or discoloration. It’s best to opt for whole quinoa seeds rather than pre-rinsed or pre-packaged options, as these may contain additives that can hinder sprouting.
Once you have your quinoa seeds, start by rinsing them thoroughly under cold water. This helps remove the natural coating called saponin, which can give quinoa a bitter taste. Soaking the seeds overnight in a bowl of water can further aid in the sprouting process.
After soaking, drain the water and rinse the seeds again. This helps get rid of any residue and ensures a clean start for sprouting.
By carefully selecting and preparing your quinoa seeds, you can greatly increase the chances of successful sprouting. Remember to always use high-quality seeds and give them a thorough rinse and soak before proceeding to sprout.
Sprouting Quinoa Method
Discover the simple step-by-step process of sprouting quinoa with this easy-to-follow method. Learn how to unlock the nutritional benefits and add a delicious crunch to your dishes by sprouting this versatile grain.
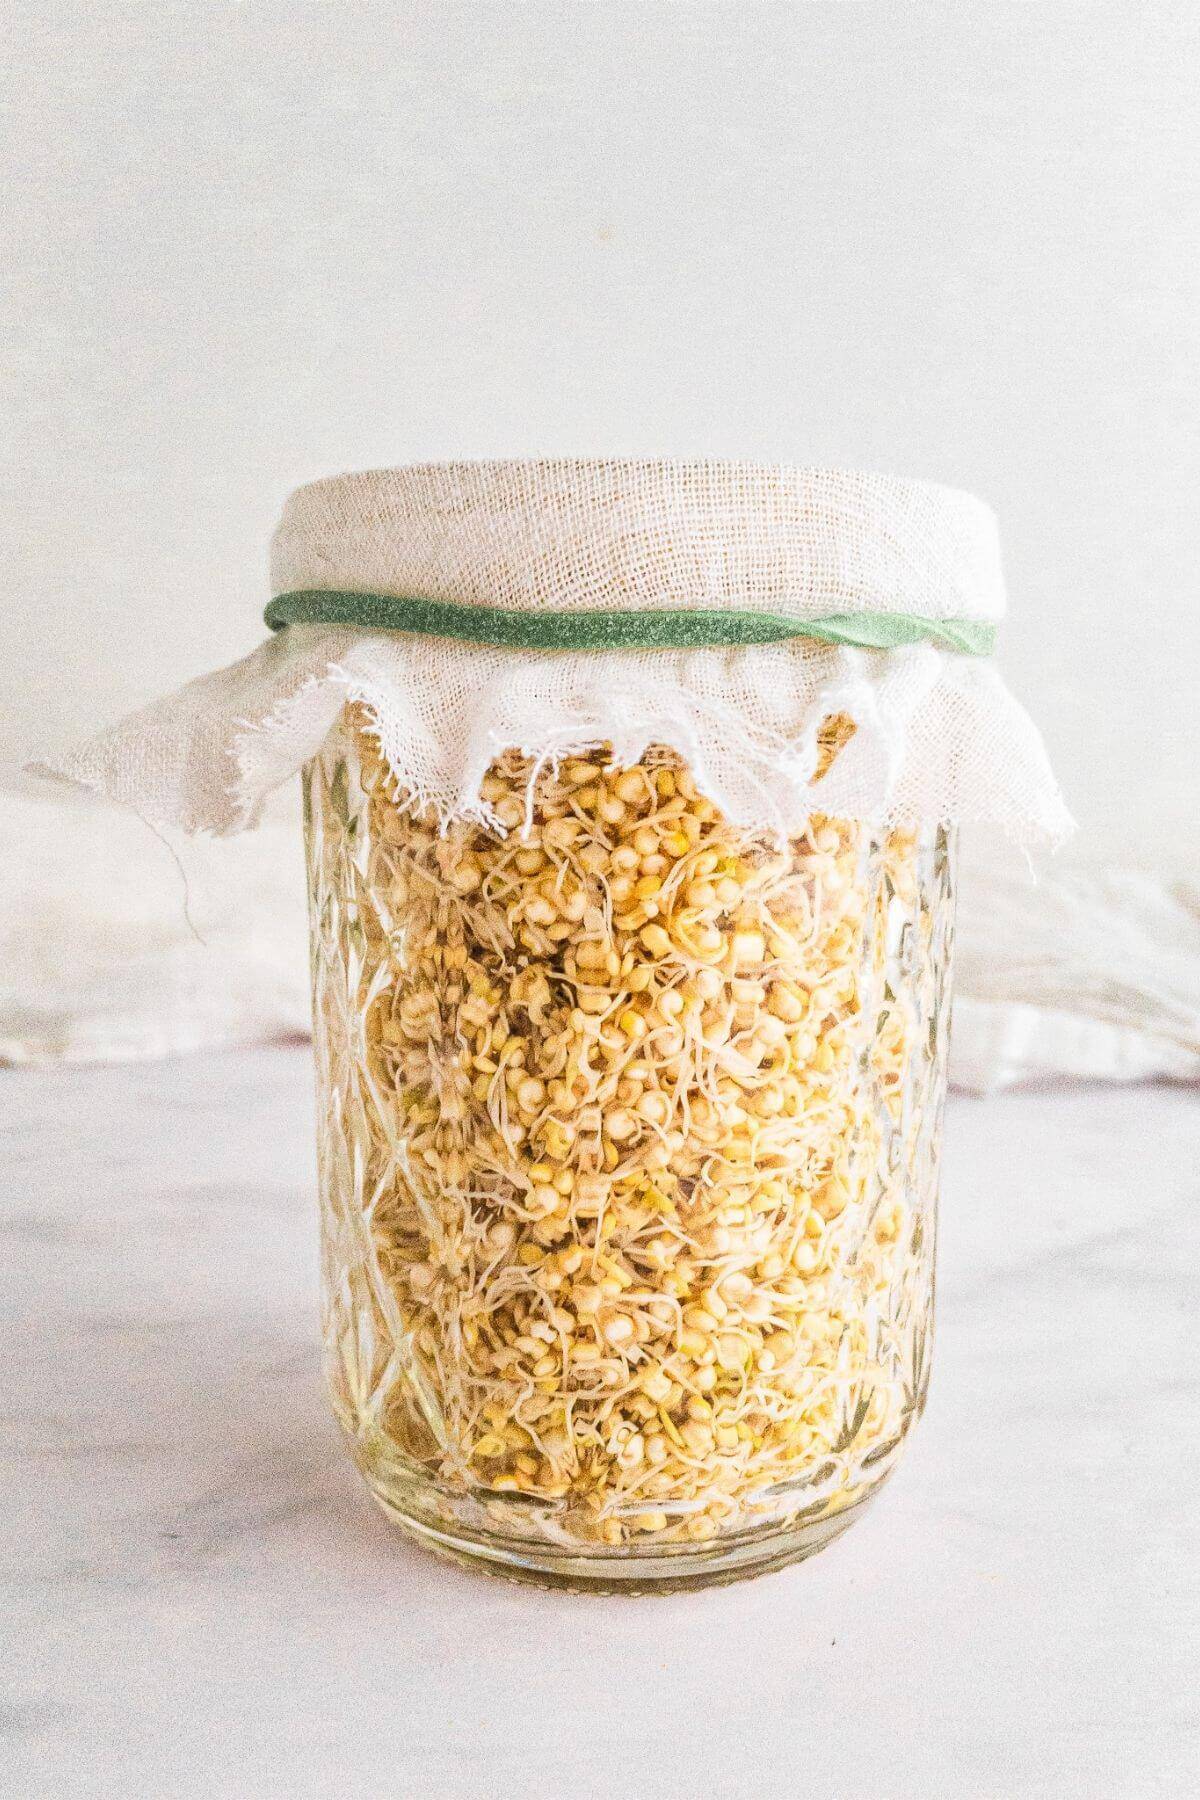
Choosing a sprouting method: You have three options for sprouting quinoa – using a jar, tray, or cloth. Each method has its advantages, so select the one that suits you best.
Preparing the sprouting vessel: Before sprouting quinoa, ensure that your sprouting vessel is clean and sterilized. This prevents any unwanted bacteria or mold growth during the sprouting process.
Adding soaked quinoa to the sprouting vessel: After soaking the quinoa overnight in water, drain the excess water thoroughly. Transfer the quinoa to your chosen sprouting vessel, ensuring that the seeds are spread evenly.
Rinsing and draining quinoa during sprouting process: During the sprouting process, it is crucial to rinse the quinoa at least twice a day, using clean water. After rinsing, make sure to drain off any excess water to prevent waterlogging. This promotes airflow and reduces the risk of mold formation.
| Sprouting Method | Advantages |
|---|---|
| Jar | Easy to observe and rinse the sprouts |
| Tray | Allows for growing larger quantities of sprouts |
| Cloth | Convenient and suitable for travel |
Monitoring And Caring For Sprouting Quinoa
When sprouting quinoa, it is essential to monitor and take care of the sprouting process. Maintaining ideal temperature and humidity levels is crucial for successful sprouting. Quinoa sprouts thrive in temperatures between 60-70°F (15-21°C) and humidity levels at around 50-70%. This ensures optimum conditions for germination and prevents mold or bacterial growth.
Regular rinsing and draining are a crucial part of sprouting quinoa. You should rinse the quinoa seeds every 8-12 hours, ensuring they are thoroughly soaked and drained. This helps to remove the bitter saponin coating and promotes healthy sprout growth. It is important to be consistent with the rinsing and draining process throughout the sprouting duration.
Monitoring visual cues is an effective way to determine the progress and readiness of the sprouts. As the sprouting process advances, you will notice small tails or sprouts emerging from the seeds. Once the sprouts reach a desired length, usually about 1/4 inch to 1/2 inch, they are ready to be harvested and consumed.
Harvesting And Storing Sprouted Quinoa
Harvesting and storing sprouted quinoa is an important step in the sprouting process. Determining the optimal sprouting duration is crucial to ensure that the quinoa has sprouted fully and is ready for harvesting. Typically, quinoa seeds are soaked for around 8-12 hours until they start sprouting tiny tails. Usually, the tails grow to about 1/4 to 1/2 inch in length. Once the sprouting duration is complete, it’s time to harvest the sprouted quinoa. Gently rinse the sprouts in cold water to remove any remaining hulls or debris.
After harvesting, the sprouted quinoa can be dried or refrigerated for storage. Drying the sprouts can be done by spreading them out on a clean towel or baking sheet and allowing them to air dry completely. Alternatively, you can refrigerate the sprouted quinoa in an airtight container or resealable bag. Storing them in the refrigerator helps to extend their shelf life and maintain their freshness. Remember to label the containers with the harvest date for reference.
Delicious Ways To Use Sprouted Quinoa
Sprouted quinoa is a versatile ingredient that can add a nutritious boost to your meals. There are several delicious ways to use sprouted quinoa. One option is to add it to salads for a protein-packed twist. The delicate crunch of sprouted quinoa pairs well with fresh greens and vegetables. Another idea is to incorporate sprouted quinoa into stir-fries and grain bowls.
It adds texture and substance to these dishes, while also providing an array of vitamins and minerals. Additionally, you can try baking with sprouted quinoa flour. It can be used as a substitute for regular flour in recipes like cookies, muffins, and bread, adding a nutty flavor and enhancing the nutritional value. Experiment with different ways to use sprouted quinoa and enjoy its delicious and healthy benefits!
Frequently Asked Questions On How To Sprout Quinoa
Can You Make Sprouts Out Of Quinoa?
Yes, you can sprout quinoa. Soak it in water for 2-4 hours, then rinse and drain it. Place the quinoa in a sprouting jar or a colander, and rinse it 2-3 times a day for 2-3 days until sprouts form.
Enjoy your quinoa sprouts in salads or as a nutritious addition to meals.
Is Sprouted Quinoa Better For You?
Sprouted quinoa is better for you because it enhances nutrient availability and digestibility. Sprouting eliminates antinutrients, increases protein and mineral content, and boosts antioxidant levels, making it a healthier choice.
How Long Do Quinoa Seeds Take To Sprout?
Quinoa seeds sprout in about 2 to 4 hours when soaked, or within 12 to 24 hours if left unsoaked.
What Does Sprouted Quinoa Look Like?
Sprouted quinoa has a different appearance, it resembles tiny spirals or small tails. The quinoa seed starts to sprout and develop a small, curving tail after soaking and sprouting for some time.
Conclusion
Sprouting quinoa is a simple and nutritious way to unlock the full potential of this superfood. By soaking and rinsing the grains, you can increase their digestibility and enhance their flavor. With a bit of patience and attention, you can enjoy the added benefits of sprouted quinoa in your meals.
So, why not give it a try and experience the goodness for yourself? Start sprouting today and take your dishes to a whole new level of health and taste.