To propagate Alocasia from cuttings, carefully divide the plant rhizome and plant each section in well-draining soil. Alocasia plants, with their striking foliage and lush green leaves, make beautiful additions to any indoor or outdoor space.
While some gardeners prefer to propagate Alocasia through division or bulbs, propagating from cuttings can be an effective and straightforward method. This method involves carefully dividing the rhizome into sections, each containing a healthy shoot or bud, and planting them in well-draining soil.

Credit: www.reddit.com
With the right care and conditions, these cuttings can develop into thriving Alocasia plants, adding a touch of tropical beauty to your home or garden. We will explore the step-by-step process of propagating Alocasia from cuttings, so you can expand your collection or share the beauty of these plants with others.
How to Propagate Alocasia from Cuttings : Step by Step Guide
Choosing The Right Alocasia Variety
Looking for the right Alocasia variety to propagate from cuttings? Consider the size, appearance, and sunlight needs of the plant to make the best choice. Different Alocasia varieties require specific care and conditions for successful propagation from cuttings.
When it comes to propagating Alocasia from cuttings, selecting the right variety is crucial for successful growth and development. Alocasias come in a wide range of stunning varieties, each with its own unique foliage patterns and colors. By choosing the right variety, you can ensure that your propagated plants thrive and add a touch of tropical beauty to your indoor or outdoor space.
Consider The Environmental Conditions
Before making your selection, consider the environmental conditions in which your propagated Alocasia will be growing. Alocasias generally prefer warm, humid climates and thrive in bright, indirect sunlight. Additionally, they require well-draining soil and regular watering to keep their soil evenly moist.
To ensure the success of your propagated Alocasia, consider the following environmental conditions:
- Temperature: Alocasias thrive in temperatures between 60°F and 85°F (15°C to 29°C).
- Humidity: They prefer high humidity levels, between 60% and 80%, to mimic their natural tropical habitat.
- Light: Bright, indirect sunlight is ideal for Alocasias, as direct sunlight can scorch their leaves.
- Soil: Well-draining soil is essential to prevent waterlogged roots and promote healthy growth.
- Watering: Alocasias prefer consistently moist soil; avoid overwatering or letting the soil dry out completely.
By taking these environmental conditions into account, you can choose a variety of Alocasia that will thrive in your specific climate and growing conditions.
Selecting Healthy Parent Plants
When propagating Alocasia from cuttings, it is crucial to start with healthy parent plants. Healthy parent plants not only produce healthy cuttings but also pass on desirable traits to the propagated plant. Here are a few factors to consider when selecting healthy parent plants:
- Leaf Health: Look for Alocasias with vibrant, healthy leaves that are free from discoloration, wilting, or pest damage.
- Root System: Inspect the root system of the parent plant to ensure it is well-established, without any signs of rot or decay.
- Stem Strength: Choose parent plants with strong, sturdy stems that can support the weight of the leaves and promote upright growth.
- Absence of Diseases and Pests: Avoid selecting parent plants that show signs of diseases or pest infestations, as these can be transmitted to the propagated plant.
- Overall Vigor: Select Alocasias that exhibit overall vigor, with lush growth and a well-balanced structure.
By carefully selecting healthy parent plants, you can ensure the propagation process starts with a strong foundation and increase the chances of success for your Alocasia cuttings.
Preparing The Cuttings
Propagating Alocasia from cuttings is an effective way to expand your collection of these beautiful plants. It’s a simple process that allows you to create new plants from healthy stems, giving you even more of these stunning foliage plants to enjoy. In this article, we will walk you through the steps of preparing the cuttings, ensuring a successful propagation.
Gathering Necessary Tools
Before you begin the process, it’s important to have the necessary tools at hand. Collecting these tools beforehand will help you have a smooth propagation experience. Here are the tools you will need:
- Sharp and clean pair of pruning shears
- A small container with water or a rooting hormone of your choice
- Well-draining potting mix
- Small plant pots or containers
- Plastic bags or propagation domes
- A misting bottle or sprayer for watering
Identifying Suitable Stems For Propagation
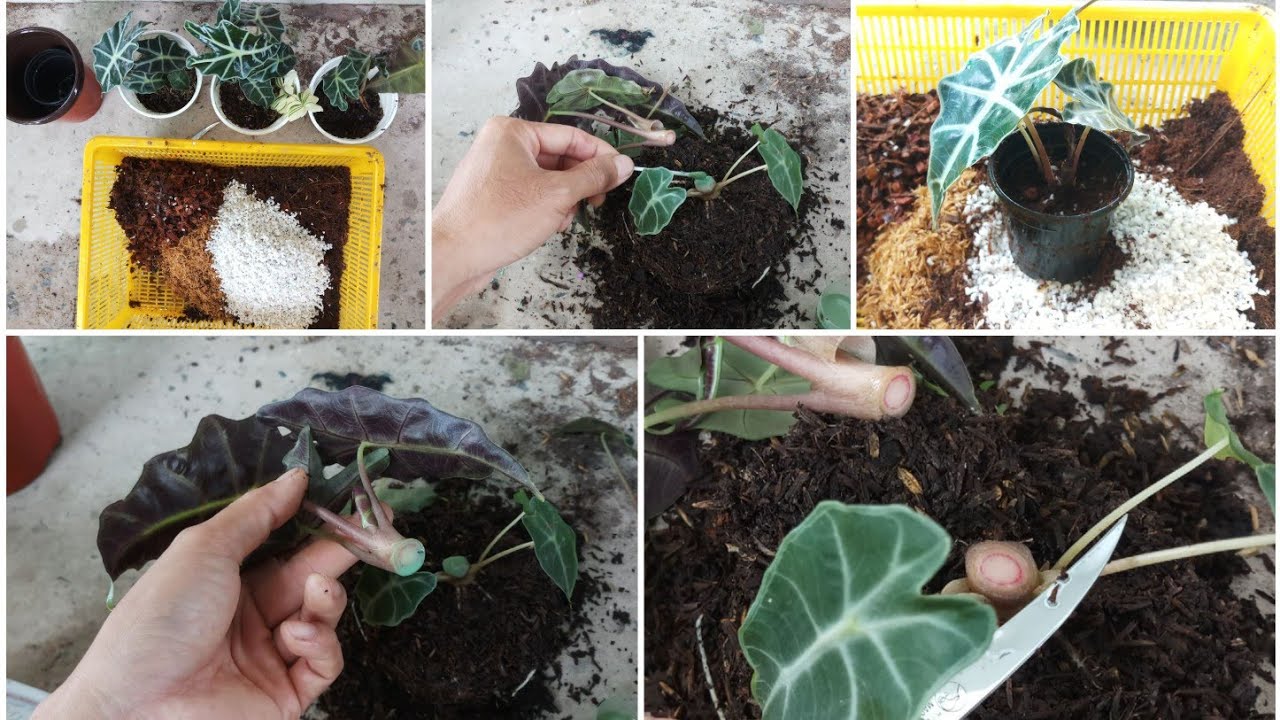
The next step in preparing your Alocasia cuttings is identifying suitable stems for propagation. The ideal stems for propagation are healthy and free from diseases or pests. Look for stems that have a minimum of two to three leaves and are around six inches long. These stems should also have a slight firmness to them, indicating they are mature enough for successful propagation.
Once you have identified the suitable stems, use the pruning shears to cut them just below a node. This is where the new roots will eventually emerge from. Take care to make a clean cut to avoid damaging the stem.
Rooting The Cuttings
Learn how to easily propagate Alocasia plants from cuttings by following these simple steps. Rooting the cuttings is an effective method to multiply your Alocasia collection and create new plants for your indoor garden.
Selecting The Proper Potting Mix
To successfully root Alocasia cuttings, it is crucial to select the right potting mix. Provide your cuttings with a blend of well-draining soil and organic matter. Avoid potting mixes that retain excessive moisture, as this can lead to root rot. A good option is a mixture of equal parts perlite, peat moss, and potting soil. This combination ensures proper drainage while retaining enough moisture for the cuttings to develop healthy roots. Remember, a well-aerated potting mix is key to successful propagation.
Providing Adequate Watering And Humidity
Watering and maintaining a humid environment are essential steps in rooting Alocasia cuttings. Once you have potted the cuttings, keep the soil consistently moist, but not soggy. Overwatering can suffocate the developing roots and hinder growth. A beneficial tip is to use a spray bottle to mist the leaves regularly. This helps to maintain the desired level of humidity in the air and prevents the cuttings from drying out. Alocasia plants thrive in a high-humidity environment, which mimics their natural habitat.
| Watering Tips: |
|---|
|
Remember, maintaining the right humidity and watering routine helps promote healthy root growth and increases the chances of successful propagation. By providing optimal conditions, your Alocasia cuttings will flourish and develop into beautiful plants.

Credit: www.reddit.com
Caring For New Plants
Learn how to propagate Alocasia plants from cuttings with these simple steps. This guide will help you care for new plants and successfully grow your Alocasia collection.
“caring For New Plants: Understanding The Acclimatization Process”
After successfully propagating your Alocasia plants from cuttings, it’s crucial to provide the right care and support during the acclimatization process. This is a critical phase for the newly developed plants as they transition and adjust to their new environment. Understanding the acclimatization process and implementing the necessary care practices will ensure their healthy growth and development.
“implementing Regular Maintenance Practices”
Maintaining a regular care routine is key to nurturing and sustaining the health of your new Alocasia plants. Implementing these practices will help keep them thriving:
Monitor Light and Temperature
- Place your Alocasia plants in a bright location without direct sunlight, as excessive light can damage their leaves.
- Ensure the temperature stays within the range of 60°F to 85°F (15°C to 29°C) for optimal growth and avoid exposing them to cold drafts.
Proper Watering
- Water your new Alocasia plants thoroughly, keeping the soil consistently moist, but not waterlogged.
- Tip: Check the moisture level by inserting your finger into the soil. Water if the top inch of soil feels dry.
- Avoid placing the plants in standing water, as this can lead to root rot.
Fertilizing
- Tip: Prioritize feeding your Alocasia plants during the growing season, from spring to early fall.
- Use a balanced liquid fertilizer diluted to half strength and apply it every 4 to 6 weeks.
Humidity
- Humidity is crucial for Alocasia plants. Consider using a humidifier or placing a tray filled with pebbles and water beneath the plants to increase moisture in the air.
- Mist the leaves occasionally, especially during dry periods.
Pruning and Cleaning
- Trim any yellowing or damaged leaves to maintain the overall plant health.
- Regularly clean the leaves with a damp cloth to remove dust and improve their ability to absorb light.
By following these regular maintenance practices, you can ensure that your newly propagated Alocasia plants receive the optimal care they need to thrive in their new environment. Remember, each plant requires individual attention, so always monitor their signs of growth and adjust your care accordingly.
Troubleshooting Common Issues
As you propagate Alocasia from cuttings, you may encounter various issues that can affect the process and the overall health of the plant. Identifying signs of stress, addressing potential diseases or pests, and ensuring proper care are crucial for successful propagation. By being aware of common issues and knowing how to troubleshoot them, you can promote the growth and development of your Alocasia cuttings.
Identifying Signs Of Stress
It’s important to monitor the health of your Alocasia cuttings for signs of stress, such as wilting or yellowing leaves. These can indicate issues with inadequate watering or excessive sunlight. Ensure the cuttings are kept moist but not waterlogged and provide filtered light to prevent stress from intense sunlight. Additionally, monitor for signs of root rot, which can occur if the cuttings are overwatered.
Addressing Potential Diseases Or Pests
To maintain the health of Alocasia cuttings, it’s essential to watch for potential diseases or pests. Inspect the foliage for any signs of fungal infections or pest infestations. If you notice any black spots or moldy patches, consider adjusting the humidity levels and providing good air circulation to prevent the spread of diseases. Use organic pest control methods to address any pest issues without harming the cuttings.
:max_bytes(150000):strip_icc()/cormssprouting-7faad162ed834eceb55da8868128dbf2.JPG)
Credit: www.thespruce.com
Frequently Asked Questions For How To Propagate Alocasia From Cuttings
What Is The Propagation Method For Alocasia?
Alocasias can be propagated through division or by taking stem cuttings. Dividing the plant involves separating the offshoots from the main plant, while stem cuttings require cutting a portion of the stem with at least one node and placing it in soil or water until roots form.
How Do You Propagate Alocasia Corms In Water?
To propagate Alocasia corms in water, start by filling a container with water and submerging the corms halfway. Place the container in a warm and well-lit area, ensuring the water level remains constant. After a few weeks, roots will develop, and new shoots will emerge.
Transplant the corms into soil when the shoots are an inch or two long.
How Do You Propagate Dragon Alocasia?
To propagate dragon Alocasia, separate rhizomes with healthy roots from the main plant. Plant in well-draining soil, provide warmth, humidity, and indirect light. Keep soil moist but not waterlogged, and roots will develop within a few weeks.
How Do You Propagate Alocasia Zebrina Cuttings?
To propagate Alocasia zebrina cuttings, choose a healthy stem with a few leaves. Cut the stem below a node. Place the cutting in water and keep it in a warm, humid place. Once roots develop, transfer the cutting to a pot with well-draining soil.
Water regularly and provide indirect light.
Conclusion
Propagating Alocasia from cuttings can be a rewarding and successful endeavor for any plant enthusiast. By following the steps outlined in this blog post, you can increase your collection of Alocasia plants while also fostering a sense of accomplishment. Remember to provide the necessary care and attention to your cuttings, as they have the potential to flourish into vibrant and lush plants.
Happy propagating!