Are you ready to grow stunning moonflowers that light up your garden at night? Germinating moonflower seeds might seem tricky, but with the right steps, you can watch these beautiful blooms come to life.
Imagine your garden filled with large, fragrant white flowers that open as the sun sets. In this guide, you’ll discover simple and effective ways to get your moonflower seeds sprouting quickly and healthily. Keep reading, and you’ll soon enjoy the magical glow of moonflowers right outside your door.

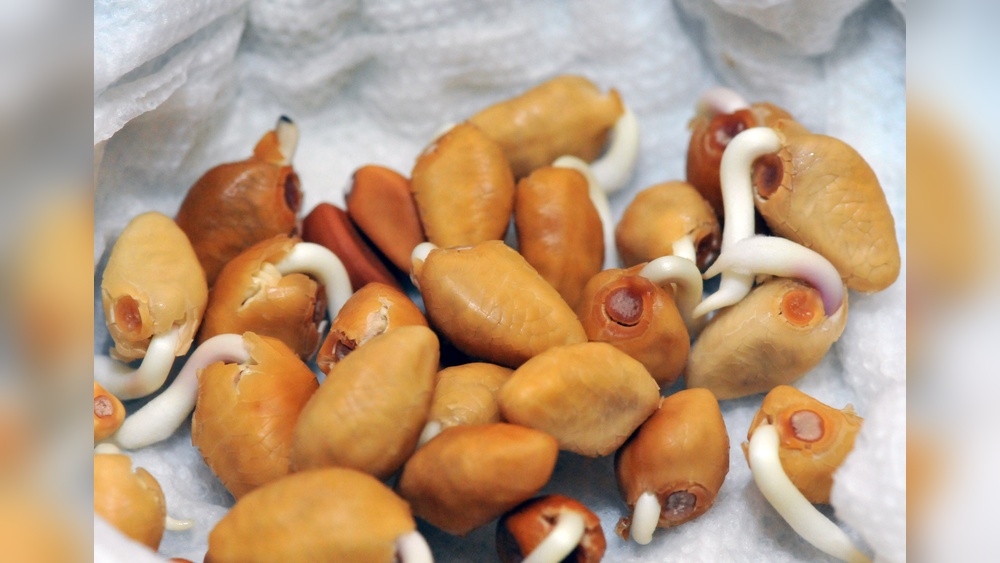
Credit: sowrightseeds.com
Choosing Quality Moonflower Seeds
Choosing quality moonflower seeds is the first step to a healthy garden. Good seeds grow strong plants that bloom beautifully. Poor seeds may not sprout or produce weak plants. Pay attention to seed quality before planting.
Seed Selection Tips
Pick seeds that look fresh and whole. Avoid seeds that are cracked or broken. Check for a firm texture; soft seeds often mean old or damaged. Dark, uniform color usually shows good quality. Read the seed packet for the harvest date. Fresher seeds have better chances to sprout well. Store seeds in a cool, dry place before planting.
Where To Buy Seeds
Buy seeds from trusted garden centers or nurseries. These places often sell high-quality seeds. Online seed stores can offer a wide selection. Choose sellers with good reviews and clear product details. Avoid seeds from unknown sources or street vendors. This lowers the risk of poor seed quality. Buying from experts helps ensure strong moonflower growth.
Preparing Seeds For Germination
Preparing moonflower seeds for germination helps plants grow strong and healthy. Seeds need care before planting. This step makes the process faster and improves success. Use simple methods to prepare your seeds well. Follow easy steps to get the best results.
Soaking Techniques
Soaking moonflower seeds softens their hard outer shell. Place seeds in warm water for 12 to 24 hours. Use a clean container to avoid bacteria. Change water if it gets cloudy. Seeds swell and become easier to sprout. Remove seeds from water before planting.
Scarification Methods
Scarification means scratching or breaking the seed coat. Use sandpaper or a nail file to rub seeds gently. Do not damage the inner part of the seed. This helps water enter and starts germination. Scarify seeds carefully to improve growth chances.
Ideal Soil And Containers
Choosing the right soil and containers is key for germinating moonflower seeds. These plants need good conditions to grow strong roots and healthy seedlings. The soil should hold moisture but drain well. Containers must provide enough space and proper drainage. This section explains the best soil mix and container types for moonflower seed germination.
Best Soil Mix
Use a light, well-draining soil mix for moonflower seeds. A mix of peat moss, perlite, and vermiculite works well. This blend keeps the soil moist but not soggy. Avoid heavy garden soil because it can hold too much water. Seeds need air around them to sprout. Adding some sand improves drainage and helps roots breathe. The soil should be soft and loose to make it easy for seedlings to push through.
Container Types
Choose containers with drainage holes to stop water from pooling. Small pots or seed trays work fine for starting seeds. Plastic containers keep moisture longer but watch for overwatering. Clay pots dry out faster and are good if you want more control over watering. Use containers at least 2-3 inches deep to give roots room. Avoid very large pots early on because they can hold too much water and cause seed rot.
Planting Moonflower Seeds
Planting moonflower seeds is a simple process that sets the foundation for healthy growth. These seeds need the right care and space to sprout well. Preparing the soil and planting at the correct depth helps the seeds grow strong roots. Spacing the seeds properly allows the plants to spread out and bloom beautifully.
Seed Depth
Plant moonflower seeds about ½ inch deep. This depth keeps the seeds moist and warm. Too deep can stop them from sprouting. Too shallow might dry out the seeds quickly. Cover the seeds gently with soil after planting.
Spacing Guidelines
Space the seeds 12 to 18 inches apart. This gives each plant room to grow wide. Crowded plants may get fewer flowers. Good air flow prevents disease. Leave space so vines can climb or spread easily.
Creating The Perfect Environment
Creating the perfect environment is key to germinating moonflower seeds successfully. Seeds need the right warmth and moisture to sprout well. Too much or too little of these can stop growth. Focus on temperature and humidity to give seeds the best start.
Temperature Requirements
Moonflower seeds need warmth to germinate. Keep the soil between 70°F and 85°F (21°C and 29°C). Cooler soil slows down sprouting. Too hot soil may kill the seeds. Use a heat mat if indoor temperatures are low. Check soil temperature daily with a thermometer. Consistent warmth helps seeds break dormancy and begin growth quickly.
Humidity Control
Seeds need moisture to swell and grow roots. Keep humidity high around the seeds. Cover the seed tray with a clear plastic dome or plastic wrap. This traps moisture and prevents the soil from drying out. Mist the soil lightly if it looks dry. Avoid water pooling, which can cause mold or rot. Open the cover a little each day to let fresh air in. Balanced humidity encourages healthy seedling development.
Watering And Care Tips
Watering and caring for moonflower seeds is vital for strong growth. Proper moisture helps seeds sprout well and young plants stay healthy. Too little water can stop growth. Too much water causes root problems.
Understanding the right watering habits is key. Watch the soil and plant closely. This section explains how often to water and how to avoid overwatering.
Watering Frequency
Keep the soil moist but not soaked. Water the seeds gently every two to three days. Adjust frequency based on weather and soil dryness. In hot or dry conditions, water more often. When soil feels damp, pause watering. Seedlings need more water than mature plants.
Avoiding Overwatering
Overwatering can drown moonflower seeds. It causes roots to rot and plants to weaken. Use pots with drainage holes to let excess water escape. Check soil before watering. If the top inch feels wet, wait to water. Water slowly to reach roots without flooding. Good air circulation helps soil dry evenly.
Tracking Germination Progress
Tracking germination progress helps you know how well your moonflower seeds sprout. It shows if conditions are right and seeds are healthy. Watching closely helps catch problems early. You can adjust care to improve growth chances.
Expected Timelines
Moonflower seeds usually start to sprout in 7 to 14 days. Some may take longer if the temperature is cool. Keep the soil moist but not wet. Seedlings appear small and fragile at first. They grow stronger as days pass. Note each day you see changes. This tracking helps you understand your specific seed batch.
Troubleshooting Common Issues
Slow germination can mean the soil is too cold or dry. Seeds might rot if soil is too wet. Poor light can make seedlings weak and leggy. Check soil moisture daily for balance. Use a warm spot for better sprouting. Remove mold or bad seeds quickly. Replant fresh seeds if many don’t sprout after two weeks.

Credit: petalsandwings.blog
Transplanting Seedlings Outdoors
Transplanting moonflower seedlings outdoors is an important step to help your plants grow strong. Moving seedlings from pots to the garden requires care. The right timing and garden preparation make a big difference. This guide helps you know when and how to transplant seedlings for best results.
When To Transplant
Wait until the moonflower seedlings have at least two sets of true leaves. The plants should be about 4 to 6 inches tall. Avoid transplanting during cold or windy days. Choose a day with mild weather and no rain forecast. The soil temperature should be above 60°F (15°C). This helps the roots grow well after transplanting.
Preparing The Garden Bed
Choose a sunny spot with well-drained soil for your moonflowers. Loosen the soil to a depth of 8 to 12 inches. Mix in compost or organic matter to improve soil quality. Create small holes spaced 18 to 24 inches apart. Water the garden bed well before planting. This keeps the soil moist and ready for seedlings.
Encouraging Healthy Growth
Encouraging healthy growth is key to a strong moonflower plant. Proper care helps the vines grow tall and bloom beautifully. Focus on feeding and supporting the plant well. This keeps it healthy and vibrant throughout the season.
Healthy growth starts with good nutrition and physical support. Both help the plant reach its full potential. Let’s explore easy ways to nourish and support your moonflower vines.
Fertilizing Tips
Use a balanced fertilizer every two weeks after seedlings appear. Choose one with equal parts nitrogen, phosphorus, and potassium. This mix supports leaves, roots, and flowers.
Apply fertilizer gently around the base, not on leaves. Water the plant after feeding to help nutrients soak in. Avoid over-fertilizing, which can harm roots and slow growth.
Supporting Vines
Moonflowers climb and need sturdy support to grow well. Use a trellis, fence, or stakes near the plant. Guide young vines gently onto the support.
Check ties regularly to avoid cutting into stems. Strong support stops vines from breaking in wind or rain. It also helps flowers get more sunlight for better blooms.
Maximizing Bloom Potential
Maximizing the bloom potential of moonflower plants starts with proper care. Healthy plants produce more flowers and last longer. Small changes in light and pruning can make a big difference.
Moonflowers need the right environment to open their large, beautiful blooms each evening. Understanding light needs and pruning methods helps your plant thrive and bloom fully.
Light Requirements
Moonflower seeds need bright light to grow strong. Place seedlings in a spot with indirect sunlight. Too much direct light can burn young leaves. Once plants grow, they enjoy full sun for most of the day. At least six hours of sunlight helps flowers open wide. During cloudy days, keep plants near a bright window or use grow lights. Proper light encourages healthy growth and more blooms.
Pruning Techniques
Pruning moonflower plants supports more flowers and better shape. Trim back long stems to promote new growth. Remove dead or yellow leaves to keep the plant healthy. Pinch off early flower buds to help the plant grow stronger first. Regular pruning stops the plant from becoming too leggy. Use clean scissors or pruning shears to avoid infections. Pruning helps the plant focus energy on blooming fully.

Credit: www.planetnatural.com
Frequently Asked Questions
How Long Does It Take To Germinate Moonflower Seeds?
Moonflower seeds typically germinate within 7 to 14 days. Warm soil temperatures between 70-85°F speed up the process. Consistent moisture and light soil coverage improve germination rates effectively.
What Is The Best Soil For Moonflower Seed Germination?
Use well-draining, light, and nutrient-rich soil for germinating moonflower seeds. A mix of potting soil and sand or perlite promotes aeration. Avoid heavy or waterlogged soil to prevent seed rot.
Should Moonflower Seeds Be Soaked Before Planting?
Yes, soaking moonflower seeds in warm water for 24 hours softens their hard coat. This helps speed up germination and improves seedling emergence. Avoid soaking longer to prevent seed damage.
How Much Sunlight Do Moonflower Seedlings Need?
Moonflower seedlings require bright, indirect sunlight for 6 to 8 hours daily. Avoid harsh direct sunlight initially, which can stress young plants. Gradually increase sun exposure as seedlings grow stronger.
Conclusion
Growing moonflowers starts with careful seed germination. Keep seeds warm and moist for best results. Use light soil and water gently every day. Watch for sprouts, usually in one to two weeks. Once seedlings grow strong, move them to bigger pots.
Patience is key; moonflowers bloom at night beautifully. Follow these simple steps to enjoy your garden’s glow. Happy planting!