Are you ready to grow your own castor beans from seed and enjoy the beauty and benefits they bring? Whether you want to add a unique plant to your garden or explore natural oils and other uses, starting with the right steps makes all the difference.
This guide will walk you through simple, clear instructions to help your castor bean seeds sprout strong and healthy. Keep reading, and you’ll discover easy tips that anyone can follow to get the best results—no green thumb needed!
Credit: hort.extension.wisc.edu
Choosing The Right Seeds
Choosing the right seeds is the first step to growing healthy castor beans. The seed quality affects how well the plants grow. Good seeds give strong plants and better harvests. Poor seeds may fail to sprout or produce weak plants. Spend time selecting seeds with care. This ensures your castor bean plants start strong and stay healthy.
Selecting Quality Seeds
Choose seeds that look healthy and full. Avoid seeds that are cracked, shriveled, or discolored. Healthy seeds have a smooth and firm surface. Check the seed size; larger seeds often grow better plants. Fresh seeds have a higher chance to sprout well. Old seeds may have low germination rates. Buy seeds from a trusted source to get good quality.
Certified Vs. Non-certified Seeds
Certified seeds come with proof of quality and purity. They are tested for germination and disease-free status. These seeds are more reliable for good growth. Non-certified seeds may be cheaper but carry risks. They might have low germination or carry pests. For best results, choose certified seeds. This choice helps ensure strong and healthy castor bean plants.
Credit: getbusygardening.com
Preparing The Soil
Preparing the soil is the first step to successfully growing castor beans from seed. Healthy soil creates a strong foundation for the plants. It helps roots grow well and absorb nutrients. Taking time to prepare the soil improves seed germination and plant growth.
Soil Type And Ph Requirements
Castor beans grow best in well-drained soil. Sandy loam or loamy soil works well. Heavy clay or waterlogged soil can harm the plants.
The soil pH should be between 6.0 and 7.0. This range allows plants to absorb nutrients easily. Test the soil pH before planting. Adjust it if needed using lime to raise pH or sulfur to lower it.
Improving Soil Fertility
Rich soil helps castor beans grow strong and healthy. Add organic matter like compost or aged manure. It improves soil texture and adds nutrients.
Mix the organic matter into the top 6 to 8 inches of soil. This helps roots reach nutrients quickly. Avoid fresh manure as it can burn young plants.
Consider using balanced fertilizer with nitrogen, phosphorus, and potassium. Follow package instructions for the correct amount. Fertile soil supports good seedling growth and high yields.
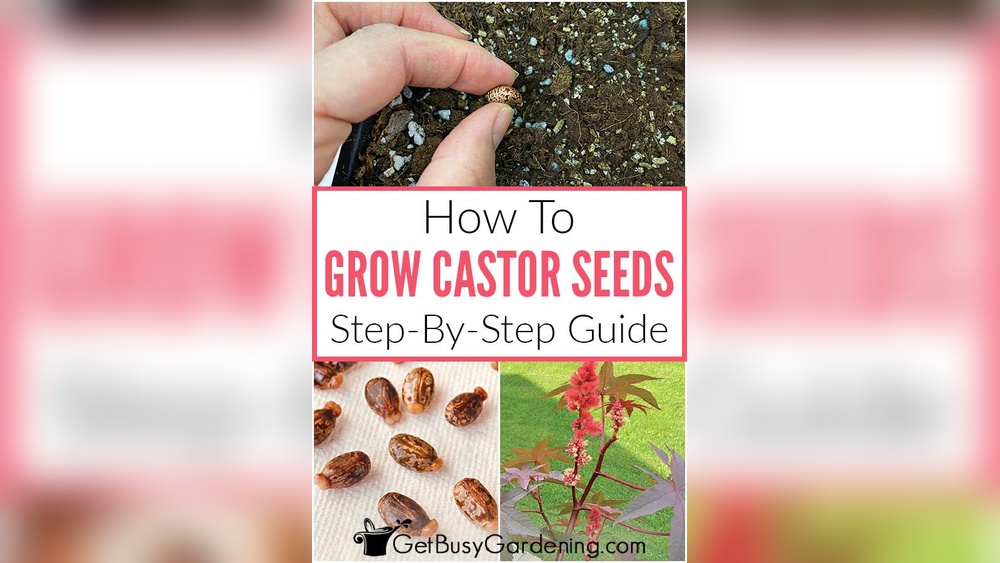
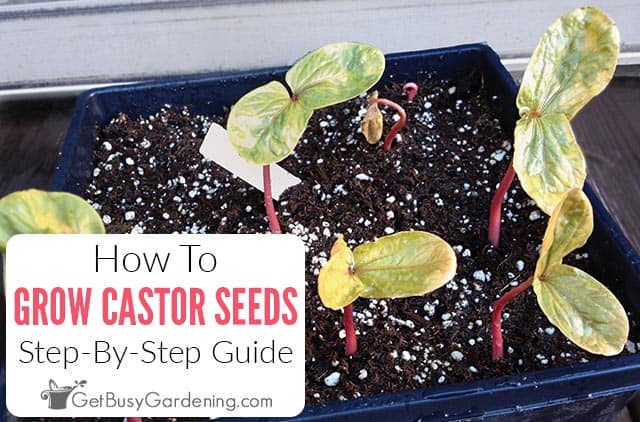
Planting Seeds
Planting castor bean seeds correctly is essential for strong plant growth. Proper planting helps seeds sprout quickly and grow healthy roots. This section covers the best time to plant and how deep and far apart to place seeds.
Optimal Planting Time
Plant castor bean seeds after the last frost date. The soil should be warm, at least 60°F (15°C). Warm soil helps seeds germinate faster. Early spring or late spring works well in most areas. Avoid planting in cold, wet soil to prevent seed rot.
Seed Spacing And Depth
Plant seeds about 1 inch (2.5 cm) deep. Cover them lightly with soil to keep moisture. Space seeds 3 to 4 feet (90 to 120 cm) apart. This distance gives plants room to grow large leaves and strong stems. Crowded plants may grow weak and produce fewer beans.
Watering And Care
Watering and care are crucial for growing healthy castor bean plants. These plants need regular moisture but dislike waterlogged soil. Proper watering helps seeds sprout and plants grow strong.
Besides watering, good care includes protecting roots and keeping soil fertile. The right care keeps plants healthy and boosts bean production.
Irrigation Tips
Water castor beans deeply once or twice a week. The soil should stay moist but not soggy. Avoid watering leaves; focus on the base of the plant. Early morning watering reduces water loss from evaporation. Adjust watering frequency during rainy or dry periods.
Mulching Benefits
Mulch keeps soil moist longer by reducing evaporation. It also controls weeds that steal nutrients from castor beans. Organic mulches like straw or leaves improve soil quality as they break down. Mulching protects roots from temperature changes. Apply mulch around plants, leaving space near stems to prevent rot.
Managing Pests And Diseases
Managing pests and diseases is key to growing healthy castor bean plants. These problems can reduce growth and lower seed production. Early detection and proper care keep your plants strong and productive. Understanding common pests and how to prevent diseases helps you protect your crop effectively.
Common Pests
Castor plants attract several pests. Aphids suck plant sap and weaken growth. Whiteflies also feed on the leaves, causing yellow spots. Spider mites create tiny webs and damage leaf surfaces. Caterpillars chew on leaves and can defoliate plants quickly. Regularly check leaves and stems for signs of pests. Removing affected leaves stops pests from spreading.
Disease Prevention Methods
Prevent diseases by keeping soil well-drained and clean. Avoid waterlogging, which encourages fungal infections. Use disease-free seeds to reduce risk. Space plants properly to improve air flow and reduce humidity. Remove and destroy infected plants immediately to stop disease spread. Rotate crops yearly to break disease cycles. Apply organic fungicides if needed to protect plants.
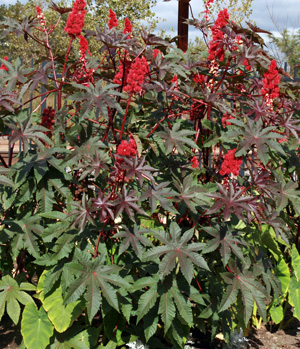
Harvesting Castor Beans
Harvesting castor beans is a crucial step in growing healthy plants. Proper timing and methods ensure the best yield. Knowing when and how to harvest protects the seeds and the plant.
Signs Of Maturity
Castor beans turn brown or reddish when they are ready to harvest. The seed pods become dry and hard. Leaves around the pods may start to yellow and fall off. The plant stops producing new flowers. These signs show the seeds have reached full growth.
Harvesting Techniques
Cut seed pods carefully using sharp scissors or pruners. Avoid damaging the plant to allow new growth. Collect pods in a dry container to prevent mold. Let the pods dry further in a warm, airy place. Once fully dry, break open the pods to remove seeds. Store seeds in a cool, dry spot for future planting or use.
Post-harvest Handling
After harvesting castor beans, careful handling is crucial to keep seeds healthy. Proper post-harvest steps help prevent damage and loss. These steps include drying, storing, and processing the seeds.
Drying And Storage
Dry the beans under the sun for several days. Spread them out in a thin layer. Turn the beans often to dry evenly. Avoid moisture to stop mold growth. Store dried seeds in a cool, dry place. Use airtight containers to keep pests away. Proper storage keeps seeds viable for planting next season.
Seed Processing
Remove the outer shell gently to avoid seed damage. Use simple tools like a mortar and pestle or hand rubbing. Clean the seeds by removing dirt and broken pieces. Sorting seeds by size can improve germination rates. Processed seeds are easier to plant and grow into healthy plants.
:strip_icc()/tall-border-castor-bean-04786d16-335a05c84be84f66ac60765192bbed85.jpg)
Credit: www.bhg.com
Tips For Better Yield
Growing castor beans successfully takes more than just planting seeds. Small changes in care can boost your crop’s yield. Paying attention to soil health and nutrient supply helps plants grow strong. Healthy plants produce more beans. Here are two key tips for a better harvest.
Fertilization Strategies
Castor beans need balanced nutrients to thrive. Use a fertilizer rich in nitrogen, phosphorus, and potassium. Apply it before planting and again during growth. Avoid over-fertilizing as it can harm the plant. Organic compost is a good option for slow nutrient release. Regularly check soil pH; castor beans prefer slightly acidic to neutral soil. Correct pH helps nutrients absorb better.
Crop Rotation Benefits
Rotating castor beans with other crops improves soil health. It prevents pests and diseases from building up. Different crops use different nutrients, so rotation keeps soil balanced. Avoid planting castor beans in the same spot yearly. Rotate with legumes or cereals to restore nitrogen in the soil. Crop rotation leads to stronger plants and higher yields.
Frequently Asked Questions
How Long Do Castor Beans Take To Germinate?
Castor beans typically germinate within 7 to 14 days under warm conditions. Maintain soil temperature between 70-85°F for optimal growth.
What Soil Type Is Best For Growing Castor Beans?
Castor beans grow best in well-draining, fertile soils with a pH between 6. 0 and 7. 0. Loamy soil enriched with organic matter is ideal.
How Much Sunlight Do Castor Bean Plants Need?
Castor bean plants require full sunlight, at least 6 hours daily. Adequate sunlight ensures healthy growth and maximizes seed production.
How Often Should Castor Bean Seeds Be Watered?
Keep the soil consistently moist but not waterlogged. Water castor bean seeds moderately, especially during germination and early growth stages.
Conclusion
Growing castor beans from seed is simple with the right steps. Plant seeds in warm soil and water them regularly. Watch for strong sprouts and keep weeds away. Castor plants need sunlight and space to grow tall. Harvest seeds carefully when pods turn brown.
This process gives you healthy castor beans for many uses. Start small, learn as you grow, and enjoy the results. Patience and care will help your plants thrive. Give it a try and see your garden flourish.