
Are you looking to grow beautiful calla lilies year after year without buying new plants? Harvesting your own calla lily seeds is easier than you might think—and it gives you a sense of pride watching your garden flourish with flowers you grew from scratch.
In this guide, you’ll discover how to harvest calla lily seeds and store your seeds properly. By the end, you’ll have the confidence to create a vibrant garden filled with elegant calla lilies, all started by your own hands. Keep reading to unlock the secrets of successful seed harvesting and take your gardening skills to the next level!

Credit: www.youtube.com
Choosing The Right Calla Lily
Choosing the right calla lily is the first step to harvesting good seeds. Healthy plants give strong seeds. The right variety also affects seed quality and growth.
Focus on plants that are healthy and suited for seed harvesting. This helps ensure a good harvest and vibrant flowers next season.
Selecting Healthy Plants
Pick calla lilies with no signs of disease or pests. Leaves should be green and firm, not yellow or wilted. Strong stems and bright flowers show good health. Avoid plants with spots or holes on leaves. Healthy plants produce better seeds that grow well.
Best Varieties For Seed Harvesting
Some calla lily varieties produce seeds more easily. Look for types known for seed pods and strong growth. Classic white callas often yield good seeds. Colored varieties can also produce healthy seeds. Choose varieties that thrive in your climate for best results.
Credit: www.gardeningknowhow.com
When To Harvest Seeds
Knowing when to harvest calla lily seeds helps you collect healthy seeds. Timing affects seed quality and future plant growth. Watch your plants closely to catch the right moment.
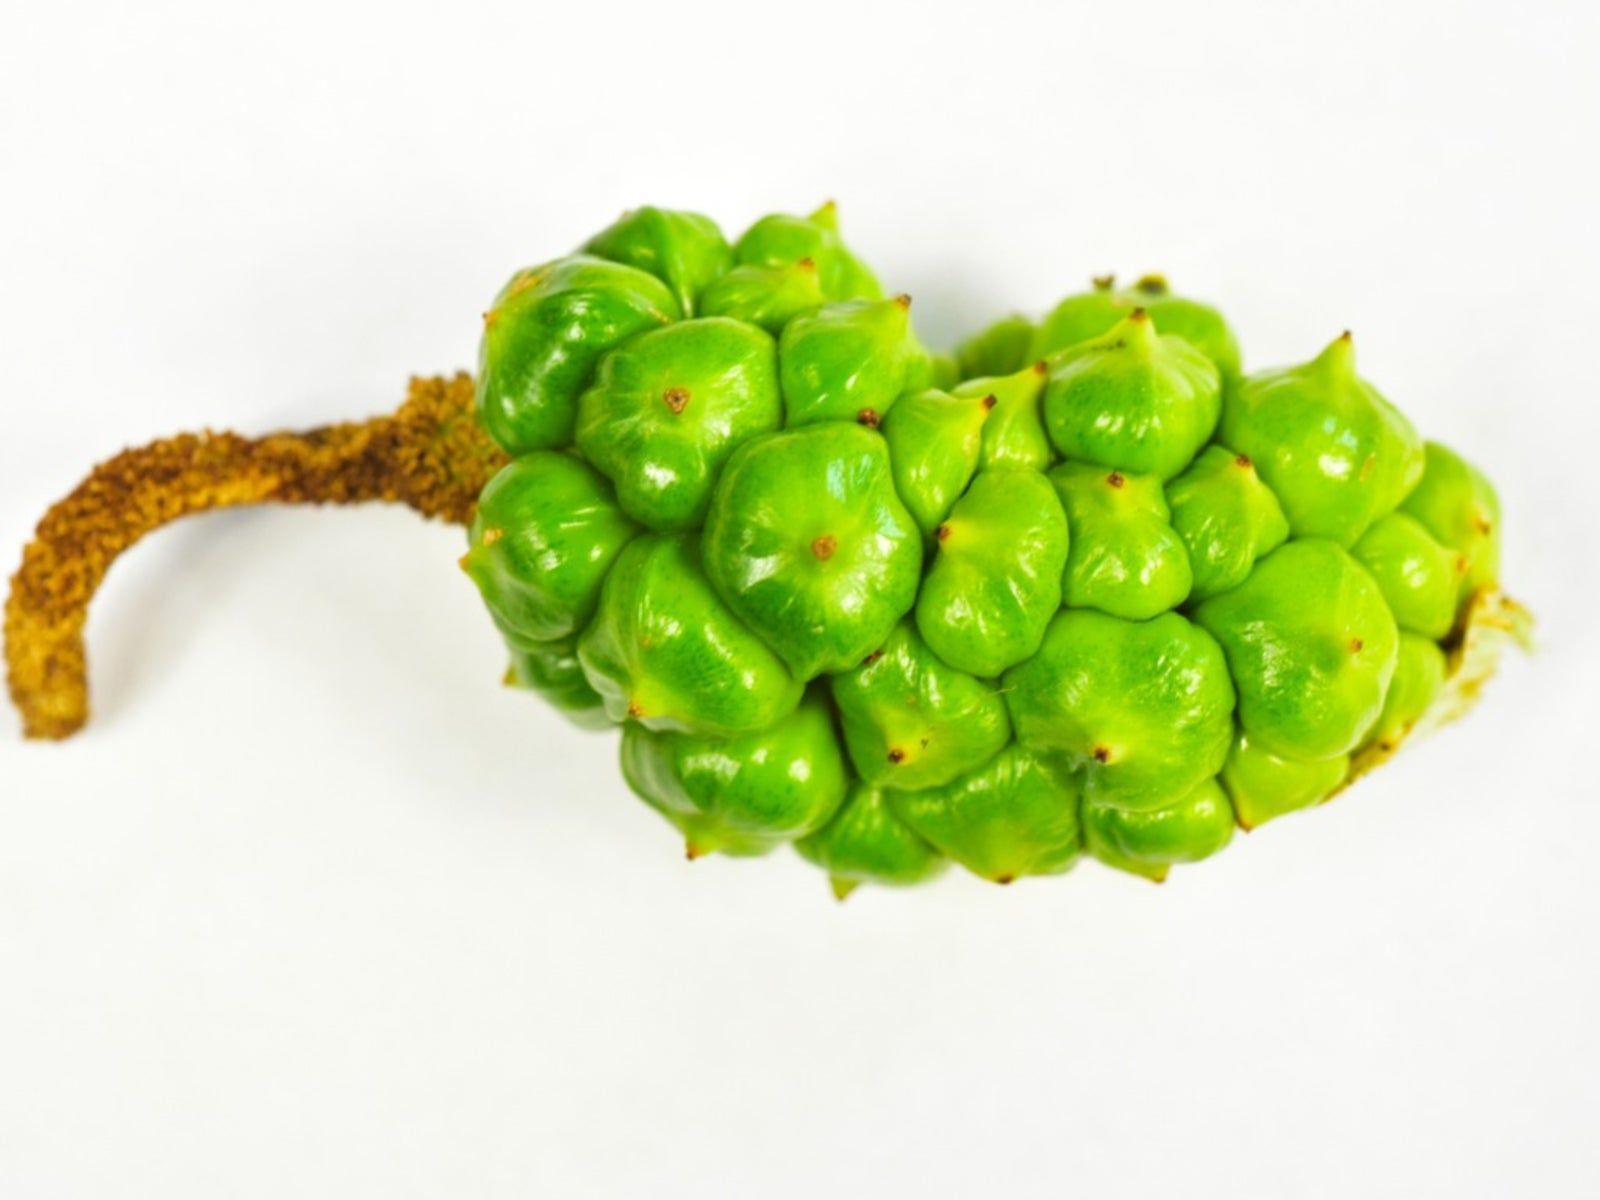
Identifying Mature Seed Pods
Seed pods form after the flowers fade. They start green and harden over time. Mature pods change color, often turning brown or yellow. The pods become dry and may crack slightly. Avoid picking pods that are still green or soft. These seeds may not grow well.
Timing For Optimal Seed Viability
Harvest seeds once pods fully ripen on the plant. This usually happens several weeks after blooming ends. Check pods every few days to catch peak maturity. Picking too early or too late lowers seed viability. Collect seeds on a dry day to prevent mold. Store seeds in a cool, dry place for best results.
Collecting Calla Lily Seeds
Collecting Calla lily seeds is a simple task that helps grow new plants. Seeds form inside the flower after it blooms and fades. Harvesting these seeds ensures you can plant more Calla lilies in your garden. It takes patience to wait for the right time to collect the seeds. Knowing the proper tools and steps makes the process easier and more effective.
Tools Needed For Harvesting
Gather basic tools before starting seed collection. Use sharp scissors or garden shears to cut seed pods. Have a small container or paper bag ready to hold the seeds. Gloves protect your hands from sap or dirt. Tweezers help remove seeds from pods carefully. A clean workspace keeps seeds safe and free from debris.
Step-by-step Seed Collection
First, watch for seed pods turning brown and dry. This indicates seeds are mature and ready to harvest. Cut the pod carefully from the plant using scissors or shears. Place the pod in your container or paper bag. Open the pod gently and remove the seeds with tweezers. Spread seeds on a paper towel to dry for a few days. Store dry seeds in a cool, dry place until planting time.
Preparing Seeds For Planting
Preparing calla lily seeds for planting is a key step for a strong start. Proper preparation helps the seeds sprout well and grow healthy plants. This process involves cleaning the seeds to remove any fruit residue and drying them to prevent mold. Storing the seeds correctly keeps them fresh until planting time. Following these simple steps ensures better seed health and higher germination rates.
Cleaning And Drying Seeds
After harvesting, remove the seeds from the seed pod gently. Wash the seeds under cool water to remove any pulp or debris. Use your fingers to rub off sticky residue carefully. Spread the seeds on a clean paper towel in a single layer. Let them dry in a warm, airy place for several days. Avoid direct sunlight to protect the seeds from damage. Dry seeds are less likely to rot or develop mold.
Storing Seeds Properly
Once dry, store the seeds in a cool, dark place. Use a paper envelope or a small container with ventilation holes. Avoid plastic bags, which trap moisture and cause mold. Label the storage container with the date and seed type. Keep the seeds away from heat sources and humidity. Proper storage can keep seeds viable for up to one year.
Planting Calla Lily Seeds
Planting calla lily seeds is a rewarding step in growing these elegant flowers. It takes patience and care for seeds to sprout strong seedlings. Preparing the right environment helps seeds grow healthy. Choosing the proper soil and containers sets a good foundation. Using the best sowing methods improves seed germination and growth.
Ideal Soil And Containers
Use well-draining soil rich in organic matter. A mix of potting soil and compost works well. Avoid heavy or clay soils that hold water. Containers should have drainage holes to prevent waterlogging. Small pots or seed trays are perfect for starting seeds. Clean containers reduce the risk of disease. Make sure containers are large enough for root growth.
Sowing Techniques For Best Results
Sow seeds about half an inch deep in the soil. Cover seeds lightly to keep moisture in. Keep the soil moist but not soggy. Place containers in a warm area with indirect sunlight. Temperatures between 70-75°F help seeds sprout faster. Use a spray bottle to water gently. Avoid disturbing seeds after sowing. Thin seedlings once they grow to avoid crowding.

Credit: www.reddit.com
Caring For Seedlings
After harvesting calla lily seeds, caring for seedlings is the next crucial step. Seedlings need gentle care to grow strong and healthy. Proper attention helps them develop into beautiful plants.
Young calla lily plants are delicate. They require the right environment to thrive. Paying attention to watering and light is essential. Protecting seedlings from harm ensures their survival.
Watering And Light Requirements
Calla lily seedlings need moist soil but not soggy. Water them lightly every day or when the soil feels dry. Avoid overwatering to prevent root rot.
Place seedlings where they get bright, indirect sunlight. Too much direct sun can burn young leaves. A spot near a window with filtered light works well.
Keep the temperature steady and warm. Around 70°F (21°C) is ideal for seedling growth.
Protecting Young Plants
Young seedlings are vulnerable to pests and sudden temperature changes. Use a light cover or mesh to keep insects away.
Watch for drafts or cold spots. Move seedlings to a safe place if needed. Handle plants gently to avoid damage.
Thin out overcrowded seedlings. Give each plant enough space to grow strong roots and leaves.
Troubleshooting Common Issues
Harvesting calla lily seeds can be rewarding but sometimes tricky. Problems may arise during seed germination or plant growth. Recognizing common issues helps you fix them quickly. This section guides you through solving typical problems in calla lily seed care.
Dealing With Poor Germination
Seeds may fail to sprout due to several reasons. Old seeds lose their ability to grow. Use fresh seeds collected from healthy plants. Ensure the soil is moist but not soaked. Too much water causes seeds to rot. Keep the temperature warm; calla lily seeds like it around 70°F (21°C). Light helps some seeds germinate, but calla lily seeds grow best in darkness. Cover seeds lightly with soil. Check seeds daily for signs of sprouting.
Preventing Diseases And Pests
Diseases and pests can harm young seedlings and mature plants. Use clean pots and fresh soil to avoid fungus. Water plants at the base to keep leaves dry. Wet leaves attract mildew and mold. Watch for aphids and snails that eat leaves and stems. Remove pests by hand or use gentle insect sprays safe for flowers. Keep air flowing around plants to reduce fungal problems. Healthy plants resist pests and disease better.
Frequently Asked Questions
How Do You Know When Calla Lily Seeds Are Ready?
Calla Lily seeds are ready when the seed pod turns brown and dries. This usually happens in late summer or early fall. The pod should be firm and start to crack open naturally. Harvest seeds promptly to ensure viability and avoid mold or pests.
What Is The Best Way To Harvest Calla Lily Seeds?
Cut the mature seed pods carefully with clean scissors or pruning shears. Place the pods in a paper bag and let them dry further indoors. Once dry, gently crush the pods to release the seeds, then store them in a cool, dry place.
How Should Calla Lily Seeds Be Stored After Harvesting?
Store seeds in an airtight container in a cool, dark, and dry location. Use labeled envelopes or glass jars with silica gel packets to keep moisture out. Proper storage helps maintain seed viability for up to one year or more.
Can You Grow Calla Lilies From Seeds Successfully?
Yes, you can grow Calla Lilies from seeds, but it takes patience. Germination can take several weeks to months. Seeds require warm, moist conditions and indirect sunlight. Seedlings may take 2-3 years to bloom, so many gardeners prefer tubers for faster results.
Conclusion
Harvesting calla lily seeds takes patience and care. Watch seed pods closely until they turn brown. Gently open pods to collect seeds without damage. Store seeds in a dry, cool place for best results. Plant seeds in well-drained soil after the last frost.
Water regularly and give them plenty of light. Growing calla lilies from seeds can be rewarding. With simple steps, you can enjoy beautiful blooms year after year. Start your seed harvest today and watch your garden grow.