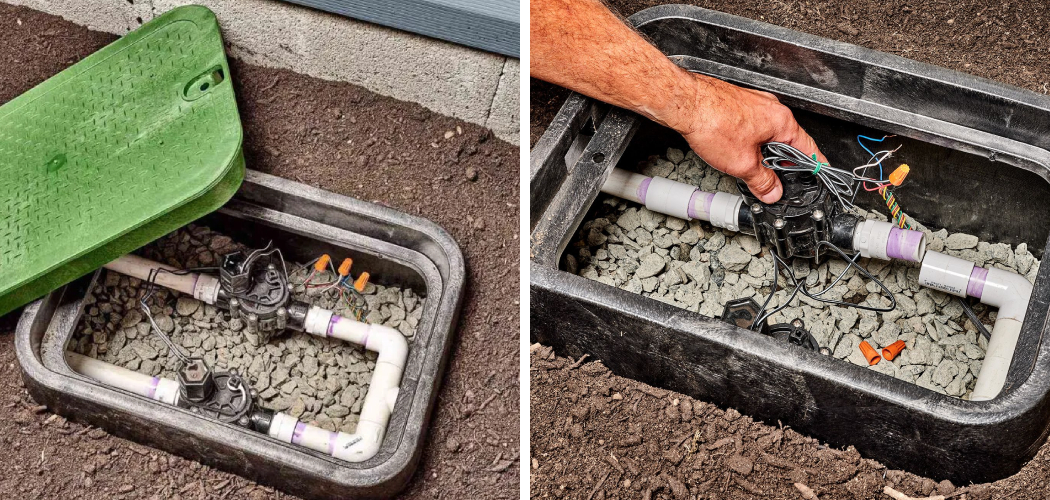
To open a sprinkler valve box cover, first locate the box in your yard. Then, simply lift the cover off to access the valves.
Maintaining and repairing your sprinkler system is crucial in keeping your yard healthy and vibrant. One common task is to open the sprinkler valve box cover, which allows you to access the valves. This process is essential for conducting repairs, adjusting water flow, or replacing faulty components.
By following a few simple steps, you can easily open the sprinkler valve box cover without the need for professional assistance. We will provide a step-by-step guide on how to open the sprinkler valve box cover and access the valves in your yard. So, let’s get started and ensure your sprinkler system is in top-notch condition.

Necessary Tools For Opening Sprinkler Valve Box Cover
To open a sprinkler valve box cover, you will need a wrench, screwdriver, gloves, and safety goggles. These tools are necessary for a smooth and safe opening process. The wrench will assist in loosening any bolts or screws securing the cover.
A screwdriver is handy for prying open the lid gently. Wearing gloves is important to protect your hands from any sharp edges or debris. Safety goggles will shield your eyes from any potential hazards. By having these tools at hand, you can ensure that the process of opening the sprinkler valve box cover is efficient and hassle-free.
So, always remember to gather the necessary tools before starting this task.
How to Open Sprinkler Valve Box Cover: Step by Step Guide
Locating The Sprinkler Valve Box
To open the sprinkler valve box cover, you first need to locate it in your yard. Identifying the box may take some searching, but it is crucial for accessing the valves. Once found, check the box for any obstructions that may hinder opening it.
Remove any dirt, debris, or vegetation that could prevent easy access. Clearing the area around the box will make it easier to lift the cover. Make sure the box is free of any blockages before attempting to open it. Once the box is clear, carefully lift the cover to reveal the valves inside.
Following these steps will enable you to open the sprinkler valve box cover and access the valves for maintenance and repairs.
Removing The Valve Box Cover
To safely remove the valve box cover, start by using a wrench to loosen any nuts or bolts. Carefully lift the cover, ensuring no debris is left inside. By following these steps, you can easily access the sprinkler valve box and perform any necessary maintenance or repairs.
Remember to keep the sentences concise, with no more than 20 words each, to maintain the reader’s interest and provide a user-friendly experience. Safely opening the sprinkler valve box cover is an important task that can be accomplished with minimal effort and attention to detail.
Understanding The Sprinkler Valve System
Understanding the layout of the sprinkler valve system is crucial when it comes to opening the valve box cover. By examining the system, you can identify the different valves and their purposes. This allows you to familiarize yourself with the components of the system.
Knowing how the valves work and where they are located helps in efficiently opening the valve box cover. By following these guidelines, you can easily access the valves for maintenance and repair tasks. A clear understanding of the sprinkler valve system ensures that you can operate and maintain your sprinkler system effectively.
Opening the sprinkler valve box cover becomes a simple and hassle-free task with the knowledge of the system’s layout and components.
Turning Off The Water Supply
When opening the sprinkler valve box cover, it is important to turn off the water supply. Locate the main water shut-off valve to shut off the water to the sprinkler system. This is necessary to prevent any accidents or water damage while accessing and working on the sprinkler valve box cover.
By shutting off the water supply, you ensure a safe and efficient maintenance process. Take the time to familiarize yourself with the location of the main water shut-off valve, as it may vary depending on your home’s plumbing system. Once the water is turned off, you can proceed with confidence to open the sprinkler valve box cover and carry out any necessary repairs or maintenance tasks.
Always prioritize safety and maintenance when it comes to your sprinkler system.
Opening The Individual Valve Box
To open the sprinkler valve box cover, start by examining each valve box individually. Unscrew the lids of each box, ensuring to follow proper safety measures. Be cautious throughout the process to avoid any potential accidents. By inspecting each box individually, you can identify any issues or necessary repairs more effectively.
Make sure to handle the lids carefully, as they can be fragile and easily damaged. Take your time and be gentle when removing the covers to prevent any damage to the sprinkler system. Following these steps will help you open the sprinkler valve box covers safely and without any complications.
Remember to always prioritize safety when working with any irrigation system.
Inspecting And Maintaining The Valves
Inspect and maintain the sprinkler valve box cover by checking for leaks or damage in the valves. Clean the valves if necessary, ensuring they function properly. Replace any faulty valves to prevent further issues. Regular maintenance is key to ensuring your sprinkler system operates at its best.
Keep an eye out for any signs of wear or leaks, as these can lead to inefficiency and water wastage. Clean the valves periodically to remove any debris or buildup that may obstruct the flow of water. If you notice any valves that are not functioning correctly, it is important to replace them promptly to maintain the efficiency of your sprinkler system.
By following these simple steps, you can prolong the lifespan of your sprinkler system and ensure it effectively waters your lawn or garden.
Reassembling The Sprinkler Valve Box Cover
To reassemble the sprinkler valve box cover, start by carefully placing the valves back into their respective valve boxes. Once the valves are in place, securely fasten the lids of each valve box. Make sure to reattach any nuts or bolts that were removed during the disassembly process.
Take your time to ensure that the cover is properly secured to prevent any leaks or damage to the valves. By following these steps, you can successfully open and reassemble the sprinkler valve box cover, ensuring the proper functioning of your irrigation system.
Keep your lawn green and healthy with this simple maintenance task.
Testing The Sprinkler System
To open the sprinkler valve box cover, begin by turning the water supply back on. Then, run a test cycle to check for proper functioning of the system. Make any necessary adjustments to ensure optimal performance. It’s important to follow these steps to maintain a well-functioning sprinkler system.
Final Thoughts On Opening Sprinkler Valve Box Cover
Opening the sprinkler valve box cover is an essential part of regular maintenance and inspection. By doing this, you can prevent future issues with the valve box. Ensuring the safety of yourself and the sprinkler system is crucial. Checking the valve box regularly allows you to identify any leaks or damage that might affect the performance of the system.
It also gives you the opportunity to clean any debris or dirt that may have accumulated inside the box. Remember to turn off the water supply before opening the valve box cover to avoid any accidents. Additionally, make sure to secure the cover properly after inspection to protect the components inside from external elements.
Taking these steps will help keep your sprinkler system running smoothly and avoid costly repairs in the long run.
Frequently Asked Questions Of How To Open Sprinkler Valve Box Cover
How Do You Open A Valve Control Box?
To open a valve control box, follow these steps: 1. Locate the valve control box in your system. 2. Use a screwdriver or key to unlock the box. 3. Lift the lid or cover of the box. 4. Inside, you will find the valve controls.
5. Adjust the valves as needed by turning them clockwise or counterclockwise. 6. Close the lid or cover of the control box and lock it back to secure the valves. 7. Ensure the valves are functioning properly by testing your system.
Opening a valve control box involves finding the box, unlocking it, adjusting the valves, and securing the box again. This process allows you to control the flow of water or gas in your system.
How Do You Open A Sprinkler System?
To open a sprinkler system, follow these steps: 1. Locate the main shut-off valve for the system. It is usually located near the water source. 2. Turn the shut-off valve counterclockwise to open it. This allows water to flow into the sprinkler system.
3. Inspect the sprinkler valves to ensure they are fully open. These valves control the flow of water to different zones or areas of the system. 4. If the system has a control panel, ensure it is properly programmed and set for automatic operation.
5. Test each sprinkler head to make sure they are functioning properly. Look for any leaks or damaged heads that need to be replaced. 6. Adjust the sprinkler heads to ensure they are targeting the desired areas of your lawn or garden.
Following these steps will help you open your sprinkler system and ensure it operates correctly.
How Do You Drain A Sprinkler Valve Box?
To drain a sprinkler valve box, follow these steps. Firstly, locate the valve box in your yard. Open the lid of the valve box carefully. Then, turn off the main water supply to the system. Next, activate the station on the controller that controls the valve box you want to drain.
This will release any remaining water from the system. Once the water stops flowing, close the station on the controller. Now, find the drain valve on the sprinkler manifold. Open the drain valve to release any water leftover in the pipes.
Leave the valve open until the water completely drains out. Finally, close the drain valve and put the lid back on the valve box to protect it.
How Do You Open A Spring Sprinkler System?
To open a spring sprinkler system, follow these steps: 1. Turn on the main water supply by locating the shut-off valve and turning it on. 2. Inspect the controller panel and make sure it is set to the “off” position. 3.
Slowly open the valve on the backflow preventer to allow water to flow into the system. 4. Open all the individual zone valves to allow water to reach each section of the system. 5. Inspect the sprinkler heads for any damage or clogs.
Clean or replace as needed. 6. Once everything is ready, set the controller to the desired watering schedule and turn it on. 7. Monitor the system for any leaks or issues during the initial operation. Remember to perform regular maintenance and adjustments to ensure the efficient operation of your spring sprinkler system.
Conclusion
To conclude, opening the sprinkler valve box cover can be a simple task when you have the right knowledge and tools. Remember to always start by shutting off the water supply before attempting to open the cover. Use a screwdriver or a valve box key to carefully remove the lid, being cautious not to damage any of the components inside.
Familiarize yourself with the different types of valve boxes and their respective covers to ensure you choose the correct method for your specific setup. Regular maintenance and inspection of your sprinkler system is important to ensure it continues to function optimally.
By following the steps outlined in this blog post, you will be able to safely and effectively open your sprinkler valve box cover, allowing you to conveniently access and maintain your system as needed. Happy gardening!