To build a bucket garden stand, gather the necessary materials and tools. Then, assemble the stand by following a step-by-step guide or tutorial.
If you’re interested in cultivating a garden but don’t have a backyard or enough space in your home, a bucket garden stand can be a fantastic solution. This DIY project allows you to create a sturdy and portable stand to hold your gardening buckets, enabling you to grow plants in a compact area like a balcony or patio.
Building a bucket garden stand is a straightforward task that requires some basic materials and a few essential tools. By following a step-by-step guide or tutorial, you can quickly assemble a stand that is not only functional but also aesthetically pleasing. We will walk you through the process of building your own bucket garden stand. So, let’s get started and bring your gardening dreams to life with this simple and practical project.

Credit: m.youtube.com
Choosing The Right Materials And Tools
When building a bucket garden stand, it is crucial to choose the right materials and tools to ensure its stability and durability. To start, assess the requirements for your bucket garden stand, considering factors such as the number of buckets you plan to use and the available space.
Next, gather the necessary materials, which may include sturdy wood or metal posts for the stand’s frame, screws or nails for assembly, and a level to ensure that everything is straight and even. Additionally, essential tools for building the stand include a saw for cutting the wood or metal, a power drill for attaching screws or nails, and a measuring tape for accurate dimensions.
How to Build a Bucket Garden Stand : Step by Step Guide
Preparing The Work Area
Clearing the space for construction is the first step in building a bucket garden stand. Remove any debris or obstacles in the designated area. Taking safety precautions is crucial to prevent accidents. Wear protective gear such as gloves and goggles to ensure your safety throughout the process.
To streamline the construction process, organize your tools in a convenient manner. Keep all the necessary tools within arm’s reach. Use a tool belt or toolbox to have easy access to them. This will save you time and effort while working on the bucket garden stand.
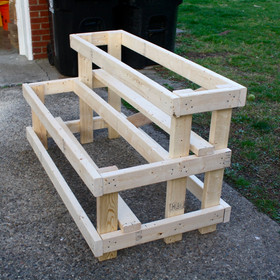
Constructing The Basic Frame
Constructing the Basic Frame of a bucket garden stand involves several steps. First, you need to measure and mark the dimensions accurately. Use a measuring tape and mark the lengths on your wooden lumber. Next, cut the lumber for the legs and supports according to your measurements.
Once the pieces are cut, assemble the legs and supports for the frame. Ensure they are aligned properly and use screws or nails to secure the joints. This will provide stability and strength to your garden stand. Remember to use the appropriate size and type of fasteners to maintain the structural integrity of the frame. With these steps, you can successfully build the basic frame of your bucket garden stand.
Ensuring Stability And Durability
When building a bucket garden stand, it is important to ensure stability and durability. One way to achieve this is by reinforcing the frame with additional support braces. These braces can be securely attached to key areas of the stand to prevent any wobbling or bending. In addition, strengthening the connections between the different parts of the frame using glue or wood adhesive can further enhance the durability of the stand.
This will ensure that the stand remains sturdy and functional over time. Lastly, sanding the frame to remove any rough edges is crucial for both safety and aesthetic reasons. Smooth edges not only prevent any potential injuries but also give the stand a polished and professional look.
Incorporating Adjustable Features
Incorporating adjustable features in a bucket garden stand allows for customization based on your specific needs. One important aspect to consider is adding height adjustments to accommodate different bucket sizes. This feature enables you to raise or lower the height of the stand to ensure optimal positioning for your plants. Additionally, including customizable width options enhances the versatility of the stand, enabling you to accommodate various sizes and quantities of buckets.
This flexibility is especially beneficial if you plan to expand your garden or utilize different types of plants. By incorporating adjustable features like height and width adjustments, you can create a bucket garden stand that is tailored to your gardening preferences and requirements.
Finishing Touches And Enhancements
Now that your bucket garden stand is structurally sound and sturdy, it’s time to add the finishing touches and enhancements. One way to protect your stand from the elements and give it a polished look is to apply a protective coat of paint or stain. Choose a color that matches your garden’s aesthetic or opt for a natural wood finish for a more rustic appeal.
In addition to a protective coat, you can also add decorative elements to further customize your bucket garden stand. Consider adding embellishments such as carved designs, decorative brackets, or even a mosaic pattern to make it truly unique and eye-catching.
Furthermore, if you want to make your bucket garden stand easily movable, you can install wheels. This will allow you to effortlessly relocate your stand to follow the sun or to accommodate changes in your garden’s layout. With the addition of wheels, you can conveniently move your bucket garden stand whenever needed without any hassle.
Preparing The Buckets For Installation
<p>Choosing suitable buckets for your garden stand is the first step in building a bucket garden stand. **Consider the size and material** of the buckets, ensuring they are sturdy enough to hold your plants. **Drilling drainage holes** in the bottom of the buckets is essential to prevent waterlogging and promote healthy root growth. Use a drill or a hammer and nail to create several small holes.
**Painting or decorating the buckets** not only adds a touch of style but also helps coordinate them with the garden stand. Choose colors that complement your outdoor space and apply weather-resistant paint or sealant. Adding patterns or designs can make the buckets visually appealing. **Ensure the paint is dry** before installing the buckets onto the stand. By following these steps, you can prepare your buckets for installation and create a beautiful bucket garden stand.</p>
Installing The Buckets On The Stand
When installing the buckets on the stand for your bucket garden, it’s important to position them correctly. Make sure to secure the buckets in place using zip ties or clamps, ensuring they are tightly fastened. This will help prevent any accidental tipping or falling of the buckets. Additionally, check for stability once the buckets are attached and make any necessary adjustments to ensure they are level and secure. By taking these steps, you can create a sturdy and functional bucket garden stand. With the buckets securely in place, you’ll be able to enjoy the benefits of a beautiful and organized garden.
Maintaining And Caring For Your Bucket Garden Stand
Regularly inspecting the bucket garden stand is crucial to ensure its longevity and functionality. **Check for wear and tear** on all components, including the buckets, stand frame, and any additional attachments. Tighten any loose screws or bolts and **replace any damaged or broken parts** promptly. This will help prevent further damage and potential accidents.
To maintain cleanliness and **prevent mold or mildew growth**, it is essential to regularly clean both the buckets and the garden stand. **Use a mild detergent** and warm water to **thoroughly clean** the buckets and rinse them well. Ensure they are fully dry before reassembling the stand. Similarly, clean the stand frame and any other attachments using the appropriate cleaning agents.
| Regular Maintenance Steps |
|---|
| Inspect the stand for wear and tear |
| Clean the buckets and stand |
| Replace damaged or broken components |
Showcasing Your Bucket Garden Stand
Building a bucket garden stand is a fantastic way to showcase your gardening skills and elevate the aesthetic appeal of your garden. Once you have successfully assembled your stand, it’s time to arrange the buckets with a variety of plants or flowers to create a visually stunning display.
Utilizing the stand to maximize garden space is essential. You can strategically place the buckets at different heights to make the most of the vertical space available. Consider grouping plants with similar watering requirements together to streamline maintenance.
Another great aspect of the bucket garden stand is the opportunity to share your success on social media. Snap some eye-catching photos of your beautifully arranged buckets and post them on platforms such as Instagram or Pinterest. Don’t forget to use relevant hashtags to reach a wider audience and inspire fellow garden enthusiasts.
Frequently Asked Questions On How To Build A Bucket Garden Stand
How To Build A 5 Gallon Bucket Raised Garden?
To build a 5 gallon bucket raised garden, follow these steps: 1. Drill drainage holes in the bottom of the bucket. 2. Fill the bucket with a mixture of soil and compost. 3. Plant your desired plants or seeds in the bucket.
4. Water the garden regularly and provide proper sunlight. 5. Maintain the garden by weeding and fertilizing as needed.
How To Build A Planter Box With 5 Gallon Buckets?
To build a planter box with 5-gallon buckets, follow these steps: Find 5-gallon buckets, drill drainage holes, fill with soil, and plant your desired plants.
Can You Garden In 5 Gallon Buckets?
Yes, you can garden in 5 gallon buckets. They’re small, portable, and ideal for growing herbs and small vegetables.
How Do You Connect Two 5 Gallon Buckets Together?
To connect two 5-gallon buckets, you can use a rope or bungee cord to tie them securely together.
Conclusion
Creating a bucket garden stand is an accessible and practical way to elevate your gardening experience. By repurposing buckets, you can save money and maximize space in your garden. The process involves a few simple steps, such as drilling drainage holes, attaching the buckets to a stand, and filling them with soil and plants of your choice.
The versatility of bucket garden stands allows for creative customization and easy mobility. Whether you have limited outdoor space or want to add vertical gardening to your repertoire, a bucket garden stand is an excellent solution. With this DIY project, you can enjoy the benefits of fresh produce, vibrant flowers, and a greener environment.
Explore the endless possibilities of bucket gardening and embark on a journey of sustainable and rewarding gardening. Start building your bucket garden stand today and elevate your gardening experience to new heights.