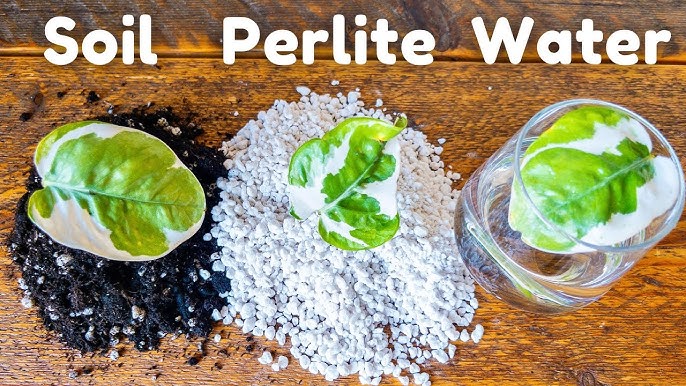
To transplant to perlite, gently remove the plant from its current container, shake off excess soil, and place it in a new pot filled with moist perlite. Perlite, a lightweight and sterile medium, provides excellent drainage and aeration for plants, promoting healthy root growth.
Plants need a suitable environment for growth, and choosing the right planting medium is crucial for their overall well-being. One such medium is perlite, a volcanic rock that has been heated and expanded. Perlite is widely used in horticulture due to its lightweight nature, excellent drainage properties, and ability to improve aeration.
Transplanting to perlite involves transferring a plant from its current container and replanting it in a pot filled with moist perlite. This process allows the plant’s roots to receive ample air and prevents water from accumulating and rotting the roots. In this guide, we will discuss the steps to successfully transplant to perlite, ensuring optimal conditions for your plants’ growth.

Credit: planetdesert.com
Different Types Of Perlite
Perlite is a versatile substance that finds applications in various fields. There are three main types of perlite, each serving unique purposes.
| Types of Perlite | Description |
|---|---|
| Horticultural Perlite | Horticultural perlite is widely used in gardening and plant cultivation. Its lightweight and porous nature allow for excellent water drainage and aeration, promoting healthy root growth and preventing waterlogging. |
| Agricultural Perlite | Agricultural perlite is specifically formulated to enhance soil quality and improve crop yields. It aids in moisture retention, nutrient absorption, and root development, making it an essential component in agriculture. |
| Industrial Perlite | Industrial perlite is used in diverse industries, including construction, insulation, filtration, and refractories. Its outstanding thermal and sound insulation properties make it an ideal choice for lightweight concrete, roofing materials, and fireproofing. |
Understanding the specific characteristics and applications of each type of perlite will help you choose the right one for your needs, whether it’s horticulture, agriculture, or industrial purposes.
Considerations For Transplanting
When transplanting your plants to perlite, there are several important factors to consider:
| Plant Type | Growth Stage | Soil Type |
|---|---|---|
| Bold and italicize generic phrase “Plant Type” | Bold and italicize generic phrase “Growth Stage” | Bold and italicize generic phrase “Soil Type” |
| For plants that require a well-draining medium, such as cacti and succulents, perlite is an excellent choice for transplantation. | Whether your plants are in their early seedling stage or already established, perlite can be used for successful transplantation. | Perlite is compatible with a variety of soil types, including potting soil mixes, peat moss, and vermiculite, ensuring nutrient availability and root development. |
When considering transplantation to perlite, it’s crucial to match the plant type, growth stage, and soil type for optimal results. With its high porosity and excellent drainage properties, perlite provides a beneficial environment for root growth and nutrient absorption.
How to Transplant to Perlite: Step by Step Guide
Cleaning And Sterilizing Perlite
To ensure the successful transplanting of plants to perlite, it is essential to clean and sterilize the perlite properly. This process helps eliminate any dust, debris, and potential contaminants that may hinder plant growth. To remove dust and debris, **gently rinse the perlite with water** until it becomes clean. Pat dry the perlite using a towel or allow it to air dry completely before transplanting.
Additionally, treating the perlite with a fungicide solution is crucial to prevent the growth of harmful fungi and to maintain a healthy environment for the plants. Prepare a mixture of **fungicide solution and water** as per the instructions on the product label. Soak the perlite in this solution for the recommended amount of time, ensuring that all the perlite is adequately coated. Once the soaking period is complete, **drain the excess solution** and allow the perlite to dry completely before use.
Moistening Perlite
Proper watering technique plays a crucial role in ensuring the optimal moisture level of perlite for successful transplantation. To achieve this, follow these guidelines:
- Use a fine mist spray: When watering perlite, it is best to use a fine mist spray to distribute water evenly and gently without causing disturbance to the medium.
- Water until evenly moist: The goal is to water the perlite until it reaches an evenly moist state. Ensure that all parts of the perlite are adequately hydrated.
- Avoid overwatering: Perlite should not be saturated with water. Excessive watering may lead to waterlogging and root rot. Regularly check the moisture level of the perlite to prevent overwatering.
- Allow drainage: Proper drainage is essential to prevent water from accumulating in the container or pot. Ensure there are enough drainage holes to allow excess water to escape.
- Monitor moisture levels: Regularly monitor the moisture levels of the perlite to determine if additional watering is necessary. Check the top few inches of the perlite to assess its moisture content.
- Adjust watering frequency: Depending on various factors like plant species, environmental conditions, and container size, adjust the watering frequency accordingly. Avoid a fixed watering schedule and adapt to the plant’s needs.
By following these guidelines, you can master the art of properly moistening perlite, promoting healthy plant growth and successful transplantation.
Mixing Perlite With Soil
In the process of transplanting to perlite, it is essential to carefully mix perlite with soil to create an ideal growing medium for plants. The soil to perlite ratio plays a crucial role in ensuring optimal drainage and aeration. It is recommended to use a ratio of 1:1, equal parts soil and perlite, for most plants. This combination allows for proper water retention while preventing excess moisture buildup that can lead to root rot.
Thoroughly incorporating perlite into the soil is important to ensure even distribution. Begin by adding the desired amount of perlite to the soil and mix well using a garden trowel or gardening gloves. Make sure to break up any clumps and ensure a consistent mixture.
The addition of perlite to soil can significantly improve the growing conditions for plants by enhancing air circulation and water drainage. By following the appropriate soil to perlite ratio and thoroughly incorporating perlite, you can create a conducive environment for healthy plant growth and development.
Choosing The Right Pot
When transplanting your plants to Perlite, choosing the right pot is crucial for their growth and development. Consider the size and depth of the pot to ensure enough space for the roots to spread and for the plant to thrive. A pot that is too small can restrict root growth and lead to stunted plants. Additionally, a pot with good drainage holes is essential to prevent waterlogging and root rot.
Adequate drainage allows excess water to escape, keeping the soil airy and preventing waterlogged roots. This promotes healthy root development and prevents the risk of fungal diseases. So, when selecting a pot for transplanting to Perlite, consider the size, depth, and presence of drainage holes for optimal plant growth.
Preparing The Plant For Transplanting
Transplanting Process
|
Transplanting plants to perlite can help enhance their growth and development. The process involves carefully removing the plant from its current pot, placing perlite at the bottom of the new pot, and gently transferring the plant to the perlite. To start, gently loosen the soil around the plant’s roots using your fingers or a small gardening tool. Carefully lift the plant by its stem or base, avoiding any damage to the roots. Once the plant is free from its current pot, inspect the roots for any signs of damage or disease. Fill the new pot with a layer of perlite at the bottom. Perlite provides excellent drainage and aeration for the plant’s roots, promoting healthy growth. Carefully place the plant on top of the perlite, ensuring that the roots are spread out and not cramped together. Add more perlite around the sides of the plant, gently pressing it down to secure the plant in its new pot. Water the plant thoroughly after transplantation, allowing excess water to drain away. Regularly monitor the plant’s watering needs and ensure adequate light and temperature conditions for optimal growth. |
Post-Transplant Care
Post-transplant care is essential to ensure the successful growth of your plants in perlite. Proper watering and moisture management are vital to maintain the optimum conditions for your transplants. **Water your plants regularly**, ensuring that the perlite remains moist but not waterlogged. **Avoid overwatering** as it can lead to root rot or other fungal diseases. It is also recommended to adjust the light and temperature to provide the ideal environment for your plants.
**Provide adequate sunlight** or artificial light to promote healthy growth. Monitor the temperature to prevent extreme heat or cold, which can stress the transplanted plants. Lastly, consider the nutrient requirements of your plants. **Provide a balanced fertilizer** to support their growth and development in perlite. Regularly monitor and adjust the nutrient levels as needed. By following these care guidelines, you can ensure the successful survival and growth of your transplants in perlite.
Overwatering
Overwatering can be detrimental to the health of your plants. It is important to understand the signs of overwatering to prevent damage to your perlite-transplanted plants. One of the signs of overwatering is wilting leaves, which can be mistaken for a lack of water. However, overwatered plants have droopy leaves that are also yellow or discolored.
Another sign of overwatering is the presence of fungus or mold on the soil surface. Excess moisture creates an ideal environment for the growth of these undesirable pathogens. Additionally, overwatered plants may have roots that appear soggy or rotten.
To maintain a proper watering schedule, it is recommended to allow the perlite to dry out slightly between waterings. This will ensure that the roots have access to oxygen and prevent the risk of overwatering. It is important to monitor the moisture level of the perlite by inserting a finger into the soil to determine if it feels dry.
Underwatering
One of the essential aspects of successful plant care is maintaining proper soil moisture levels. Underwatering can be detrimental to plant health, but recognizing the signs is crucial for prompt action.
Monitoring Soil Moisture:
Regularly checking the soil moisture is key to prevent underwatering. Insert your finger into the soil, about one inch deep. If the soil feels dry and crumbly, it could indicate inadequate moisture. Additionally, if the potted plant appears light when lifted, it may signify a lack of water.
Visible Signs of Underwatering:
- Wilting or drooping leaves: The leaves may become soft, lifeless, or lose their vibrant color.
- Leaf curl: The edges of the leaves might curl inward.
- Slow growth: Plants may exhibit reduced growth and stunted development.
- Leaf loss: Some plants may shed their leaves prematurely when deprived of water.
- Dry or brittle soil: The soil may become hard and compact, making it difficult for water to penetrate.
By carefully monitoring soil moisture and recognizing these signs of underwatering, you can ensure that your plants receive the necessary water and thrive in their perlite-filled environment.
Using Incompatible Plants
Plant compatibility is an essential aspect to consider when transplanting to perlite. Not all plants thrive well with perlite, making it crucial to choose compatible ones. Some plants may not tolerate the excellent drainage provided by perlite, while others may require a more moisture-retentive soil. It is important to research and determine the suitability of different plant species before transplanting them to perlite.
Some plants that are generally compatible with perlite include succulents, cacti, and herbs like rosemary and thyme. These plants benefit from the improved aeration and drainage properties of perlite. Additionally, perlite can be mixed with other growing media to enhance its water-holding capacity and provide a balanced environment for plants with varying moisture requirements.
| Compatible Plants | Incompatible Plants |
|---|---|
| Succulents | Ferns |
| Cacti | Orchids |
| Rosemary | Lilies |
| Thyme | Rhododendrons |
| – | Ferns |
It is important to note that this is just a general guideline, and individual plant requirements may vary. It is always recommended to consult specific care instructions for each plant before making any transplanting decisions. By selecting compatible plants, you can harness the benefits of using perlite as a growing medium and ensure optimal growth and health for your plants.
Neglecting Drainage
Transplanting to perlite requires proper drainage to ensure the health and growth of your plants. Neglecting drainage can lead to stagnant water, root rot, and poor nutrient absorption. Adequate drainage is of utmost importance in perlite use as it allows excess water to flow out, preventing waterlogged soil. To improve drainage, consider the following solutions:
- Choose a container with drainage holes.
- Use a well-draining potting mix.
- Add perlite, gravel, or sand to the mix for enhanced drainage.
- Elevate the container using plant stands or bricks.
- Avoid overwatering by monitoring soil moisture levels.
- Ensure proper air circulation around the plants.
By following these guidelines, your plants will thrive in perlite-based growing mediums, benefiting from optimal drainage and avoiding potential issues caused by excess moisture.
Frequently Asked Questions Of How To Transplant To Perlite
How Do I Transplant To Perlite?
To transplant to perlite, prepare the perlite by moistening it with water. Gently remove the plant from its current pot, shaking off excess soil. Place the plant in a new pot with perlite and fill in the gaps with more perlite.
Water the plant thoroughly and allow it to drain before placing it in a suitable location.
Why Is Perlite A Good Medium For Transplanting?
Perlite is a good medium for transplanting because it is lightweight, allowing for better aeration and root development. It provides excellent drainage, reducing the risk of overwatering and root rot. Perlite also helps to maintain optimum moisture levels in the soil, promoting healthy plant growth.
Can I Mix Perlite With Other Potting Soil?
Yes, you can mix perlite with other potting soil. Perlite helps to improve the drainage and aeration of the soil, while also reducing the weight of the mixture. This can be beneficial for plants that prefer well-draining soil, such as succulents.
Experiment with different ratios to find the best mix for your plants.
Conclusion
To summarize, transplanting to perlite is a straightforward and efficient method for enhancing plant growth. By providing improved drainage and aeration, perlite creates an ideal environment for root development. Whether you are a beginner or an experienced gardener, this technique can significantly improve the health and vigor of your plants.
Remember to carefully prepare the perlite, water thoroughly, and monitor your plants’ progress. With these tips in mind, you can enjoy a thriving garden filled with lush and vibrant vegetation.