To transplant a boxwood, choose a new location, prepare the soil, dig a hole twice the width of the root ball, gently remove the plant, and transfer it to the new hole, ensuring it is planted at the same depth as before. Boxwood, scientifically known as Buxus, is an evergreen shrub loved for its versatility and low maintenance.
Whether you want to move a boxwood to a different spot in your garden or relocate it to a new home, transplanting it can be done successfully with proper care and preparation. We will discuss the steps involved in transplanting a boxwood, ensuring its survival and healthy growth in its new location.
Whether you are a seasoned gardener or a beginner, these guidelines will help you through the process of transplanting your boxwood efficiently. So, let’s dive in and learn how to transplant boxwood without any hassle.

Credit: www.gardenerbasics.com
Understanding The Growth Cycle Of Boxwood
Understanding the growth cycle of boxwood is crucial when it comes to successfully transplanting this evergreen shrub. Boxwood goes through different stages of growth, each with its own characteristics and requirements. By exploring these stages, you can identify the optimal timing for transplanting.
During the initial stage, known as the establishment phase, boxwood focuses on root development. It is important to provide adequate water and nutrients during this stage to encourage strong root growth.
Once established, boxwood enters the maturation phase, where it develops its foliage and structure. Vigorous pruning during this stage can promote bushier growth and a more compact form.
The final stage, known as the dormancy phase, occurs during the winter months. Boxwood enters a rest period and experiences slower growth. It is generally not recommended to transplant during this phase.
To determine the optimal transplanting timing, closely monitor your boxwood’s growth cycle, focusing on the establishment and maturation phases. This will ensure the best chance of success when transplanting this beloved shrub.
How to Transplant Boxwood : Step by Step Guide
Selecting The Healthiest Boxwood
Identifying Signs of a Healthy Plant:
- Look for vibrant, glossy leaves that are rich in color. Healthy boxwood plants have dark green leaves that are free from discoloration or yellowing.
- Inspect the stems and branches. They should be flexible and firm, without any signs of rot, breakage, or browning.
- Check for a well-developed root system. Healthy boxwood plants have roots that are white or off-white in color and spread evenly throughout the root ball.
Avoiding Diseased or Weak Boxwood:
- Stay away from boxwood plants with leaves that show signs of fungal infections, such as powdery mildew or leaf spots.
- Avoid plants with damaged or distorted foliage, as these may indicate insect infestations or disease.
- Select boxwood plants that are sturdy and not floppy or drooping. Weak plants may struggle to establish after transplantation.
Preparing The Transplant Site
Assessing Soil Conditions and Drainage: It is important to assess the soil conditions and drainage of the transplant site before planting boxwood. Boxwood thrives in well-drained soil that is rich in organic matter. **Check the soil pH** as boxwood prefers slightly acidic to slightly alkaline soil with a pH range of 6.5 to 7.5. If necessary, amend the soil **with organic matter** or *appropriate fertilizers* to improve its condition.
Clearing the Area from Weeds and Debris: Before transplanting boxwood, make sure to clear the designated area from any weeds, grass, or debris. This will ensure that the boxwood plants have ample space to grow without competition for nutrients and water. **Remove any rocks**, sticks, or large objects that may hinder the establishment and growth of the boxwood plants.
| Important Steps for Transplanting Boxwood |
|---|
| 1. Assess soil pH and conditions |
| 2. Amend soil with organic matter as needed |
| 3. Clear area from weeds, grass, and debris |
| 4. Remove rocks, sticks, and large objects |
Properly Pruning The Boxwood
When it comes to transplanting boxwood, it is crucial to also focus on effectively pruning the plant. Trimming overgrown branches and foliage is essential for its overall health and appearance. By removing any damaged or diseased parts, you can promote new growth and prevent further issues.
Maintaining a balanced shape and size is another key aspect of boxwood pruning. It is recommended to trim the plant during its dormant period to avoid stimulating new growth. Start by identifying any overcrowded areas or branches that are growing inwards. By carefully pruning these sections, you can ensure better air circulation and prevent disease.
Remember, it’s important to use sharp and clean pruning tools to minimize damage to the plant. Regularly monitor your boxwood to assess its growth and perform necessary pruning as needed. By following these guidelines, you can effectively prune your boxwood and promote a healthier and more visually appealing plant.
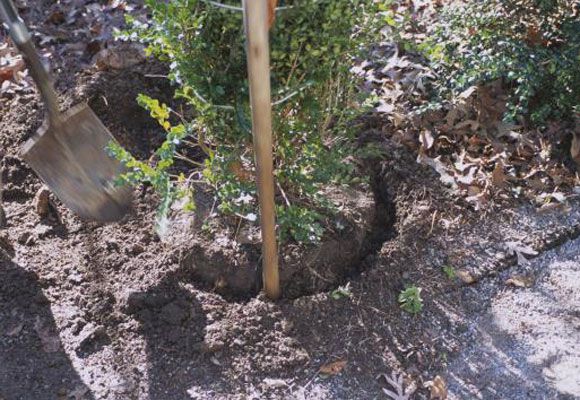
Digging The Hole Correctly
When transplanting boxwood, one of the most important steps is digging the hole correctly. To ensure the plant’s successful relocation, the proper size of the hole should be measured. This involves considering the size of the root ball and allowing for adequate space for root expansion.
When digging the hole, it is essential to make it wide enough to comfortably accommodate the root ball. The width should be at least three times the diameter of the root ball. This ensures that the roots have enough space to spread out and establish themselves in the new location.
Additionally, the depth of the hole should be equal to the height of the root ball. This allows the boxwood to be planted at the same level it was in its previous location. Planting too deep or too shallow can lead to poor root development and hinder growth.
By following these guidelines and providing the boxwood with the proper hole size, you can promote a successful transplantation and ensure the plant’s health and growth in its new environment.
Safely Removing The Boxwood From Its Original Spot
To safely transplant a boxwood, you need to start by loosening the soil around its roots. Gently dig around the plant, using a garden fork or shovel, being careful not to damage the roots. Once the soil is loosened, you can proceed to lift the plant. Opt for a spade or shovel, making sure to dig deep enough to lift the root ball intact.
When lifting the boxwood, try to minimize any damage to the roots. Lift the plant carefully, supporting the root ball as you lift it out of the ground. It’s important to keep the plant upright during the transplantation process to reduce stress on the roots.
In terms of aftercare, it’s crucial to water the transplanted boxwood thoroughly. This helps settle the soil and promotes root establishment. Apply a layer of mulch around the base of the plant to retain moisture and deter weed growth.
Transferring The Boxwood To Its New Location
Transplanting boxwood requires careful planning and execution. When moving the plant to its new location, **create a prepared hole** that is slightly wider and deeper than the root ball. This will allow the roots to spread and establish in the new soil. Place the boxwood into the hole, ensuring that it is properly aligned with the surrounding landscape. **Maintaining the same orientation** as in its original location will help the plant thrive.
Carefully backfill the hole with soil, firming it gently around the roots to eliminate any air pockets. **Water the newly transplanted boxwood thoroughly** and regularly to help it adjust to its new environment. Monitor the moisture levels to prevent under or overwatering. Providing sufficient water and adequate drainage is crucial for the plant’s health.
Additionally, **mulching** around the base of the boxwood can help retain moisture and regulate soil temperature. Avoid placing mulch directly against the trunk to prevent rot. Regularly inspect the plant for signs of stress or disease and take appropriate measures to address them.
Watering And Mulching
| Watering and Mulching |
|
Transplanting boxwood requires proper care and attention to ensure its successful establishment. One important aspect is establishing a consistent watering schedule. Adequate watering is crucial during the initial stages, as the root system needs time to adapt and develop. Regularly monitor soil moisture, and ensure it remains consistently moist but not waterlogged. Avoid over or under watering, as it can stress the plant and hinder its growth. |
| Applying mulch is another essential step to retain moisture and control weeds around the transplanted boxwood. Mulch helps regulate soil temperature, conserves moisture, and suppresses weed growth. Spread a layer of organic mulch around the base of the plant, keeping it a few inches away from the stem to prevent rot. Mulch materials like shredded bark, wood chips, or compost can be used. Replenish the mulch annually to maintain its benefits. |
Monitoring For Signs Of Stress
Transplanting boxwood requires careful monitoring for signs of stress and recognizing common transplant shock symptoms. It is crucial to alleviate stress by implementing the right remedies. Some common symptoms of transplant shock include wilting or yellowing leaves, stunted growth, and root decay.
To alleviate stress, ensure proper watering, providing adequate sunlight, and using organic fertilizers to promote healthy root development. **Regularly** check the moisture level in the soil and adjust watering accordingly. **Provide** shade or shelter from harsh weather conditions to protect the transplanted boxwood. **Additionally, consider** mulching around the base of the plant to retain moisture and suppress weed growth. **Moreover, periodically** inspect the roots for any signs of disease or rot and **take immediate action** to prevent further damage. By monitoring and addressing signs of stress promptly, you can ensure a successful boxwood transplant.
Maintaining The Health Of Transplanted Boxwood
Transplanting boxwood requires proper care and maintenance to ensure its health and vitality. It is crucial to regularly inspect the plant for pests or diseases that may affect its growth. Detecting issues early allows for timely intervention and prevents further damage to the plant. Providing adequate nutrients and fertilizers is also essential to support its growth and development.
Be sure to choose the right fertilizers and follow the recommended application rates. Additionally, watering the transplanted boxwood regularly and maintaining optimal moisture levels will promote healthy root development. Proper mulching helps conserve moisture and suppress weed growth around the plant. Following these practices will help keep your transplanted boxwood healthy and thriving.
Frequently Asked Questions Of How To Transplant Boxwood
When Should You Transplant Boxwood?
Transplant boxwood during early spring or late fall. This ensures better root establishment.
How Do You Dig Up And Move Boxwoods?
To dig and move boxwoods, carefully dig a trench around the plant’s root ball using a sharp spade. Lift and transfer the boxwood to its new location, ensuring the hole is wide enough for the roots. Fill with soil, water thoroughly, and provide proper care to help it adapt to its new home.
Are Boxwoods Easy To Move?
Moving boxwoods is a relatively easy task due to their shallow root system. With proper care and planning, you can successfully relocate boxwoods without much difficulty.
Do Boxwoods Have Deep Roots?
Boxwoods have shallow, fibrous roots that spread horizontally in the top few inches of soil. These roots help the plant anchor itself and efficiently absorb water and nutrients. The shallow root system makes it important to provide adequate irrigation and mulching to prevent them from drying out.
Conclusion
Successfully transplanting boxwood requires careful planning, preparation, and execution. With the right guidance and attention to detail, you can ensure the health and longevity of your boxwood plants. Remember to choose the appropriate time, prepare the new location, and handle the root system with care.
By following these steps, you can enjoy vibrant and thriving boxwood plants in your garden for years to come. Happy gardening!