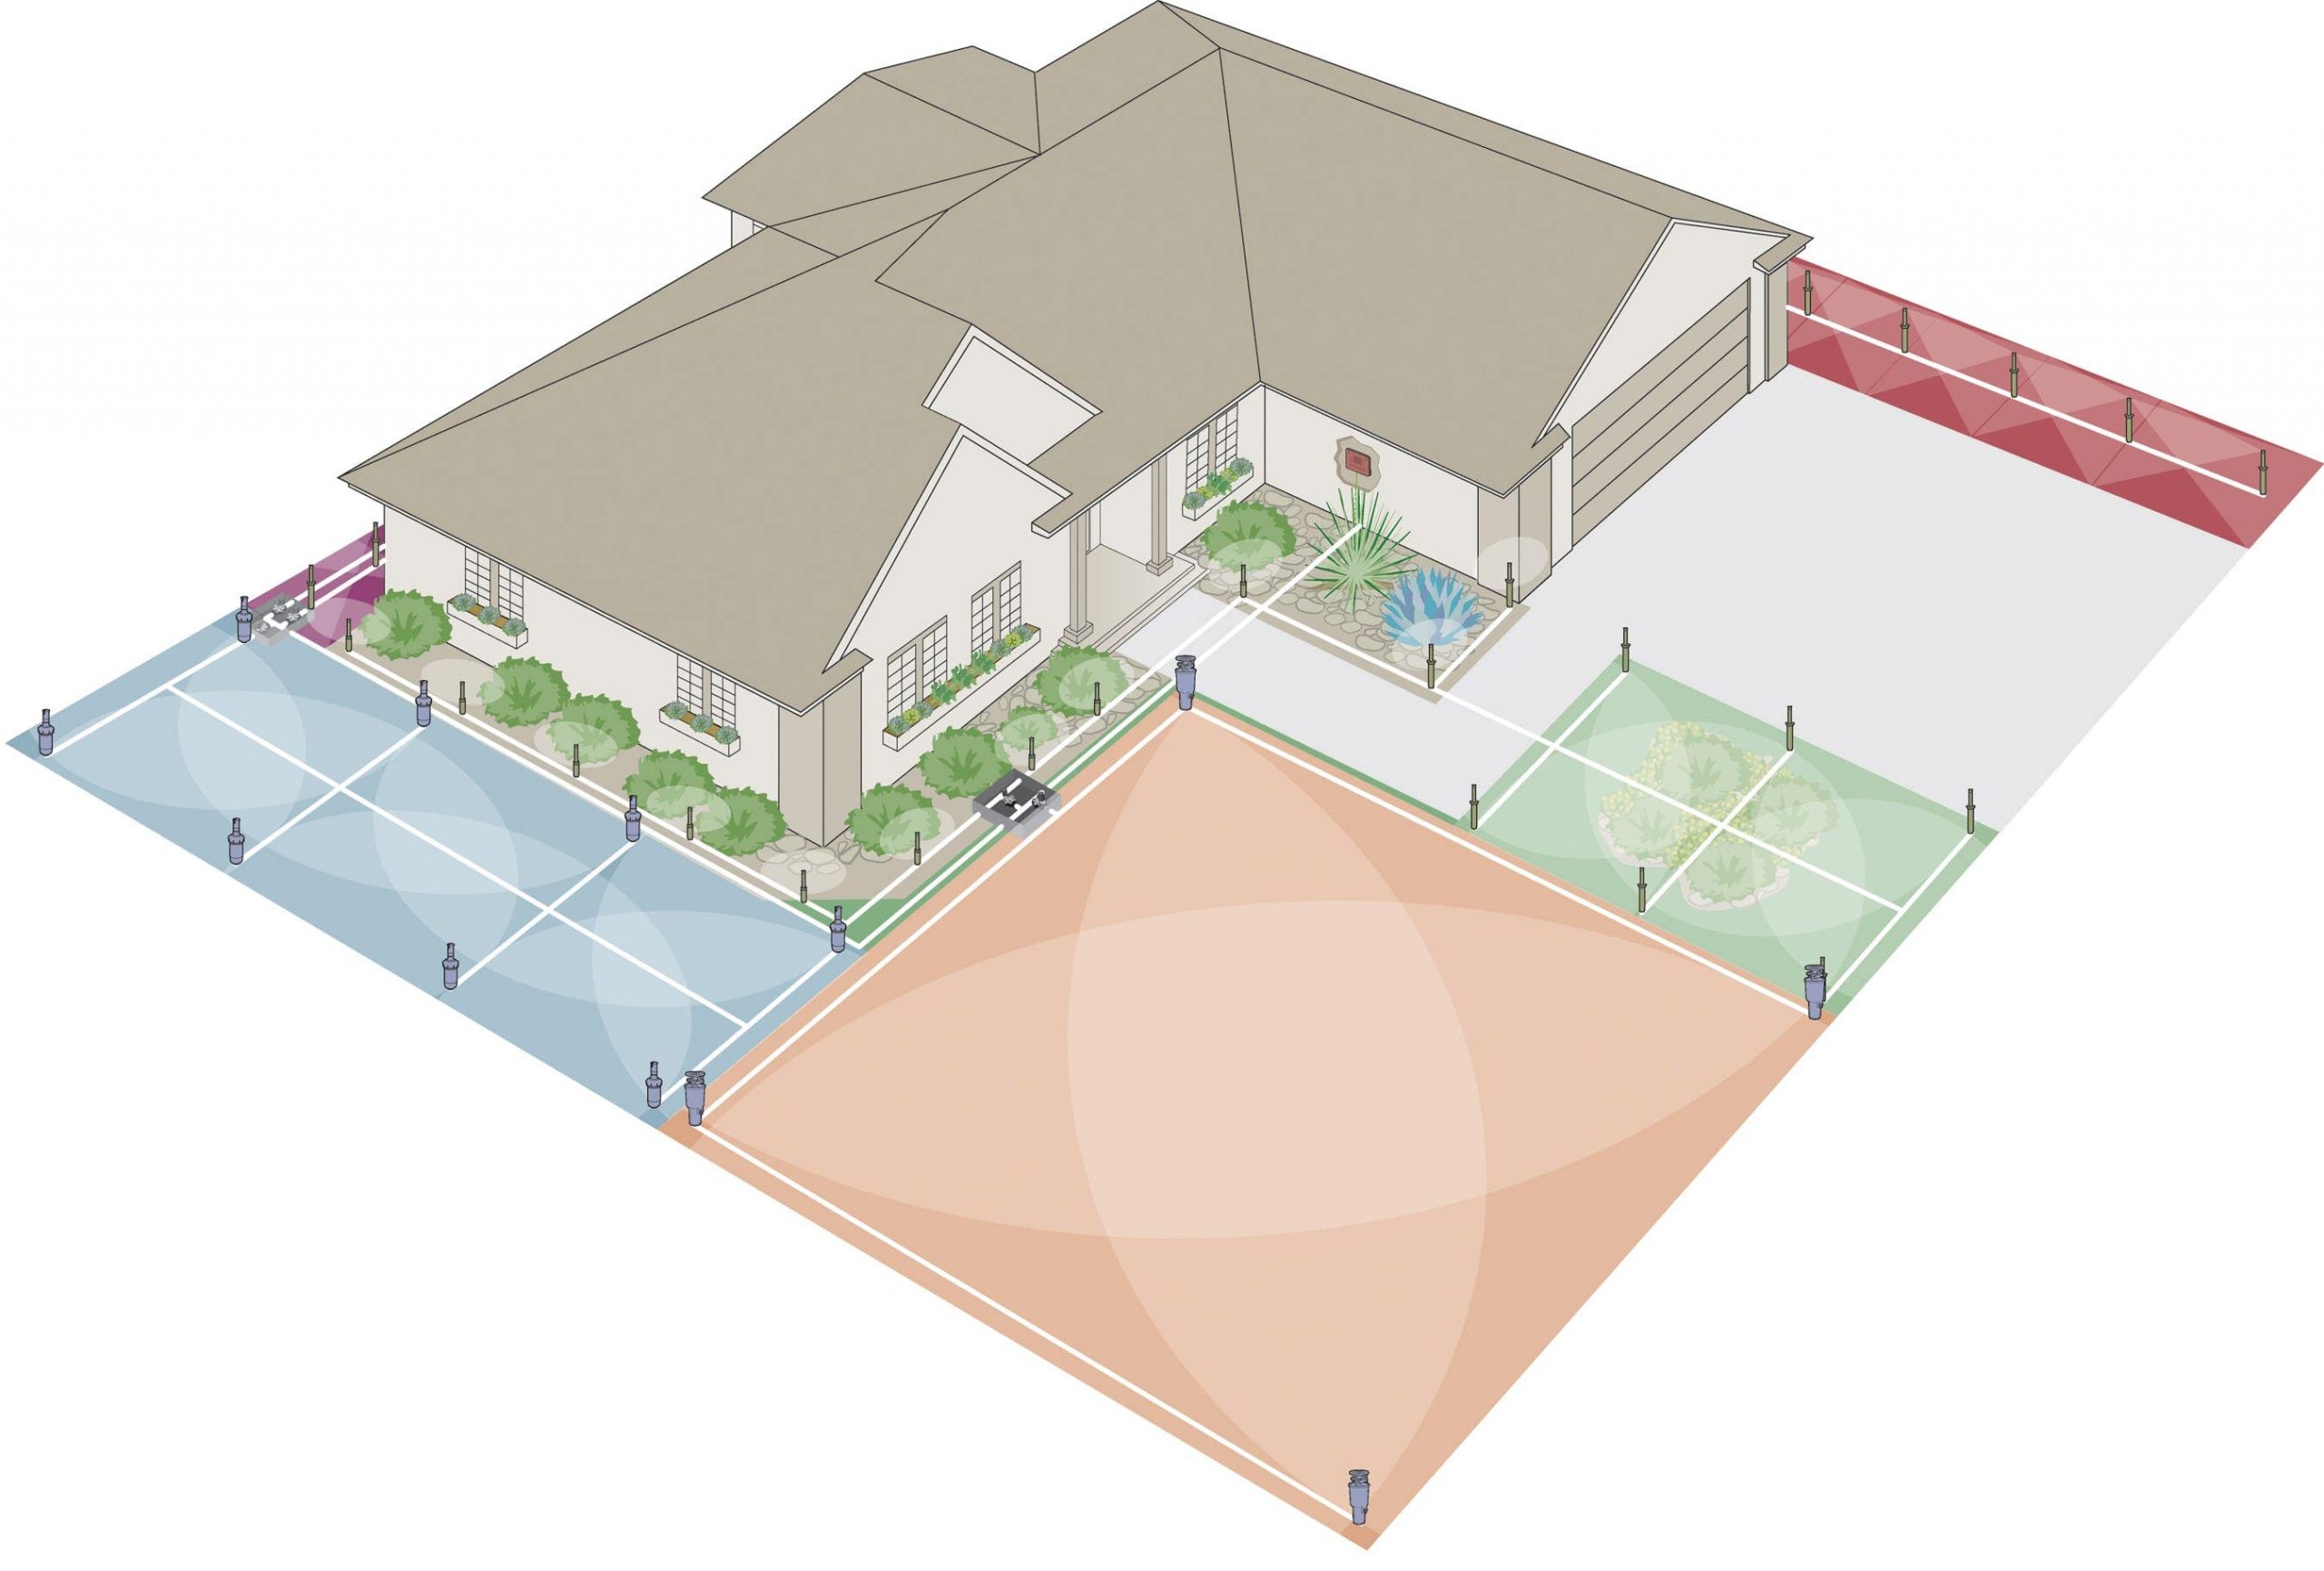
To map out a sprinkler system, start by measuring your yard, marking any obstacles and determining the water source. Then, create a layout plan of the sprinkler heads, pipes, and valves.
This will help ensure an efficient and effective irrigation system.
Credit: community.rachio.com
Assessing Your Landscape Needs
Assessing your landscape needs is an important step in mapping out your sprinkler system. By understanding the size of your yard and its water requirements, as well as identifying areas that need irrigation and potential obstacles, you can ensure that your system is optimized for efficiency. Let’s dive into each of these aspects in detail:
Determine The Size Of Your Yard And Water Requirements
To begin with, it is crucial to determine the size of your yard and understand its water requirements. This will help you determine the number and type of sprinkler heads needed to cover your entire landscape effectively.
One way to calculate the size of your yard is to measure its square footage. Break down your yard into easily measurable sections, such as rectangular or square areas. Measure the length and width of each section and multiply the two measurements together to calculate the square footage. Once you have the total square footage of your yard, you can determine the water requirements.
Understanding the water requirements of your yard involves considering factors such as soil type, plant species, and climate. Sandy soil, for example, drains quickly and may require more frequent watering, while clay soil retains moisture for longer periods. Different plants have varying water needs, so it’s essential to research the specific requirements of your landscape.
To optimize water usage and prevent excessive runoff, you can also consider incorporating smart irrigation controllers. These controllers use weather data and moisture sensors to adjust watering schedules based on actual plant needs, resulting in significant water savings.
Identify Areas That Need Irrigation And Potential Obstacles
Once you have determined the size of your yard and its water requirements, the next step is to identify areas that require irrigation and potential obstacles that may affect the installation of your sprinkler system.
Walk around your yard and make note of areas where plants appear stressed, such as dry patches or wilting foliage. These areas are likely candidates for irrigation. Additionally, consider areas that receive full sunlight or are shaded, as these factors can impact water requirements. For example, plants in sunny areas may need more water compared to those in shaded spots.
During this assessment, it is also crucial to identify potential obstacles that may hinder the installation of your sprinkler system. These obstacles can include existing structures, underground utilities, tree roots, or uneven terrain. By recognizing these obstacles, you can plan for necessary adjustments or choose alternative irrigation methods for those specific areas.
How to Map Out Sprinkler System: Step by Step Guide
Planning The Layout
When it comes to setting up a sprinkler system for your garden or lawn, proper planning is essential. One of the first steps in the planning process is to map out the layout of your system. This involves considering factors such as the water source and pressure in your area, creating a zone map based on water needs and plant types, and determining the number and placement of sprinkler heads. In this article, we will explore each of these aspects in detail.
Consider The Water Source And Pressure In Your Area
Before you start designing your sprinkler system, it’s important to have a good understanding of the water source and pressure in your area. This will help you determine if any modifications or adjustments are needed to ensure optimal water distribution.
To gather this information, you can contact your local water authority or conduct a water pressure test. The water pressure test involves attaching a pressure gauge to an outdoor faucet and turning on the water. Ideally, your water pressure should be between 40 and 60 PSI (pounds per square inch) for efficient sprinkler operation.
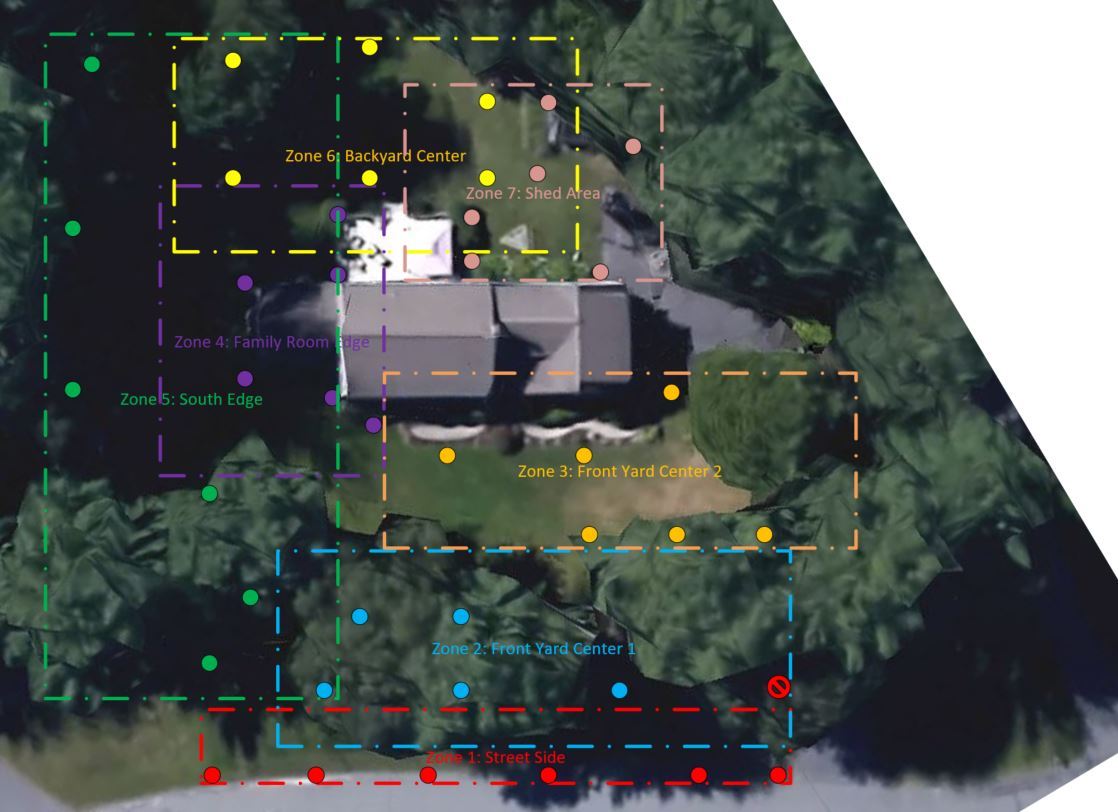
Create A Zone Map Based On Water Needs And Plant Types
Next, it’s essential to create a zone map that takes into account the water needs and plant types in different areas of your garden or lawn. This will help you ensure that each plant receives the appropriate amount of water without wasting any resources.
Start by dividing your outdoor space into zones. Zones can be based on factors such as sun exposure, soil type, or plant type. For example, you might want to create separate zones for your lawn, flower beds, and vegetable garden. Each zone should have similar irrigation requirements.
Once you have identified the zones, determine the water needs of the plants within each zone. Some plants require more water than others, so it’s important to consider their specific needs. This information can usually be found on plant tags or through online research.
Use this information to create a zone map that indicates the water requirements for each area. This will serve as a guide when determining the duration and frequency of watering for each zone.
Determine The Number And Placement Of Sprinkler Heads
Now that you have a zone map in place, it’s time to determine the number and placement of sprinkler heads. This step is crucial as it ensures that each area within a zone receives the right amount of water.
When deciding on the number of sprinkler heads, consider the water distribution pattern of the sprinkler heads you plan to use. This will depend on factors such as the size and shape of the area to be watered. You want to make sure that the sprinkler heads overlap slightly to eliminate any dry spots.
When it comes to the placement of sprinkler heads, aim for uniform coverage within each zone. Avoid placing sprinkler heads too close to walls, fences, or other obstacles that may block the water. Additionally, ensure that the sprinkler heads are positioned in a way that does not result in water wastage or runoff.
By carefully planning the layout of your sprinkler system and considering factors such as the water source, zone map, and sprinkler head placement, you can create an efficient and effective irrigation system for your garden or lawn. Taking the time to plan ahead will ensure that your plants thrive while conserving water resources.
Gathering The Necessary Tools And Materials
Gathering the necessary tools and materials is an essential step when it comes to mapping out a sprinkler system. By having all the required equipment and supplies ready, you can ensure a smooth and efficient installation process. In this section, we will discuss how to research the types of sprinkler heads and system components available, make a list of the materials needed for installation, and gather all the necessary tools for the job.
Research The Types Of Sprinkler Heads And System Components Available
Before starting the installation process, it is crucial to research and understand the different types of sprinkler heads and system components available. This knowledge will help you choose the most appropriate options based on your specific needs and preferences.
When it comes to sprinkler heads, there are several types to consider, including fixed spray heads, rotary heads, drip emitters, and pop-up spray heads. Each type has its own unique features and advantages, so it is important to research and select the one that best suits your landscape layout and watering requirements.
Additionally, you should familiarize yourself with the various system components such as valves, pipes, fittings, and timers. Understanding how these components work together will ensure a well-designed and functional sprinkler system.
Make A List Of The Materials Needed For Installation
To install a sprinkler system efficiently, it is essential to make a detailed list of the materials required. This will prevent any unnecessary trips to the store during the installation process.
Here is a comprehensive list of materials commonly needed for sprinkler system installation:
| Materials | Quantity |
|---|---|
| Sprinkler heads | Depending on the number of zones |
| Pipes | Based on the length and layout of the area to be irrigated |
| Valves | 1 per zone |
| Fittings | Varies based on the complexity of the system |
| Timer/controller | 1 |
| Backflow preventer | 1 |
| Pipe tape | As needed |
| Wire connectors | As needed |
| Shovels | 1 or more |
| Trencher or pipe cutter | 1 |
Gather All The Necessary Tools For The Job
Once you have your list of materials, it’s time to gather all the necessary tools to ensure a successful installation. Having the right tools on hand will make the process faster and more efficient.
Here is a list of tools commonly needed for sprinkler system installation:
- Shovels
- Trencher or pipe cutter
- Utility knife
- Tape measure
- Screwdriver
- Adjustable wrench
- Pipe wrench
- Wire strippers
- Wire connectors
- Channel locks
Having these tools readily available will save you time and effort during the installation process.
Installing The Sprinkler System
Setting up a sprinkler system not only adds convenience to your gardening routine but also ensures that your plants receive the right amount of water they need. Proper installation is crucial to the functionality and effectiveness of your sprinkler system. In this section, we will guide you through the process of installing the system step-by-step, covering everything from digging trenches to adjusting sprinkler heads. Let’s get started!
Digging Trenches For Pipes And Laying Them Out According To The Zone Map
Before you can lay out the pipes for your sprinkler system, you’ll need to dig trenches where the pipes will be placed. The trenches should be deep enough to accommodate the pipes and any necessary conduit. Here’s how you can ensure a precise and efficient layout:
- First, consult your zone map to determine the location of each zone in your landscape. Zones are areas that require different watering schedules based on factors like sun exposure and plant type.
- With the zone map in hand, start digging the trenches accordingly. Pay close attention to the layout of each zone, ensuring that the pipes will run to the correct areas. Remember to dig deeper trenches in areas that require greater water flow.
- Once the trenches are dug, carefully lay out the pipe system according to the zone map. Place the pipes in the trenches, making sure they follow the planned route for each zone.
- Secure the pipes in place by filling the trenches with soil, gently compacting it to prevent shifting or damage to the pipes.
Following this careful approach to trenching and pipe layout will help you avoid any future headaches when it comes to maintenance or repairs.
Installing Valves, Backflow Preventers, And Other Components
In order to ensure proper water flow and control for your sprinkler system, it’s essential to install valves, backflow preventers, and other components. Here are the steps to take:
- Locate the main water supply line for your sprinkler system and install the necessary valves near its connection point. Valves allow you to control the flow of water to different zones, making it easier to manage and conserve water.
- Next, install a backflow preventer to protect your drinking water supply from any potential contamination. This device prevents water from flowing back into the main water supply, ensuring its safety.
- Lastly, install any additional components such as pressure regulators or filters that may be necessary for optimal performance and water quality.
- Once all the components are securely installed, ensure they are properly connected to the pipe system.
By following these steps, you can rest assured that your sprinkler system is equipped with the necessary components to function effectively and efficiently.
Connecting The Sprinkler Heads And Adjusting Their Direction
The final step in installing your sprinkler system is connecting the sprinkler heads and adjusting their direction to ensure proper water distribution. Here’s how you can do it:
- Begin by attaching the sprinkler heads to the pipes using the appropriate connectors. Make sure to choose sprinkler heads suitable for your landscape’s needs, considering factors like water distance and spray pattern.
- Once the sprinkler heads are attached, adjust their direction to cover the desired area. This can typically be done by manually rotating the head or using any adjustment features provided by the manufacturer.
- Test each sprinkler head after adjusting its direction to ensure that the water distribution is even and reaching the intended areas.
By following these steps, you can confidently install your sprinkler system and begin to enjoy the benefits of a well-maintained and efficient irrigation system.
Testing And Maintenance
Testing and maintenance are crucial steps to ensuring the efficient operation of your sprinkler system. Regular testing allows you to identify any leaks or issues with water distribution, while proper maintenance keeps the system in top condition. In this section, we will discuss how to test the system for leaks and proper water distribution, set up an irrigation schedule, and perform regular maintenance tasks.
Test The System For Leaks And Proper Water Distribution
Before you start using your sprinkler system, it’s important to test it for any leaks or problems with water distribution. Here’s a step-by-step guide to help you:
- Inspect the sprinkler heads: Check each sprinkler head for visible leaks or damage. Replace any damaged or malfunctioning heads.
- Run a system check: Turn on the sprinklers and observe their performance. Make sure that all areas of your lawn are receiving adequate water coverage. If you notice any dry spots or uneven distribution, you may need to adjust the sprinkler heads accordingly.
- Perform a pressure test: Use a pressure gauge to measure the water pressure at various points in the system. Abnormally low or high pressure readings may indicate a problem that needs to be addressed.
- Check for leaks: Inspect all pipe connections and valves for leaks. To identify underground leaks, you can perform a leak detection test by turning off the system and checking the water meter for any movement. If the meter continues to spin, there may be a hidden leak.
Set Up An Irrigation Schedule And Adjust As Necessary
An irrigation schedule ensures that your sprinkler system delivers water to your lawn and plants at the right times and in the right amounts. Here’s how to set up an effective schedule:
- Consider local water regulations: Check your local water regulations to determine the allowed watering days and times. Adhering to these regulations helps conserve water resources and avoids penalties.
- Know your plants’ watering needs: Different plants have different water requirements. Group them based on their water needs and create separate zones in your irrigation schedule.
- Calculate the run time: Calculate the amount of time it takes for your sprinklers to deliver the desired amount of water to each zone. This can vary depending on factors such as soil type and weather conditions.
- Program your irrigation controller: Use your irrigation controller to set up the watering start times and durations for each zone. Regularly monitor the weather and adjust the schedule as necessary to account for rainfall or changes in temperature.
Perform Regular Maintenance Tasks Such As Cleaning And Winterizing
Regular maintenance is essential to keep your sprinkler system running smoothly. Here are some important tasks to include in your maintenance routine:
- Cleaning the sprinkler heads: Over time, dirt and debris can accumulate on the sprinkler heads, affecting their performance. Regularly clean the heads to ensure proper water distribution.
- Checking the valves: Inspect the valves for any signs of damage or debris. Clean or replace the valves if necessary to prevent leaks or malfunctions.
- Winterizing the system: Before the freezing temperatures arrive, it’s important to winterize your sprinkler system to prevent damage. This involves draining the water from the system and insulating the pipes to protect them from freezing.
- Regular inspections: Periodically inspect the entire system for any signs of leaks, damaged pipes, or other issues. Address any problems promptly to prevent further damage.
Frequently Asked Questions On How To Map Out Sprinkler System
How Do You Layout A Sprinkler System?
To layout a sprinkler system, follow these steps: 1. Plan the layout according to the area’s size and water pressure. 2. Determine the types and quantities of sprinkler heads needed. 3. Calculate the water flow rate and pressure required. 4.
Mark the locations for the sprinkler heads and main water line. 5. Install the main water line and connect the sprinkler heads accordingly.
How Do I Find My Sprinkler Lines Without Digging?
To find your sprinkler lines without digging, you can try these methods: 1. Use a metal detector to locate any metal parts along the lines. 2. Consult your sprinkler system map or blueprints for guidance. 3. Look for signs of irrigation, such as wet patches or lush vegetation.
4. Hire a professional who specializes in locating underground utilities. 5. Consider using specialized equipment like ground penetrating radar or video inspection.
How Do I Know How Many Sprinklers I Need Per Zone?
To determine the number of sprinklers needed per zone, measure the total area requiring irrigation. Divide this by the coverage area of each sprinkler, typically listed on the packaging. This calculation will give you the approximate number of sprinklers needed per zone.
How Do I Find My Sprinkler System In My Yard?
To find your sprinkler system in your yard, visually locate the sprinkler heads that emerge from the ground. They are typically round or rectangular and have a small cap or nozzle on top. You may also see pipes or hoses leading to the sprinkler heads.
Conclusion
To successfully map out your sprinkler system, you need to consider factors such as the size and shape of your lawn, water pressure, and available water sources. By following the step-by-step guide in this blog post, you can optimize the efficiency and effectiveness of your sprinkler system.
Remember to take measurements, plan the layout, and prioritize watering zones. With proper mapping, you can ensure that every corner of your lawn receives the right amount of water, avoiding wastage and promoting healthier landscapes. Happy sprinkler mapping!