To attach greenhouse plastic to a wood frame, use a stapler or nails to secure the plastic tightly. A well-fitted covering will prevent leaks and protect your plants effectively.
Properly attaching the plastic to the wood frame is essential for the successful functioning of your greenhouse. Whether you are a gardening enthusiast or a professional grower, having a sturdy and secure attachment will ensure that your plants are shielded from the elements.
In this article, we will explore the steps involved in attaching greenhouse plastic to a wood frame, providing you with a clear understanding of how to accomplish this task seamlessly. By following these steps, you can create a well-insulated and protected environment for your plants to thrive.

The Importance Of Properly Attaching Greenhouse Plastic To A Wood Frame
The first step in attaching greenhouse plastic to a wood frame is to understand the importance of doing it properly. By ensuring a secure attachment, you can avoid issues such as air leakage and damage caused by weather conditions. Using a wood frame for your greenhouse offers several benefits.
Wood is a natural insulator, providing better temperature control and stability for your plants. Additionally, wood is readily available and relatively inexpensive compared to other framing materials. It is also easy to work with and allows for flexibility in design.
Constructing a wood frame for your greenhouse provides a sturdy and durable structure that can withstand the test of time. Taking the time to attach the plastic correctly to the wood frame will ensure a successful and efficient greenhouse environment for your plants.
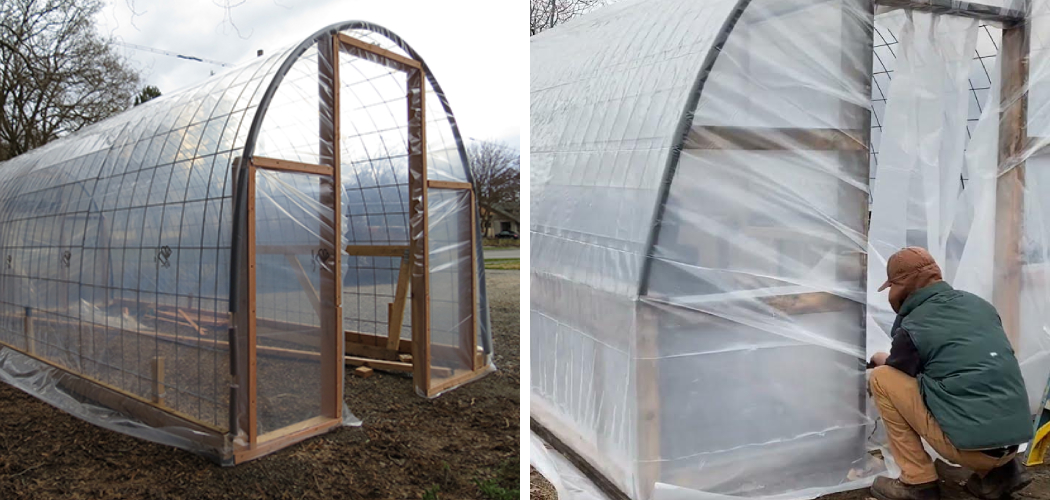
How to Attach Greenhouse Plastic to Wood Frame: Step by Step Guide
Choosing The Right Type Of Plastic For Your Greenhouse
Choosing the right type of plastic for your greenhouse is crucial for its overall performance and effectiveness. Factors to consider when selecting greenhouse plastic include durability, light transmission, uv resistance, and insulation properties. With different types of greenhouse plastic available in the market, it is important to carefully evaluate your options.
Look for plastic that is specifically designed for greenhouse use and can withstand the elements. Additionally, consider the climate and weather conditions in your area to ensure that the plastic can withstand high winds, heavy rain, and extreme temperatures. By choosing the right type of plastic, you can ensure that your greenhouse is properly sealed and provides optimal growing conditions for your plants.
Preparing The Wood Frame For Plastic Installation
Preparing the wood frame for plastic installation involves cleaning and inspecting the wood frame thoroughly. It is essential to remove any dirt, debris, or old plastic remnants from the frame. Additionally, check for any signs of damage or rot in the wood.
Once the frame is clean and dry, applying a protective sealant is crucial. This sealant will help to extend the life of the wood and prevent moisture damage. Ensure that the sealant is evenly spread on all exposed surfaces of the wood frame.
By following these steps, you can successfully prepare your wood frame for attaching greenhouse plastic, ensuring a secure and long-lasting installation.
Ensuring A Secure Attachment Of Plastic To The Wood Frame
To ensure a secure attachment of the plastic to the wood frame, there are a few tips for measuring and cutting the plastic. Firstly, accurately measure the dimensions of the wood frame and add a few inches on each side to allow for a snug fit.
Next, lay the plastic flat on the ground and use a measuring tape and marker to mark the desired length and width. Then, using a utility knife or a pair of sharp scissors, carefully cut along the marked lines. When attaching the plastic to the wood frame, it is recommended to use either stainless steel staples or screws.

Start by securing one corner of the plastic to the wood frame and gradually work your way around, pulling the plastic tightly as you go. Repeat this process for all sides, ensuring a firm and secure attachment.
Securing The Plastic On Corners And Edges
Securing greenhouse plastic to a wood frame is crucial for its effectiveness. When it comes to corners, there are specific techniques that can be employed. One method involves attaching the plastic tightly by overlapping and stapling it along the corners.
Alternatively, using greenhouse polyethylene tape can provide a secure and long-lasting attachment. For the edges, there are different ways to ensure proper fastening. One technique is to stretch the plastic tautly across the wood frame and secure it using screws or nails.
Another approach is to use specialized greenhouse plastic clips that slide onto the wood frame, holding the plastic securely. Finally, adding a layer of greenhouse sealant around the edges can provide added protection against drafts and moisture. Overall, employing these techniques will help to create a sturdy and well-insulated greenhouse structure without the need for excessive drilling or stapling.
Creating Ventilation Openings In The Plastic
Attaching greenhouse plastic to a wood frame requires proper ventilation openings. Ventilation is crucial in a greenhouse as it helps regulate temperature and humidity levels. When cutting and sealing these openings in the plastic, there are a few tips to keep in mind.
First, use a sharp utility knife to ensure clean and precise cuts. Next, consider the size and placement of the ventilation openings strategically. It’s important to balance air circulation without compromising the structural integrity of the greenhouse. Additionally, seal the edges of the plastic around the openings using a waterproof adhesive or tape to prevent any air leakage.
Regularly monitor and adjust the size of the openings as needed to maintain optimal airflow. Following these steps will ensure that your greenhouse remains well-ventilated and provides the ideal environment for your plants to thrive.
Maintaining And Repairing The Plastic Attachment
When attaching greenhouse plastic to a wood frame, regular maintenance is essential. It is crucial to inspect the plastic attachment regularly. Repair any damages or tears immediately to prevent further deterioration. Check for loose fasteners or worn-out clips and replace them promptly.
Trim any excess plastic to prevent it from becoming a safety hazard. It is vital to secure the plastic tightly to the wood frame to prevent wind damage. Regularly clean the plastic to remove dirt and debris, allowing maximum sunlight penetration.
Lastly, consider using uv-resistant plastic for longevity and durability. By following these steps, you can ensure the proper maintenance and repair of the plastic attachment on your greenhouse.
Additional Tips And Considerations
Attaching greenhouse plastic to a wood frame requires careful consideration and additional tips. One important consideration is the use of anti-drip additives to prevent condensation. By using these additives, you can protect your plants from excess moisture and potential damage.
Another tip to consider is insulating the greenhouse with bubble wrap or shade cloth. This will help regulate temperature and create a more stable growing environment. When attaching the plastic to the frame, make sure to use secure fasteners such as staples or screws to prevent any movement or damage.

Additionally, regularly inspect the plastic for tears or wear and replace it as needed to maintain the integrity of the structure. Overall, with the right techniques and attention to detail, you can successfully attach greenhouse plastic to a wood frame and create an optimal growing environment for your plants.
Troubleshooting Common Issues With Plastic Attachment
Attaching greenhouse plastic to a wood frame can sometimes pose challenges. One common issue is sagging or wrinkling of the plastic. To address this, ensure the plastic is stretched tight and properly secured to the frame. Regularly check for any signs of sagging or wrinkling, and adjust as necessary.
Another problem that may arise is loose or unstable plastic attachment. To overcome this, use strong fasteners such as screws or nails to firmly secure the plastic to the frame. Additionally, you can consider using adhesive tapes or clamps for added stability.
Regularly inspect the attachment points and make any necessary adjustments to maintain a secure and stable installation. Proper planning and attention to detail will ensure a successful attachment of greenhouse plastic to a wood frame.
Frequently Asked Questions On How To Attach Greenhouse Plastic To Wood Frame
Can You Explain The Process Of Attaching Greenhouse Plastic To A Wood Frame?
To attach greenhouse plastic to a wood frame, start by measuring and cutting the plastic to size. Then, secure it to the frame using staples, screws, or nails, ensuring it is taut and wrinkle-free. Finally, trim off any excess plastic and secure the edges with molding or weatherproof tape.
What Are The Benefits Of Using Plastic For A Greenhouse Covering?
Using plastic for a greenhouse covering offers several benefits. It is cost-effective, lightweight, and easy to install. Plastic also allows sunlight to pass through while providing insulation, and it is durable, resistant to uv rays, and offers protection against pests and extreme weather conditions.
What Type Of Plastic Is Most Suitable For A Greenhouse?
Polyethylene plastic is commonly used for greenhouse coverings. It is flexible, resistant to tearing, and provides good insulation properties. Look for greenhouse-grade polyethylene with uv protection to prolong its lifespan. A thickness of 4-6 mil is commonly recommended, but it ultimately depends on your specific climate and needs.
Conclusion
To summarize, attaching greenhouse plastic to a wood frame can be a straightforward yet crucial step in creating an effective growing environment for your plants. By following the simple methods discussed in this blog post, you can ensure a secure and durable attachment that will withstand various weather conditions.
Remember to start by preparing the wood frame, including cleaning and treating it for longevity. Next, choose the appropriate plastic and accurately measure and cut it to fit the frame. Additionally, use a combination of fasteners and adhesives to secure the plastic tightly, minimizing any gaps or openings.
Regular maintenance and inspections will help identify any issues early on and ensure your greenhouse remains intact and functional. By mastering this skill, you’ll be on your way to creating a successful greenhouse that nurtures your plants and supports their growth for years to come.