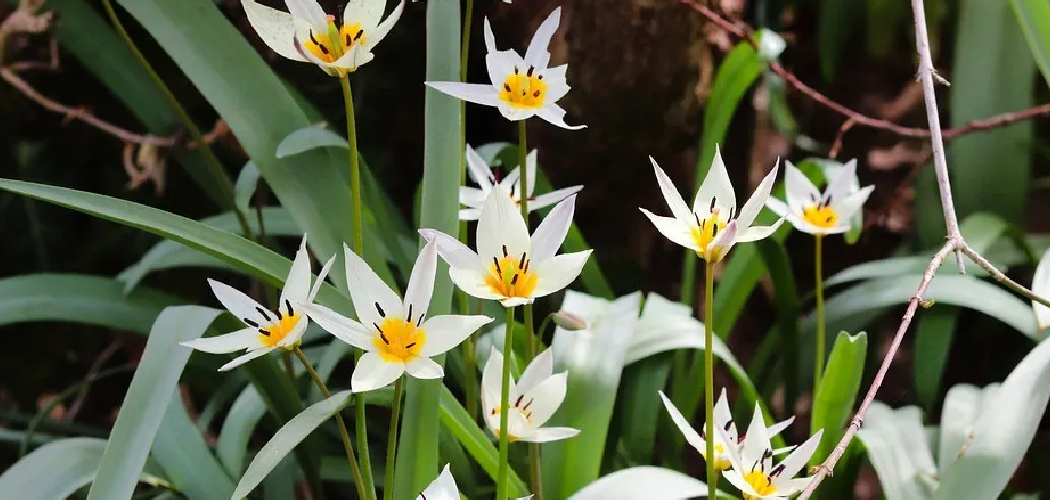
To care for tulips after bloom, cut off the dead flowers and let the foliage die back naturally. After the foliage turns yellow, you can remove it and store the bulbs for the next planting season.
Proper care ensures healthy bulbs and beautiful blooms year after year. Tulips, with their vibrant colors and elegant shape, are a beloved addition to any garden. But what should you do once the blooms have faded? Knowing how to care for tulips after bloom is crucial to ensuring their long-term health and continued beauty.

We will guide you through the essential steps to take in order to give your tulips the care they deserve. From properly removing the dead flowers to allowing the foliage to wither naturally, we will explore the optimal post-bloom care for your tulip bulbs. By following these simple tips, you can ensure that your tulips will thrive and delight you with their gorgeous blooms for years to come.
Why Is After Bloom Care Important?
Preserving the health and vigor of your tulip bulbs is essential for ensuring successful blooming next year. After the beautiful blooms have faded, it’s important to provide proper care to the plants to help them recover and prepare for the next growing season. By following these care tips, you can ensure that your tulips remain healthy and continue to produce vibrant blooms year after year:
- Once the flowers have wilted, remove them carefully to prevent seed production. This will allow the plant to conserve energy for bulb development.
- Continue to water the soil thoroughly, especially during dry spells, to keep the bulbs hydrated. However, avoid overwatering, as excessive moisture can lead to rot.
- Apply a balanced fertilizer to the soil to provide essential nutrients for the bulbs. Avoid using high-nitrogen fertilizers, as they can promote foliage growth at the expense of bulb development.
- Allow the foliage to naturally wither and yellow before removing it. This process helps the bulb store energy for next year’s growth.
- Consider mulching the soil around the bulbs to help regulate temperature and retain moisture. Mulch can also provide protection against extreme weather conditions.
- Regularly monitor and control pests and diseases that can harm the bulbs. Inspect the plants for any signs of damage and take necessary steps to mitigate the risks.
By following these post-bloom care guidelines, you can ensure the longevity and success of your tulips, allowing them to delight you with their vibrant colors year after year.
How to Care Tulips After Bloom : Step by Step Guide
Removing The Spent Flowers
Once your tulips have finished blooming, it is important to remove the spent flowers to encourage healthy growth and prevent the plant from wasting energy on seed production. Deadheading, or removing faded flowers, is a simple and effective method for achieving this. One method for deadheading tulip blooms is to wait until the petals have fallen off and the bulb has started to brown.
At this point, use sharp scissors or pruners to cut the stem about an inch above the ground. This will not only remove the unsightly spent flowers but also help redirect the plant’s energy towards bulb development for the next year. Another method is to snap off the faded blooms by hand, being careful not to damage the other buds or leaves. Dispose of the removed flowers and stems in a compost pile or bin.
By regularly deadheading your tulips, you can help prolong the blooming period and improve the overall appearance of your garden. Removing the spent flowers also prevents the plant from self-seeding, which can lead to overcrowding and reduced flower production. Additionally, this process allows the plant to focus its energy on storing nutrients in the bulb for future growth.
Allow The Foliage To Wither Naturally
Leaving the foliage intact is of utmost importance when it comes to caring for tulips after they bloom. The green leaves play a crucial role in the tulip’s growth and development. They carry out photosynthesis, a process where sunlight is converted into food and energy, which is stored in the bulb. During this time, the leaves absorb nutrients from the sun and surrounding environment, ensuring the bulb receives the necessary nourishment for the next blooming season.
Trimming The Foliage
Proper foliage trimming is essential to ensure healthy tulip bulbs for next year. When and how you trim the foliage can impact the bulb’s ability to store energy for future growth. Here are some tips for trimming tulip foliage:
- Timing: Wait until the foliage turns yellow and starts to wither before you begin trimming. This usually occurs around 6 weeks after the tulip blooms.
- Method: Use clean, sharp garden shears to avoid damaging the leaves. Cut the foliage back to about 2-3 inches above the ground.
- Leave the stems intact: Removing the entire stem can lead to rot and disease. It’s important to leave the stem attached to the bulb.
- Don’t tie or braid the foliage: Contrary to popular belief, tying or braiding tulip foliage can restrict the bulb’s ability to collect sunlight and nutrients.
- Dispose properly: After trimming, collect and dispose of the foliage away from the garden to prevent the spread of diseases and pests.
By following these guidelines, you can ensure that your tulip bulbs have a better chance of storing enough energy to produce beautiful blooms next spring.
Watering And Irrigation
Proper watering is crucial for caring for tulips after they bloom. Watering needs may vary depending on factors such as weather conditions and soil type. The key is to provide adequate moisture to support the tulip’s recovery and prepare it for the next growing season.
- Check soil moisture regularly by inserting your finger into the soil. If it feels dry about an inch below the surface, it’s time to water.
- Water deeply but infrequently. A thorough watering once or twice a week is generally sufficient.
- Avoid overwatering, as it can lead to root rot and other diseases.
- Consider using a soaker hose or drip irrigation system to deliver water directly to the root zone, minimizing evaporation.
- Apply mulch around the base of the tulips to help retain moisture and prevent weed growth.
- Water in the early morning or late afternoon to minimize evaporation and give the tulips ample time to dry before nighttime.
Fertilizing The Bulbs
After the tulips have bloomed, it is important to nourish the bulbs to ensure healthy growth and beautiful blooms for the following season. Fertilizing the bulbs is a crucial step in maintaining their vitality. Tulip bulbs require a sufficient supply of nutrients to replenish their energy reserves after flowering.
When choosing a fertilizer for tulip bulbs, opt for those specifically formulated for flowering plants or bulbs. Look for a balanced or slow-release fertilizer with a higher phosphorous content. Phosphorous aids in root development, which is vital for bulb growth.
You can choose from various types of fertilizers suitable for tulip bulbs, including granular, liquid, or organic options. Granular fertilizers can be sprinkled around the base of the plants, ensuring the nutrients reach the bulbs. Liquid fertilizers can be diluted with water and applied as a foliar feed. Organic options such as compost or well-rotted manure not only provide essential nutrients but also improve soil structure and fertility.
Feeding the tulip bulbs after blooming helps to replenish their nutrient reserves and ensures vigorous growth and abundant blooms in the next season. Remember to follow the product instructions and apply the fertilizer at the recommended rate for optimal results.
Managing Pests And Diseases
After the beautiful bloom of your Tulips, it is important to care for them properly to ensure their health and productivity. One aspect of caring for Tulips involves managing pests and diseases. Identifying common pests that attack tulip bulbs is crucial for effective pest control.
Keep an eye out for pests such as aphids, slugs, and nematodes. Aphids can be controlled by spraying the affected plants with water or applying insecticidal soap. For slugs, you can create barriers using crushed eggshells or apply organic slug pellets. Nematodes, on the other hand, can be reduced by ensuring the soil is well-drained and improving soil fertility.
Preventive measures play a vital role in disease control for Tulips. Proper planting depth and spacing can help reduce the risk of fungal diseases. Ensure that bulbs are planted at the recommended depth and are adequately spaced to promote good air circulation. Grant the plants enough sunlight and avoid overwatering. Remove and destroy any infected foliage promptly to prevent the spread of disease. Applying fungicides can also provide additional protection against common Tulip diseases.
Preparing Bulbs For Storage
To ensure the longevity of your tulip bulbs and their ability to bloom again next year, it is crucial to properly prepare them for storage. Follow these steps for optimal bulb storage:
- 1. Digging up bulbs: After the tulip blooms have faded and the foliage turns yellow or brown, carefully dig up the bulbs using a garden fork or shovel. Be cautious not to damage the bulbs in the process.
- 2. Cleaning bulbs: Gently remove excess soil from the bulbs. Avoid washing them, as this can increase the risk of rotting during storage. Allow them to dry naturally instead.
- 3. Trimming foliage: Cut off the wilted or yellowed foliage, leaving about an inch of stem attached to the bulb. This helps the bulb retain essential nutrients for next year’s bloom.
- 4. Sorting and inspecting: Discard any bulbs that show signs of disease or damage. Only store healthy, firm bulbs that are free of blemishes.
- 5. Storing bulbs: Choose a cool, dry, and well-ventilated location for bulb storage. Place the bulbs in a breathable container such as a mesh bag or wooden crate. Avoid plastic bags, as they trap moisture and promote rot.
| Condition | Temperature | Humidity |
|---|---|---|
| Cool | 35-50°F (2-10°C) | 50-60% |
| Dry | Absence of moisture | – |
| Well-ventilated | Air circulation | – |
Replanting Tulip Bulbs
Choosing the right time for replanting tulip bulbs is crucial for their continued health and growth. After the blooming season, it is important to wait until the foliage turns yellow and dies back completely. This typically occurs around 6 weeks after flowering. At this point, the bulbs have stored enough energy for the next year’s growth.
When replanting your tulip bulbs, a proper technique is essential. Start by digging a hole that is 3 times the height of the bulb. Place the bulb in the hole with the pointed end facing upwards. The depth of the hole should be about 8 inches. Backfill the hole with soil, making sure there are no air pockets left.
Water the newly planted bulbs thoroughly and cover the area with a layer of mulch to help retain moisture and regulate soil temperature. Avoid overwatering as this can lead to bulb rot. With proper care, your tulips will continue to bloom beautifully year after year.
Maintaining Soil Health
When caring for tulips after bloom, maintaining soil health is crucial to ensure the long-term success of these beautiful flowers. One important aspect of soil health is proper soil preparation for tulip bulb planting. Before planting the bulbs, it is recommended to add organic matter to the soil. This improves the soil structure, helps with water retention, and provides essential nutrients for the bulbs.
Organic matter can be added in the form of compost, well-rotted manure, or leaf mold. These materials enrich the soil and promote the growth of beneficial organisms. Prior to planting, it is recommended to mix the organic matter into the top layer of the soil. This not only improves soil fertility but also enhances drainage, preventing the bulbs from rotting.
By taking the time to prepare the soil properly and adding organic matter, you can ensure that your tulip bulbs have the best possible start. This will contribute to their overall health and longevity, allowing you to enjoy their vibrant blooms year after year.
Monitoring Growth And Bloom
After the bloom of your tulips, it is important to continue caring for them to ensure their health and maximize their bloom for the following season. One of the key aspects of this care is monitoring the growth and bloom of your tulips. By observing the growth of your tulips, you can identify any potential issues that may arise and take appropriate action to address them.
Pay attention to the size and color of the leaves, as well as the formation of the bulbs. Prune yellow or damaged leaves to promote better growth. Keep an eye out for pests or diseases and take necessary measures to control them. Additionally, observe the duration of blooming and the quality of the flowers.
To maximize bloom next season, it is recommended to deadhead the tulips as soon as they start fading. This helps redirect energy back into the bulb for future growth. Also, consider adding a slow-release fertilizer to provide essential nutrients for healthy bulb development.
By closely observing the growth of your tulips and taking necessary care, you can ensure their well-being and enjoy vibrant blooms year after year.
Frequently Asked Questions Of How To Care Tulips After Bloom
Can I Leave Tulip Bulbs In The Ground All Year?
Yes, you can leave tulip bulbs in the ground all year. Tulips are perennial plants that can withstand cold winters. Keeping them in the ground ensures proper growth and bloom in the following year. It’s important to provide enough drainage and protect them from extreme temperatures and pests.
Should You Cut Down Tulips After They Bloom?
Yes, it is recommended to cut down tulips after they bloom. Removing the spent flowers helps redirect the energy into bulb growth. Cut the stem a few inches above the ground, and leave the foliage to wither naturally. This promotes healthier bulbs for next year’s blooms.
Can I Leave Tulip Bulbs In Pots After Flowering?
Yes, you can leave tulip bulbs in pots after flowering. However, it’s important to let the foliage die naturally to allow the bulb to store energy for the next year. Keep the pot in a cool, dark place and avoid overwatering.
Remember to provide proper care to ensure healthy blooms next season.
Do Tulips Flower More Than Once?
Yes, tulips flower more than once. They are perennial plants that go through a rest period after blooming, then resume flowering in subsequent years.
Conclusion
To ensure the longevity of your tulips after they bloom, give them the care they deserve. By deadheading spent flowers, providing adequate moisture, and protecting them from harsh weather conditions, you can ensure the health and vitality of your tulip bulbs.
Remember to remove any foliage after it turns yellow and avoid excessive fertilization. With proper care, you can enjoy the beauty of your tulips year after year. Happy gardening!