Are you tired of seeing brown spots on your plants? Worry not, here are some practical ways to cure brown spots and keep your plants healthy and thriving.
Brown spots on plants can be a frustrating issue for gardeners and plant enthusiasts alike, as they often indicate problems such as fungal infections, pests, or environmental stress.

These unsightly blemishes not only affect the plant’s appearance but can also hinder its health and growth if left untreated. Fortunately, with proper care and timely intervention, it is possible to cure brown spots and restore your plants to their vibrant, healthy state.
This guide on how to cure brown spot on plants will introduce you to practical methods for identifying the cause of brown spots and practical steps to treat and prevent them.
What Are the Benefits of Curing Brown Spots on Plants?
Curing brown spots on plants not only improves their appearance but also offers several benefits for the plant’s health and growth. Here are some advantages of effectively treating brown spots on plants:
- Promotes Healthy Growth: By addressing the underlying issue causing brown spots, you can help your plant regain its vigor and encourage healthy growth.
- Prevents Further Damage: If left untreated, brown spots can spread and cause more significant damage to the affected plant. By curing them promptly, you can prevent this damage from worsening.
- Boosts Immunity: Brown spots are often a sign of stress or disease in plants. Proper treatment can boost the plant’s immune system and make it more resilient to future issues.
- Encourages Proper Care: Dealing with brown spots requires proper care and attention, such as watering, fertilizing, and pruning. By addressing the issue, you are also encouraging yourself to provide better care for your plants in general.
What Will You Need?
In order to treat and prevent brown spots, you will need a few essential items:
- Pruning Shears: These are essential for removing damaged or infected leaves and branches.
- Fertilizer: Select a fertilizer tailored to your plant’s specific needs and follow the recommended usage instructions.
- Watering Can: Proper watering is key to preventing further damage. A watering can allows for controlled and precise watering.
- Pesticides or Fungicides: If the brown spots are caused by pests or fungus, you may need to use a specific pesticide or fungicide to eliminate them.
- Gloves: It’s always best practice to wear gloves when handling plants, especially if you’re using pesticides or fungicides.
- Pruning Shears: If the brown spots are on the leaves themselves, pruning shears may be necessary to remove them and promote new growth.
- Sunlight: Ensure your plant receives the optimal amount of sunlight. Some plants may need more or less light than others, so do your research on your specific plant’s needs.

10 Easy Steps on How to Cure Brown Spot on Plants
Step 1. Identify the Cause:
The first and most crucial step in treating brown spots on plants is understanding the cause of the. Brown spots can be attributed to a variety of factors, such as fungal infections, bacterial diseases, pest infestations, overwatering, underwatering, or even sunburn caused by excessive exposure to direct sunlight.
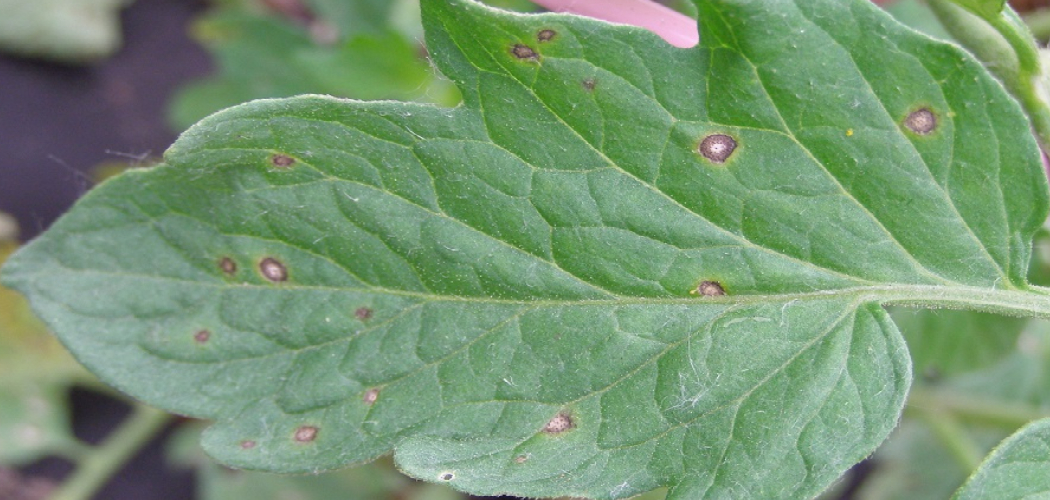
Scrutinize the plant to identify specific symptoms. For example, fungal infections often result in circular, discolored patches with a distinct border, while pests like spider mites may leave speckled spotting with visible webbing. Additionally, consider recent changes to your plant’s environment or care routine, as these might provide clues.
Step 2. Inspect Leaves and Soil:
Begin by closely examining the leaves, both on the top and underside, as this is where many pests and issues tend to manifest. Look out for signs such as discoloration, holes, sticky residue, or the presence of insects. Pay special attention to younger leaves, as they are often more vulnerable to damage. The texture of the leaves can also provide essential clues; for instance, dryness or brittleness could indicate underwatering or low humidity, while a soft, mushy texture might suggest overwatering or rot.
Step 3. Prune Affected Leaves:
Pruning affected leaves is an essential step in maintaining the overall health and appearance of your plant. Begin by using a pair of clean, sharp scissors or gardening shears to remove any leaves that show signs of significant damage or disease. This includes leaves that are severely discolored, heavily infested with pests, or exhibiting advanced rot.
Make your cuts as close to the base of the leaf as possible without damaging the main stem. Removing these leaves not only prevents the spread of pests and diseases but also allows the plant to redirect its energy toward healthy growth.
Step 4. Adjust Watering Practices:
Proper watering is crucial to maintaining the health of your plant and preventing issues such as root rot or dehydration. Assess the specific water needs of your plant, as different species require varying levels of moisture. Check the top inch of soil regularly; if it feels dry, it may be time to water.
Be sure to water thoroughly, allowing excess water to drain from the bottom of the pot, but avoid letting the plant sit in standing water. Adjust your watering schedule seasonally, as plants often require less water during cooler months and more frequent hydration during periods of active growth. Monitoring soil moisture and observing your plant’s overall condition can help you refine your watering practices over time.

Step 5. Improve Air Circulation:
Proper air circulation is essential for maintaining the health of your plants and preventing issues such as mold, mildew, and pests. Ensure your plants are spaced apart to allow adequate airflow around their leaves and stems. Consider using a small fan in indoor spaces to enhance circulation, especially in areas with limited natural airflow.
Regularly pruning and removing dead or overcrowded foliage can also help improve air circulation and ventilation. By fostering a well-ventilated environment, you can create optimal growing conditions that support the overall well-being of your plants.
Step 6. Treat with Fungicide if Needed:
If you notice signs of fungal infections, such as discolored spots, powdery residues, or wilting leaves, consider using a fungicide to address the issue. Start by identifying the specific type of fungus affecting your plants, as this will help you choose the most effective treatment. Always follow the instructions on the fungicide label carefully to ensure safe and proper application.
Organic or natural fungicides, such as neem oil or baking soda mixtures, can be excellent alternatives for those seeking eco-friendly solutions. Apply the fungicide during early morning or late evening hours to avoid potential damage caused by direct sunlight. Regular monitoring after treatment is crucial to ensure the fungus has been effectively managed, allowing your plants to recover and thrive.
Step 7. Inspect for Pests:
Regularly inspecting your plants for pests is a vital step in maintaining their health and vitality. Check both the upper and lower sides of leaves, stems, and soil for any signs of infestation, such as discolored leaves, holes, or sticky residue. Common pests include aphids, spider mites, and whiteflies, which can cause significant damage if left untreated.
Use a magnifying glass if necessary to spot smaller insects. If pests are detected, remove them manually or apply an appropriate treatment, such as insecticidal soap or neem oil, to control their spread. Early detection and prompt action are crucial for preventing pests from compromising the well-being of your plants.

Step 8. Check Sunlight Exposure:
Ensure that your plants are receiving the appropriate amount of sunlight based on their specific needs. Most plants have particular sunlight requirements, ranging from full sun to partial shade. Observe the light patterns in the area where your plants are placed and compare these with the recommendations for each plant species. If a plant appears to be struggling, such as showing signs of scorching or stunted growth, it may be receiving too much or too little sunlight. Adjust their placement as needed to optimize their health and development.
Step 9. Fertilize Wisely:
Using the right fertilizer is essential for providing your plants with the nutrients they need to thrive. Before applying fertilizer, identify the specific requirements of your plants and consider conducting a soil test to determine nutrient deficiencies. Use a balanced fertilizer or one tailored to your plant’s needs, and always follow the recommended application rates to avoid over-fertilizing, which can harm plants and the environment. Apply fertilizer during the active growing season and water your plants afterward to help the nutrients absorb into the soil effectively.
Step 10. Monitor Progress:
Regularly check your plants for signs of growth, health, and potential issues such as pests, diseases, or nutrient deficiencies. Keep an eye on the color, size, and overall appearance of the leaves and stems, as these often indicate the plant’s condition.
Maintain a schedule for watering, pruning, and fertilizing, and adjust care routines accordingly based on seasonal changes and environmental conditions. Documenting your observations in a garden journal can help track progress and identify trends over time. Monitoring ensures you catch problems early and keep your plants thriving.
By following these general principles of plant care, you can create a beautiful and healthy garden that brings joy and satisfaction.

Conclusions
How to cure brown spot on plants, it’s essential to start by identifying the underlying cause, whether it’s fungal, bacterial, or due to environmental stress.
Remove any infected leaves or plant material to prevent the disease from spreading. Ensure your plants are well-ventilated by spacing them adequately and pruning as needed to improve airflow. Avoid overhead watering, as excess moisture on leaves can promote fungal growth. Instead, water the base of the plant early in the day.
Applying an appropriate fungicide or treatment recommended for your specific plant species can also help manage the issue effectively. Consistent care and monitoring will significantly reduce the recurrence of brown spots.