To cut milk jugs for winter sowing, use a sharp utility knife or scissors. When it comes to starting seeds for winter sowing, milk jugs can be a cost-effective and efficient option.
By repurposing milk jugs, you can create mini greenhouses that protect your seeds from harsh winter conditions while providing them with the necessary warmth and moisture to germinate. However, cutting milk jugs can be a bit tricky if you’re not familiar with the process.
Credit: www.finchandfolly.com
We will provide you with a step-by-step guide on how to cut milk jugs for winter sowing in a way that ensures the best results for your seeds. So let’s get started and learn how to prepare your milk jugs for successful winter sowing!
Why Milk Jugs Are Ideal For Winter Sowing
When it comes to winter sowing, milk jugs are an excellent choice. Not only are they cost-effective and readily available, but they also provide numerous benefits for your plants. One of their greatest advantages is their ability to serve as excellent weatherproof containers. Milk jugs are designed to withstand various weather conditions, protecting your seeds from the harsh elements of winter.
Furthermore, milk jugs allow for effective ventilation and insulation. Their design enables proper air circulation while preserving heat, creating an ideal environment for seed germination and growth. The semi-transparent material of the jugs also allows sunlight to penetrate, promoting healthy development.
Using milk jugs for winter sowing is a practical and efficient method that ensures the success of your gardening endeavors. So gather those empty milk jugs and get ready to give your seeds the perfect start for the winter season!
Gathering The Necessary Tools And Materials
Gathering the necessary tools and materials for cutting milk jugs for winter sowing is essential to ensure a successful gardening process. Start by collecting clean and empty milk jugs which will serve as the containers for your winter sowing project. You will also need a utility knife or scissors to cut the milk jugs, allowing for proper ventilation and seed growth. Use a permanent marker to label each milk jug with the type of seeds you will be sowing.
In addition, you’ll require potting soil as the growing medium for your seeds, ensuring they receive the necessary nutrients for healthy growth. Choose seeds suitable for winter sowing, as these are hardy plants that can withstand colder temperatures. Finally, have a watering can or spray bottle handy to provide moisture to the seeds and keep the soil damp.
With the right tools and materials in hand, you’ll be well-prepared to embark on your winter sowing journey and successfully cut milk jugs for this gardening technique.
How to Cut Milk Jugs for Winter Sowing : Step by Step Guide
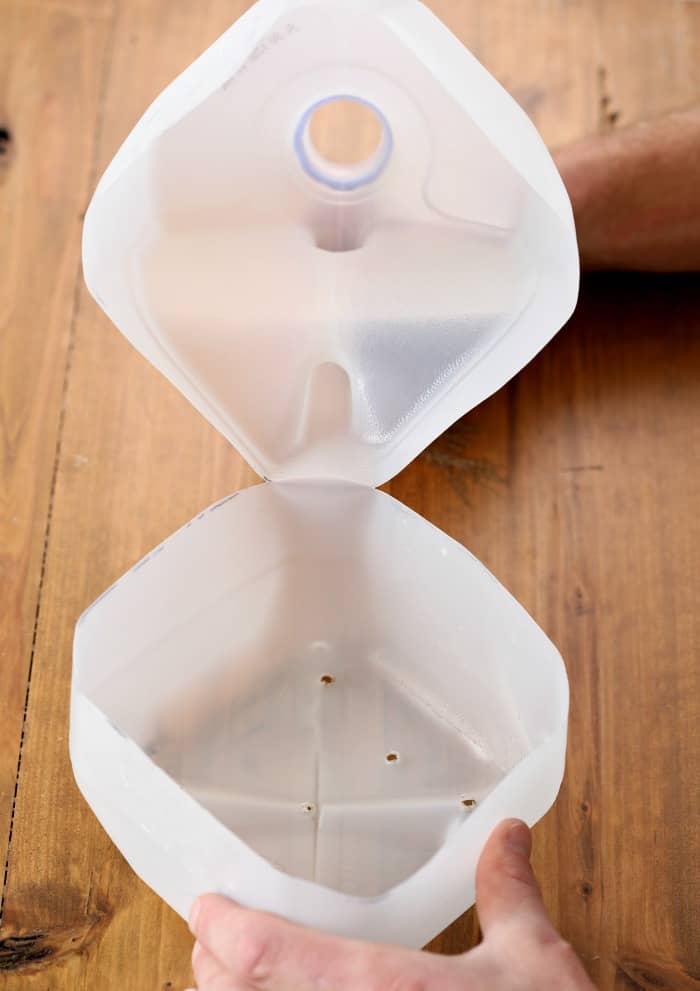
In winter sowing, cutting milk jugs is an essential step. To start, mark the cutting lines on the jug using a permanent marker. This will serve as a guide when cutting. Next, using a utility knife or scissors, carefully cut along the marked lines. Take caution to ensure a smooth and clean cut. To provide proper airflow for the plants, create ventilation holes along the sides and bottom of the jug.
These holes will help prevent moisture buildup and mold growth. Remember to leave one side of the jug attached. This will serve as a hinge, allowing for easy opening and closing. This is important when it’s time to water or check on your winter-sown seeds. Following these steps will help you successfully prepare your milk jugs for winter sowing, creating an ideal environment for your plants to grow.
The Importance Of Proper Drainage And Ventilation
The importance of proper drainage and ventilation cannot be overstated when it comes to winter sowing using milk jugs. Ensuring that excess water drains out of the milk jug is crucial to prevent waterlogged soil and root rot. It is recommended to create drainage holes at the bottom of the milk jug to allow water to escape easily.
In addition to drainage, providing sufficient airflow within the milk jug is essential to prevent mold and mildew from forming. This can be done by creating ventilation holes or slits in the upper portion of the milk jug. These openings will allow fresh air to circulate, reducing the risk of fungal growth.
An effective strategy is to position the jugs at a slight tilt during winter sowing. This angle facilitates water drainage and allows air to flow through the jug. By following these guidelines, you can create an optimal environment for winter sowing using milk jugs, promoting the successful germination and growth of your plants.
Preparing The Milk Jugs For Winter Sowing
Sterilizing the milk jugs to minimize diseases: Before starting winter sowing, it is essential to sterilize the milk jugs to prevent the spread of diseases. This can be done by washing the jugs with hot, soapy water and then rinsing them thoroughly. Alternatively, you can use a diluted bleach solution to sanitize the jugs. Make sure to rinse them well afterward to remove any residue.
Adding a layer of potting soil to the bottom of the jug: Once the jugs are sterilized, it’s time to prepare them for sowing the seeds. Start by adding a layer of potting soil to the bottom of each jug. This provides a suitable medium for the seeds to germinate and grow. Make sure to leave enough space at the top of the jug for proper ventilation and growth of the seedlings.
Moistening the soil before sowing the seeds: Before sowing the seeds, it is crucial to moisten the soil in the milk jugs. This can be done by gently watering the soil using a spray bottle or by pouring water slowly into the jug. The soil should be moist but not overly wet. This helps to create a favorable environment for seed germination. After moistening the soil, gently pat it down to ensure it is evenly distributed and compact.
Selecting the Appropriate Seeds for Winter Sowing
When planning your winter sowing project, it’s vital to choose seeds that can withstand the cold temperatures and harsh conditions. Opting for cold-hardy plant varieties significantly increases the chances of successful winter sowing. Researching the specific requirements of each plant is essential for maximum productivity.
Take into consideration the hardiness zone of your region and select seeds that are known to thrive in similar environments. Look for plants that have a reputation for withstanding freezing temperatures and frost. Durable options include cold-weather favorites such as kale, spinach, and arugula. Other cold-hardy varieties like broccoli and Brussels sprouts are excellent choices too. By carefully choosing your seeds, you can ensure a fruitful and bountiful winter sowing experience.
Sowing The Seeds And Properly Caring For Them
Sowing the seeds and properly caring for them is crucial for successful winter sowing. Start by placing the seeds evenly on the damp soil, ensuring that they are spread out to allow for proper growth. Lightly cover the seeds with more soil, providing a protective layer for germination.
Maintaining adequate moisture is key. Avoid overwatering, as excessive moisture can lead to rotting. Regularly check the soil and provide water only when it feels dry to the touch.
Additionally, protecting the seedlings from extreme temperatures is essential. Cold temperatures can hinder growth, while excessive heat can cause wilting. Consider using a protective cover or cold frame to shield the seedlings from harsh weather conditions.
Monitoring The Progress Of Winter-Sown Seedlings
Winter sowing is a popular method for starting seedlings in milk jugs, as it allows for easy monitoring and transplanting when the time is right. To observe germination and growth rates, **check the milk jugs regularly**. Look for signs of seedlings breaking through the soil and watch as they develop their first true leaves. Once the seedlings have grown and the temperatures outside are suitable, it is time to transfer them outdoors.
**Choose a mild day to acclimate the seedlings to their new environment**, gradually exposing them to the outdoor conditions. While doing so, ensure that the seedlings are protected from pests and harsh weather conditions. **Use netting or row covers** to keep bugs away and provide some shade to safeguard the delicate plants. **Water the seedlings regularly** to keep the soil moist for healthy growth. By following these steps, you can successfully monitor the progress of your winter-sown seedlings and ensure their survival.
Benefits And Success Of Winter Sowing In Milk Jugs
Winter sowing in milk jugs offers several benefits and can lead to successful plant growth. One of the key advantages of this method is the effective use of limited space. With winter sowing, you can start your seeds outdoors in the jugs, allowing you to maximize your gardening area.
Additionally, this technique promotes earlier and healthier plant growth. By providing a controlled environment within the milk jugs, the seeds have the ideal conditions to germinate and develop strong roots. This can result in sturdy seedlings that are ready to be transplanted when the weather warms up. Another advantage of winter sowing is the reduced need for indoor seed starting. Instead of relying solely on indoor setups and artificial lighting, you can utilize the natural sunlight and outdoor conditions to nurture your plants. Therefore, consider winter sowing in milk jugs as an effective method for growing seeds and maximizing your gardening space.
Frequently Asked Questions For How To Cut Milk Jugs For Winter Sowing
How Do You Cut Milk Jugs For Planting?
To cut milk jugs for planting, follow these steps: 1. Rinse the jug thoroughly. 2. Use a sharp utility knife to cut off the top portion. 3. Make small drainage holes in the bottom. 4. Fill with soil and plant your desired plants.
How Do You Prepare Milk Jug For Winter Sowing?
To prepare a milk jug for winter sowing, follow these steps: 1. Rinse the jug thoroughly to remove any residue. 2. Cut drainage holes in the bottom of the jug for water to escape. 3. Fill the jug with moist soil, leaving some space at the top for seeds.
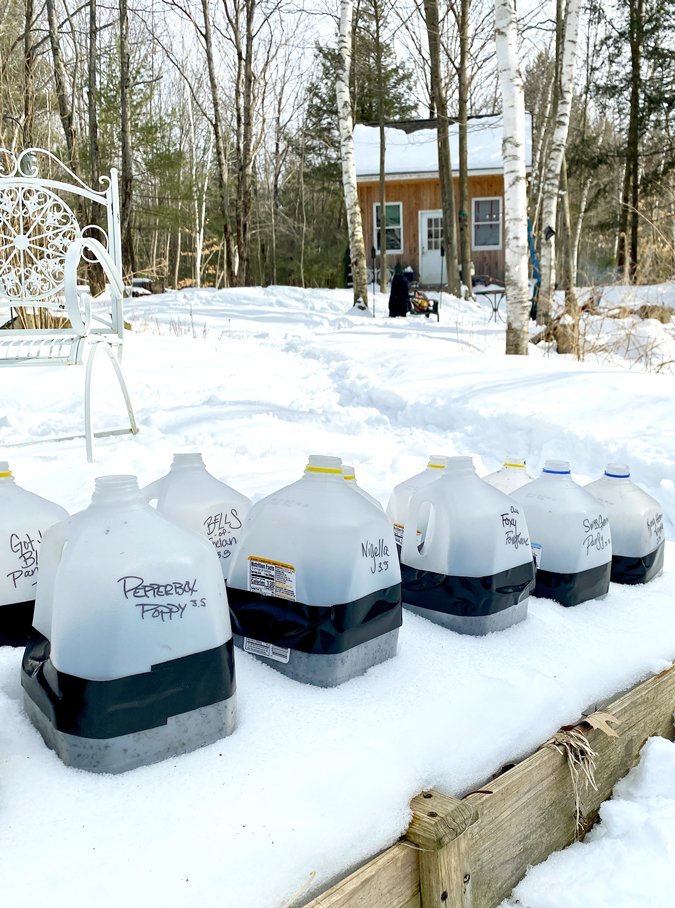
4. Plant the seeds according to the instructions and place the jug outdoors in a protected area. 5. Check the jug regularly, ensuring the soil remains moist but not waterlogged. 6. Once the weather warms up, transplant the seedlings from the jug into the garden.
When Should I Start Winter Sowing In Milk Jugs?
Start winter sowing in milk jugs when the weather gets consistently cold, usually in late winter or early spring.
How Do You Cut Plastic Milk Jugs?
To cut plastic milk jugs, follow these steps: 1) Rinse the jug and remove the cap. 2) Using scissors or a sharp blade, carefully cut along the desired line. 3) Be cautious to avoid any potential injuries or accidents. 4) Dispose of the cut pieces responsibly.
Conclusion
Milk jugs can be a valuable resource in your gardening endeavors, particularly when it comes to winter sowing. By following the simple steps outlined you can effectively cut milk jugs and utilize them for starting your seeds in the colder months.
Not only will this method save you money on purchasing expensive seed-starting containers, but it will also help you create a protective environment for your plants as they germinate. Remember to carefully use sharp scissors, cut the jugs in half, and create drainage holes to prevent over-watering.
Additionally, label your jugs to keep track of the different plants you are growing. Winter sowing provides a fantastic opportunity to kickstart your gardening season early while ensuring the best chances of success for your seeds. So don’t hesitate to give it a try and enjoy the rewards of using milk jugs for winter sowing.
Happy gardening!