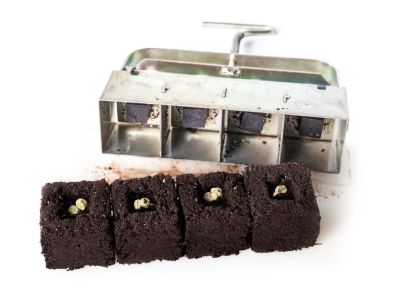
To make soil blocks, mix potting soil with water and organic matter, then press the mixture into blocks using a soil block maker. Soil blocks provide biodegradable containers for seedlings and are an environmentally friendly alternative to plastic pots.

Credit: www.gardeningknowhow.com
Making soil blocks is a cost-effective and sustainable way to start plants from seeds. In addition to reducing waste, soil blocks promote healthy root development and prevent transplant shock. By following these simple steps, you can easily make soil blocks at home and enjoy the benefits of this eco-friendly gardening technique.
How to Make Soil Blocks : Step by Step Guide
Benefits Of Soil Blocks
Soil blocks offer numerous benefits that make them an excellent alternative to traditional plastic seedling trays. One major advantage is the reduction of plastic waste. By using soil blocks, gardeners can significantly contribute to reducing the amount of plastic that ends up in landfills or pollutes the environment.
Furthermore, soil blocks promote enhanced seedling growth. The compressed nature of the blocks provides a firm foundation for young plants, allowing their roots to establish and grow more effectively. This leads to healthier and more robust seedlings that are better equipped to withstand transplant shock and thrive in the garden.
In addition to improved seedling growth, soil blocks also contribute to improved soil aeration. The porous structure of the blocks allows for better airflow and drainage, preventing waterlogging and promoting healthier root development. This, in turn, leads to better nutrient uptake and overall plant health.
To enjoy these benefits, gardeners can easily make their own soil blocks using a soil block maker or by hand. By incorporating this sustainable practice into gardening routines, individuals can contribute to a greener and more environmentally-friendly future.
Materials Needed
Materials Needed:
- Soil mix: Prepare a well-draining soil mix with a good balance of organic matter and minerals. Ensure that it provides sufficient nutrients for seedlings.
- Soil blocker: A soil blocker is a tool used to create uniform soil blocks. It helps in shaping the blocks without the need for containers or trays.
- Seed trays: Seed trays are useful for starting the germination process. They provide a controlled environment for seedlings to develop.
- Watering can: A watering can with a fine rose attachment enables gentle watering of soil blocks without disturbing the delicate seedlings.
Make sure to gather all the necessary materials before proceeding with the soil block-making process. This will make the task more efficient and ensure successful seedling growth.
Step-By-Step Soil Block Making Process
To make soil blocks, start by preparing the soil mix. This involves choosing the right ingredients and mixing them together. Once the soil mix is ready, moisten it to the appropriate level of moisture. You can use a watering can for this. Then, it’s time to use the soil blocker. Make sure to understand how the soil blocker works and position it correctly. Fill the soil blocker with the prepared mix and apply gentle pressure to form solid blocks. Transfer the blocks to seed trays by properly setting the trays and carefully transferring the soil blocks into them. Afterward, take care of the soil blocks by watering them adequately and providing sufficient sunlight and temperature. By following these step-by-step instructions, you can successfully make soil blocks for your gardening needs.
Tips For Successful Soil Block Making
Soil block making is an essential technique for successful gardening. Using a high-quality soil mix is crucial for producing sturdy and healthy blocks. It is important to moisten the soil evenly, ensuring that it is not too dry or too wet. This will help the blocks hold their shape and provide the ideal environment for seed germination. Timing the blocks’ transplanting correctly is also key. Waiting until the blocks have a well-developed root system will increase the success rate of transplanting and minimize transplant shock. By following these tips, you can enhance your soil block making process and achieve great results in your gardening endeavors.
Troubleshooting And Common Mistakes
| Troubleshooting and Common Mistakes: |
| 1. Crumbling soil blocks: If your soil blocks are crumbling, it could be due to not using the right soil mix. Soil blocks need a proper ratio of soil, compost, and other organic matter. Make sure to follow a trusted recipe to ensure the right consistency. 2. Poor seedling germination: 3. Over or under-watering the blocks: |
Frequently Asked Questions For How To Make Soil Blocks
How Do You Make Homemade Soil Blocks?
To make homemade soil blocks, simply mix soil, compost, and water until it forms a moist, crumbly texture. Press the mixture into a soil block maker, then let them dry and firm up.
What Is The Best Mix For Making Soil Blocks?
The best mix for making soil blocks consists of equal parts of compost, peat moss, and vermiculite.
How Do You Get Soil Blocks To Stick Together?
To get soil blocks to stick together, moisten the soil before forming the blocks and apply gentle pressure while compacting them.
Why Do My Soil Blocks Fall Apart?
Soil blocks can fall apart due to low cohesion, excessive moisture, poor quality soil, or improper handling.
Conclusion
Learning how to make soil blocks can significantly enhance your gardening experience. By utilizing this eco-friendly method, you can reduce plastic waste, improve seedling health, and create a sustainable garden environment. With just a few simple steps, you can create your own soil blocks using readily available materials.
The benefits of soil blocks extend beyond just gardening. They promote better air circulation, prevent transplant shock, and encourage stronger root growth. Whether you are a seasoned gardener or new to the world of growing plants, soil blocks offer a convenient and effective solution for starting and nurturing seedlings.
So, why not give it a try? Incorporating this technique into your gardening routine can lead to successful and thriving plants, while also making a positive impact on the planet. Happy gardening!
