To propagate stevia, take cuttings from healthy stevia plants and place them in water or directly in soil. Growing your own stevia plants at home is a great way to have a constant supply of this natural sweetener.
Stevia is a low-calorie alternative to sugar and is commonly used in cooking and baking. If you’re wondering how to propagate stevia, it’s actually quite simple. By taking cuttings from mature and healthy stevia plants, you can create new plants that will continue to provide you with fresh leaves for years to come.

Whether you choose to propagate stevia in water or directly in soil, this process is a cost-effective and sustainable way to expand your stevia garden. We will guide you through the steps to successfully propagate stevia plants and enjoy the benefits of this sweet plant in your own backyard.
How to Propagate Stevia : Step by Step Guide
Determining The Variety Of Stevia Plants
When propagating stevia, it is crucial to determine the variety of stevia plants you have. There are different varieties of stevia plants available, each with its own characteristics and growing requirements. By identifying the suitable variety for propagation, you can ensure successful growth and maximize the yield of this natural sweetener.
One popular variety of stevia plant is called “Rebaudiana,” which is known for its high steviol glycoside content, making it an excellent choice for extracting stevia sweeteners. Another variety, known as “Bertoni,” is a wild type that is often used for breeding purposes. Additionally, there are hybrid varieties that have been developed through cross-pollination to enhance certain traits.
When determining the variety of stevia plants, consider factors such as climate suitability, growth habit, and end-use purpose. Some varieties may be more tolerant to specific environmental conditions, while others may have specific characteristics that make them more suitable for certain uses.
By understanding the different varieties of stevia plants and their specific attributes, you can make informed decisions when propagating stevia and ensure the best results for your gardening or commercial endeavors.
Sourcing Stevia Cuttings Or Seeds
In order to propagate Stevia, it is important to source cuttings or seeds from reliable sources. When searching for trustworthy sources, consider seeking recommendations from experienced gardeners or nurseries specializing in herbs. You can also explore online marketplaces that offer a wide range of organic seeds and cuttings. Remember to read reviews and ratings to ensure the credibility of the seller.
Additionally, it is crucial to compare the quality of both cuttings and seeds before making a purchase. High-quality cuttings should have healthy stems with a good number of leaves, while seeds should be fresh and viable. By prioritizing reputable sources and carefully evaluating the quality of materials, you can enhance your chances of successful Stevia propagation.
Providing The Ideal Growing Conditions
Stevia, a natural sweetener, can be easily propagated in the right conditions. To ensure successful growth, it is important to consider sunlight and shade requirements. Stevia plants thrive in full sunlight with minimal shade. A minimum of six hours of direct sunlight is recommended for optimal growth.
In terms of soil, stevia prefers loose, well-drained soil with a neutral to slightly acidic pH level. A pH range of 6 to 7 is ideal for its growth. It is worth noting that stevia plants are sensitive to waterlogged and compacted soil, so proper drainage is crucial.
To ensure healthy growth and a bountiful harvest of stevia, providing the ideal growing conditions is essential. Adequate sunlight exposure and well-drained soil with the right pH levels are key factors to consider when propagating stevia plants.
Preparing The Propagation Medium
When propagating stevia plants, it is crucial to prepare the propagation medium correctly to ensure successful growth. One way to achieve this is by using a sterile propagation medium. This helps prevent the introduction of harmful bacteria or fungi that may hinder growth. To create a suitable medium, it is important to focus on its drainage capabilities. Stevia plants require a well-draining mixture to thrive and prevent waterlogging, which can lead to root rot.
To create a well-draining mixture, you can combine different ingredients such as perlite, vermiculite, and coconut coir. Perlite helps increase the medium’s porosity, allowing for better drainage, while vermiculite retains moisture and promotes aeration. Coconut coir, on the other hand, provides the necessary organic matter and improves moisture retention. By combining these ingredients in the correct ratios, you can create an ideal propagation medium that ensures the successful propagation of stevia plants.
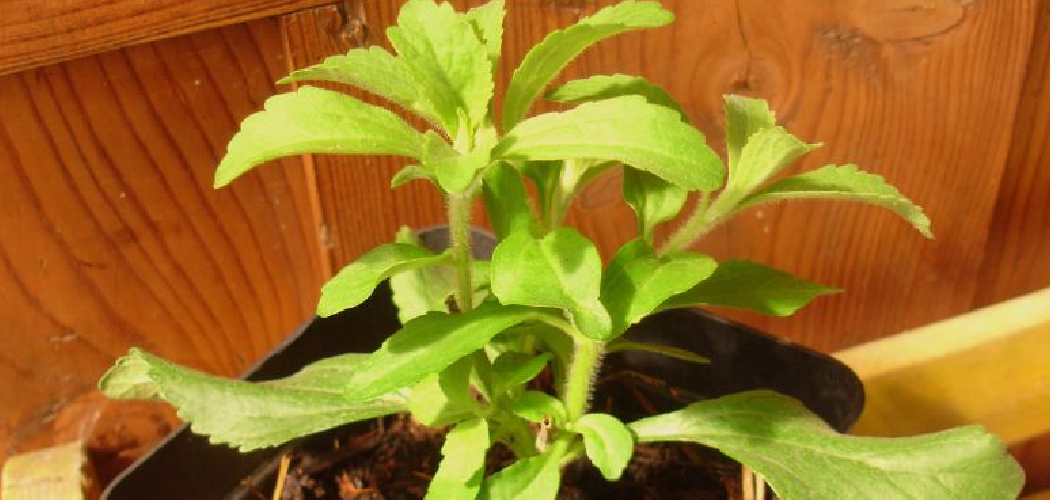
Growing Stevia From Cuttings
When propagating stevia, it is important to select and prepare healthy cuttings. Look for stems that are strong and free from disease or damage. Cut the stems at a 45-degree angle, ensuring that each cutting is between 4-6 inches long. Remove the lower leaves, leaving only a few leaves at the top. Dip the cut end into a rooting hormone, such as powdered rooting hormone or honey, to encourage root growth.
Place the cuttings in a well-draining potting mix and keep them moist, but not waterlogged. Provide indirect light and maintain a temperature of around 70°F. Check regularly for root growth by gently tugging on the cuttings. Once roots have formed, transfer the cuttings to individual pots or a larger container and continue to care for them until they are ready for transplanting into the garden.
Germinating Stevia From Seeds
Starting stevia plants from seeds can be an effective way to propagate this herb. Before sowing the seeds, it is recommended to soak them in water for 24 hours. This helps to soften the seed coat and improve germination rates. After soaking, scarify the seeds to further enhance germination. Scarification involves gently rubbing the seeds with sandpaper or nicking them with a knife. This helps to break through the seed coat, allowing moisture to penetrate and kickstart the germination process.
When it comes to seed starting, you have two options: indoors or directly in the garden. Starting stevia seeds indoors gives you better control over the growing conditions. You can provide consistent warmth and moisture, ensuring optimal germination. However, if you prefer to sow the seeds directly in the garden, make sure to choose a sunny location with well-drained soil. Avoid planting the seeds too deep, as they require light to germinate. Keep the soil consistently moist until the seeds sprout.
Watering And Fertilizing Stevia Plants
Proper watering techniques: Stevia plants require consistent moisture to thrive. It is important to water them regularly, ensuring that the soil is moist but not waterlogged. Overwatering can lead to root rot and other diseases. Water the plants deeply, allowing the water to penetrate the soil. Avoid shallow watering, as it can result in weak root systems. In drier climates, stevia plants may require more frequent watering. Monitor the moisture level of the soil and adjust the watering schedule accordingly.
Nutritional requirements and fertilization strategies: Stevia plants benefit from a balanced fertilizer that provides essential nutrients. Use a slow-release fertilizer or a liquid fertilizer diluted to half-strength. Apply the fertilizer according to the directions on the packaging. Additionally, stevia plants prefer slightly acidic soil, so adding organic matter like compost or peat moss can help improve the nutrient content and pH level of the soil. Regularly monitor the plants for any signs of nutrient deficiencies, such as yellowing leaves, and adjust the fertilization strategy accordingly.
Protecting Stevia Plants From Pests And Diseases
Protecting stevia plants from pests and diseases is crucial to ensure a healthy and thriving crop. Common pests that can infest stevia include aphids, whiteflies, and spider mites. These pests can cause significant damage to the plants by sucking out sap, resulting in stunted growth and wilting. Leaf spot, powdery mildew, and root rot are among the diseases that can affect stevia plants, leading to leaf discoloration, mold growth, and plant decay.
Implementing preventive measures such as regular inspection, crop rotation, and maintaining proper cleanliness in the garden can help minimize the risk of pest and disease infestation. Using organic pesticides and insecticidal soaps can effectively control and manage pest populations. Treating the plants with fungicides can help prevent or halt the spread of diseases. It is important to closely monitor the plants for any signs of pests or diseases and take immediate action to prevent further damage.
Taking proactive steps to protect stevia plants from pests and diseases is essential for a successful propagation. By implementing preventive measures and promptly treating any issues that arise, you can ensure the health and productivity of your stevia crop.
Preparing For Transplantation
Propagating stevia is a cost-effective way to grow this sweet herb in your garden. Before transplanting, it’s important to prepare the soil and containers. Start by choosing the right time for transplantation. Ideally, wait until after the last frost and when the soil temperature reaches 60°F. This will ensure that the stevia plants have a good start in their new location.
When preparing the soil, ensure that it is light, well-draining, and fertile. Stevia prefers a pH level between 6.7 and 7.2. Incorporate organic matter, such as compost or well-rotted manure, to improve the soil’s fertility.
For container propagation, select pots or trays that are at least 2-3 inches deep. Fill them with a potting mix that provides good drainage. You can use a mixture of equal parts of peat moss, perlite, and vermiculite.
Remember to water the plants regularly to keep the soil slightly moist. Avoid overwatering to prevent root rot. With proper preparation, your stevia plants will thrive and provide you with a natural sweetener for your culinary creations.
Transplanting Techniques
To successfully propagate stevia, it is important to follow certain transplanting techniques. Carefully handling the plants is an essential step in ensuring proper root development. This involves gently removing the stevia plants from their original containers, being cautious not to damage the delicate roots.
Once removed, it is recommended to place the plants in a prepared growing area, ensuring adequate spacing between them. This will allow the plants to receive sufficient sunlight and airflow. Watering the plants after transplantation is crucial for their survival and establishment. It is advisable to water them well immediately after transplanting and then regularly thereafter, ensuring that the soil remains consistently moist. Lastly, providing the plants with appropriate nutrients, such as a balanced organic fertilizer, can further support their growth and development. Following these techniques will increase the chances of successful stevia propagation.
Providing Ongoing Care For Stevia Plants
Providing ongoing care for stevia plants is crucial for their growth and productivity. Regular maintenance is essential to ensure a healthy and thriving plant. One important aspect of maintenance is pruning the stevia plant. This helps to stimulate new growth and maintain the desired shape and size. It is recommended to prune the plant when the stems start to become woody or when it becomes too leggy.
Additionally, monitoring the plant’s health is important to catch any signs of disease or pest infestation early. Regularly inspecting the leaves for discoloration, spots, or wilting can help identify any issues and take appropriate action. It is also essential to provide the plant with the right growing conditions, including well-drained soil, adequate sunlight, and regular watering. By following a regular maintenance routine that includes pruning and monitoring plant health, you can ensure the successful propagation and growth of your stevia plants.
Harvesting And Using Stevia Leaves
Knowing the optimal time for harvest is essential when propagating stevia. The ideal time to harvest stevia leaves is when the plants are in their prime, usually just before flowering. At this stage, the leaves are at their highest concentration of sweetness. To harvest, simply cut the plant’s stems just above a node, as this encourages new growth. Different methods can be used to dry and store the leaves.
One approach is air drying, where you hang the stems upside down in a dry, well-ventilated area until the leaves are crispy. Another method is oven drying, where you place the leaves on a baking sheet and dry them at a low temperature. Once dried, store the leaves in an airtight container in a cool, dark place to maintain their flavor and potency.
Frequently Asked Questions Of How To Propagate Stevia
How Do You Propagate Stevia Plants?
To propagate stevia plants, start by taking stem cuttings from a mature plant. Remove the lower leaves and dip the cut end in a rooting hormone. Plant the cutting in a moist potting mix and keep it warm and humid.
After a few weeks, the cutting will develop roots, and you can transfer it to a larger pot or the garden.
When Is The Best Time To Propagate Stevia?
The best time to propagate stevia is in the spring or early summer when the plant is actively growing. This allows the cutting to establish roots quickly and thrive in the warm weather. Avoid propagating in winter when the plant is dormant, as it may not root successfully.
Can You Propagate Stevia From Seeds?
Yes, you can propagate stevia from seeds. However, it is important to note that stevia seeds can be difficult to germinate, and the success rate may be low. To increase your chances of success, start the seeds indoors in a seed tray with quality potting mix and provide warm and moist conditions.
Transplant the seedlings once they are strong enough.
How Long Does It Take For Stevia Cuttings To Root?
Stevia cuttings usually take around 2 to 4 weeks to develop roots. However, the rooting time can vary depending on various factors such as temperature, humidity, and the overall health of the cutting. It is important to provide the right conditions and regularly check for root development to ensure successful propagation.
Conclusion
To conclude, propagating stevia can be a simple and rewarding process. By following the steps outlined in this blog post, you can easily grow your own stevia plants and enjoy the sweetness of this natural sweetener. Whether you choose to propagate through cuttings or seeds, providing the right conditions and regularly caring for your plants will ensure successful growth.
So, why not give it a try and have a fresh supply of stevia at your fingertips? Happy propagating!