The clematis is a gardener’s favorite, treasured for its enchanting flowers, dramatic climbing habit, and ability to beautify fences, trellises, and arbors. This versatile plant comes in many forms, offering blooms in shades from purple to pink to white, and often reblooms throughout the year.

One of the biggest joys for garden enthusiasts is multiplying these plants at home, which not only offers a satisfying hands-on experience but also saves on the cost of purchasing new ones.
Propagating clematis through cuttings is a cost-effective and reliable method to replicate the beauty of established plants, ensuring your garden flourishes year after year. In this comprehensive guide on how to take cuttings from clematis, you’ll discover each step needed to create healthy, thriving new plants from your favorite parent vine.
Understanding Clematis and Its Growth Habits
Growing clematis successfully starts with understanding the distinct characteristics of its many varieties and how these influence the propagation process.
Clematis Varieties
The clematis genus features hundreds of species, primarily divided into three groups based on their blooming season:
- Early-spring bloomers: These include Clematis montana and alpina types, known for abundant spring flowers.
- Summer-flowering varieties: Such as Clematis viticella and some large-flowered hybrids, showcase their color during the warmest months.
- Late-flowering cultivars: These, like Clematis terniflora (sweet autumn clematis), grace gardens into fall.
Growth Habits and Propagation
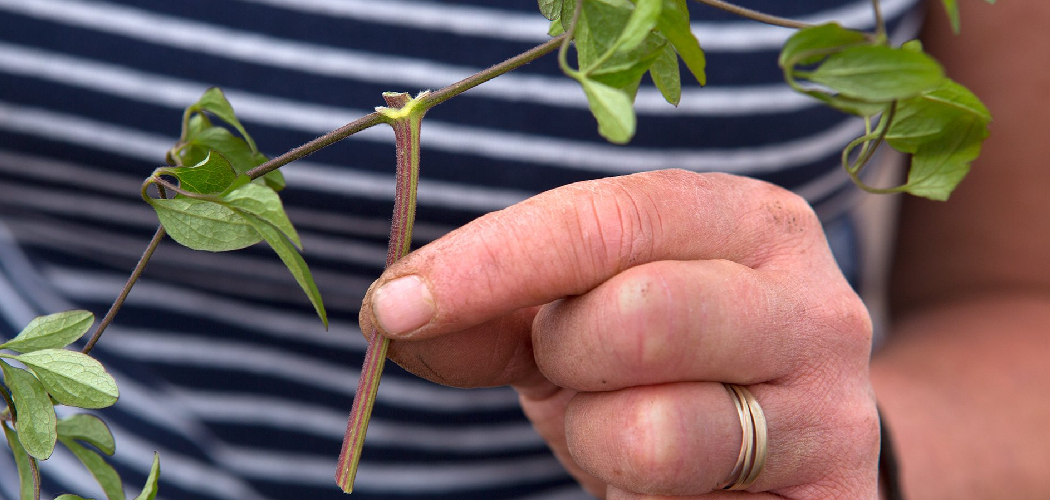
Each type of clematis grows and flowers on a different wood—either old or new growth. Understanding whether your chosen plant blooms on previous or current season’s stems is essential, as it determines both the best pruning and propagation strategies. Clematis usually produces long, vining stems with pairs of leaves and leaf nodes spaced along their length. This node structure is vital for successful cutting, as roots tend to develop from these points.
Mastering these basics ensures you’ll take the right portion of your clematis for optimal results when propagating.
Best Time for Taking Clematis Cuttings
Choosing the optimal time for propagation boosts your chances of successful root development and vigorous young plants.
Timing Based on Clematis Type
- Softwood Cuttings: Late spring through early summer is prime for taking softwood cuttings. At this stage, the plant’s shoots are still flexible and brimming with energy, ideal for encouraging new root growth.
- Semi-ripe or Hardwood Cuttings: Some gardeners prefer late summer or early autumn for tougher, semi-ripe cuttings, particularly for late-flowering varieties.
Recognizing the Ideal Stage
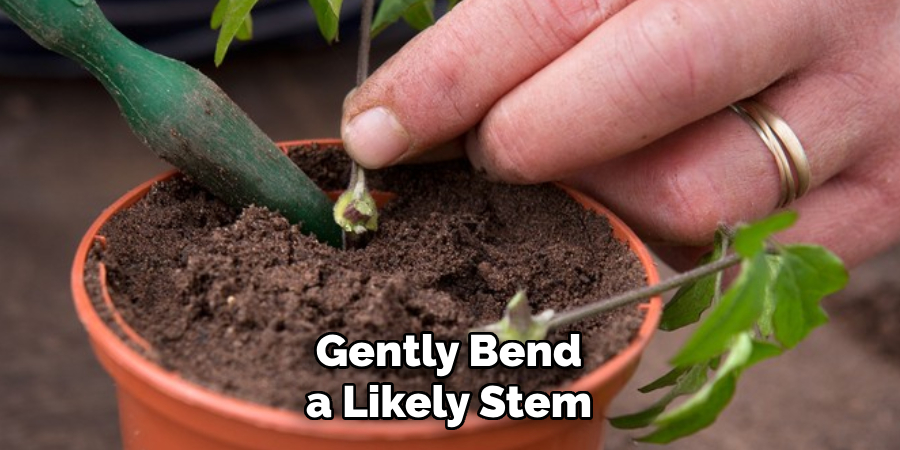
Look for stems that are neither too young (flimsy and easily damaged) nor too old (tough and woody). Gently bend a likely stem; if it flexes easily but doesn’t snap, it’s ready. Fresh, actively growing shoots with healthy green leaves offer the best foundation for new clematis plants.
Seasonal Considerations
Keep in mind that weather conditions matter too. Overly wet or hot spells can stress both the parent and the new cuttings. Target a cool, overcast day to minimize stress during the process.
Tools and Materials You’ll Need
Successful propagation depends on having the right equipment and a clean, organized workspace.
Essential Tools
- Pruning Shears: Sharp, disinfected blades make clean cuts and minimize tearing, which reduces the chance of disease.
- Rooting Hormone: While not always necessary, a rooting hormone powder or gel greatly increases the likelihood of your cuttings establishing roots.
- Pots or Seed Trays: Small pots or multi-cell trays offer convenience and support good drainage.
- Spray Bottles: Used for misting to maintain a humid environment around the cuttings.
Additional Materials
- Well-draining Soil: A light, sterile potting mix—often perlite, vermiculite, or a mixture designed for seed starting—protects against rot.
- Plastic Bags or Domes: These create a mini-greenhouse effect, trapping humidity critical for early root development.
- Plant Labels: Mark your pots with dates and clematis varieties to keep track as multiple cuttings grow.
Preparing Your Tools
Before beginning, disinfect your pruning shears and wash pots to minimize the risk of transferring disease to new cuttings. Lay out all materials within easy reach so the process is smooth from start to finish.
Preparing the Parent Plant
A healthy parent plant is the foundation for strong, vibrant clematis cuttings.
Boosting Parent Plant Health
Water your clematis deeply a day before you intend to take cuttings. Well-hydrated stems are less prone to wilting after being cut and have a better survival rate.
Selecting Suitable Stems
Choose a non-flowering, disease-free stem. Flower buds drain energy from the cutting, so stems without blooms allocate resources entirely to root formation and growth. Look for straight, vigorous shoots with multiple leaf nodes and lush foliage.
Final Prep Steps
Check for any signs of insects, mold, or rot on both the parent plant and potential cutting sites. Avoid any stem that shows blemishes or discoloration.
How to Take Cuttings from Clematis: Take the Perfect Clematis Cutting
Success with clematis propagation lies in the details of the cutting process.
Step-by-Step Cutting Instructions
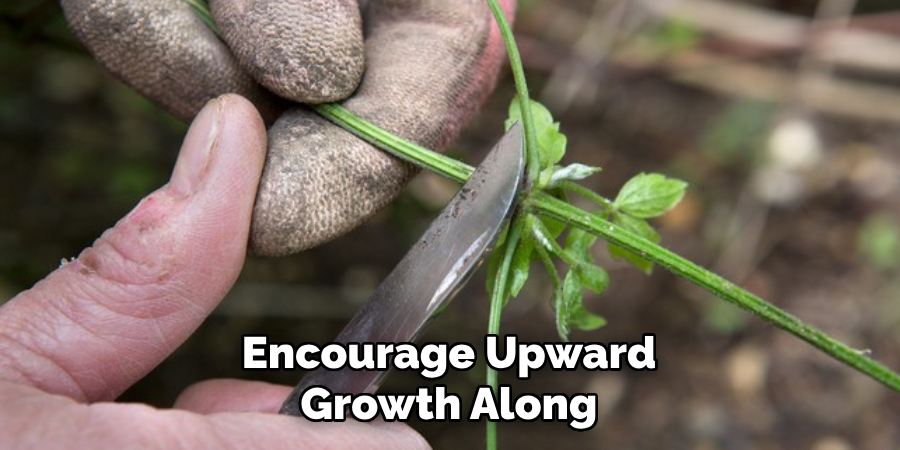
- Identify the Section: Select a healthy, non-flowering shoot that is at least 4–6 inches long and has a few pairs of leaves.
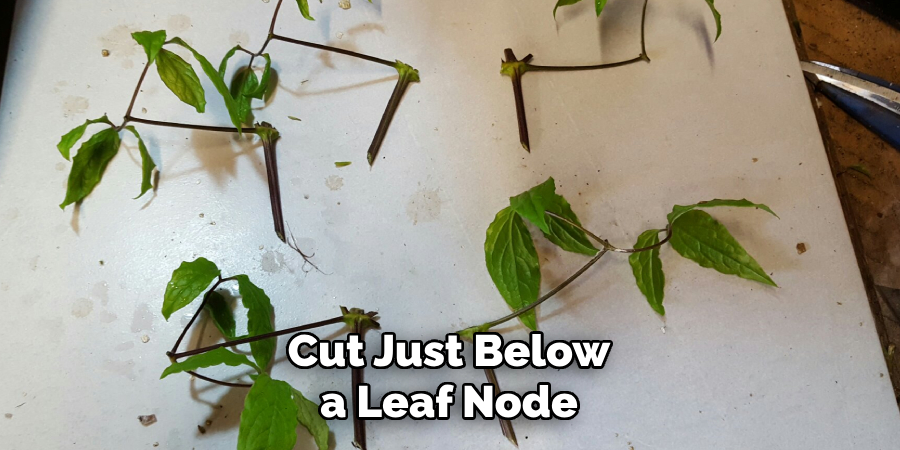
- Cut Below a Leaf Node: With your clean shears, make a precise cut just below a leaf node. This area is the most likely site for root sprouting.
- Trim Leaves: Remove the lower set of leaves completely, leaving at least one or two pairs at the top. If leaves are large, you can cut them in half to reduce moisture loss.
- Optional—Dip in Rooting Hormone: Lightly coat the base of your cutting with rooting hormone to stimulate root growth and resist rot.
Emphasizing Accuracy
Focusing on clean, angled cuts close to nodes and maintaining as much healthy tissue as possible is key. This method ensures the process of how to take cuttings from clematis yields optimal results and sets a strong foundation for the next stage.
Encouraging Root Development
Once you have your cuttings prepared, encouraging strong root development is a multi-step process.
Rooting Medium and Placement
- Planting the Cutting: Insert the trimmed end into moistened, well-draining soil or starting mix. Make a hole first, so you don’t scrape off the rooting hormone during placement.
- Spacing Cuttings: Leave space between each cutting to avoid crowding and potential rot.
Humidity and Light
- Cover for Humidity: Slip a clear plastic bag or dome over the pots to maintain moisture. Prop the covering up so it doesn’t touch the leaves.
- Lighting: Place your cuttings in bright, indirect sunlight. Too much direct sun can wilt young cuttings before they establish roots.
Managing Temperature and Moisture
- Ideal Temperature: A consistent range between 65–75°F (18–24°C) is perfect for root development.
- Watering: Mist the cuttings regularly to keep leaves hydrated, but avoid saturating the soil. Consistently damp—not soggy—medium is ideal.
Monitoring Progress
Roots should start forming within a few weeks. Tug very gently to check resistance, which signals root growth. Remove any leaves that yellow or wilt to prevent mold or rot.
Potting and Early Care for Clematis Cuttings
After roots appear, your clematis cuttings are ready for potting and a phase of gentle nurturing.
Transplanting to Pots
- Prepare the Pot: Fill a small pot with fresh, sterile potting mix. Make a hole with a pencil or stick and ease the rooted cutting into place.
- Firm but Gentle: Press the soil gently around the roots to secure the plant, but avoid compacting it.
Watering and Humidity
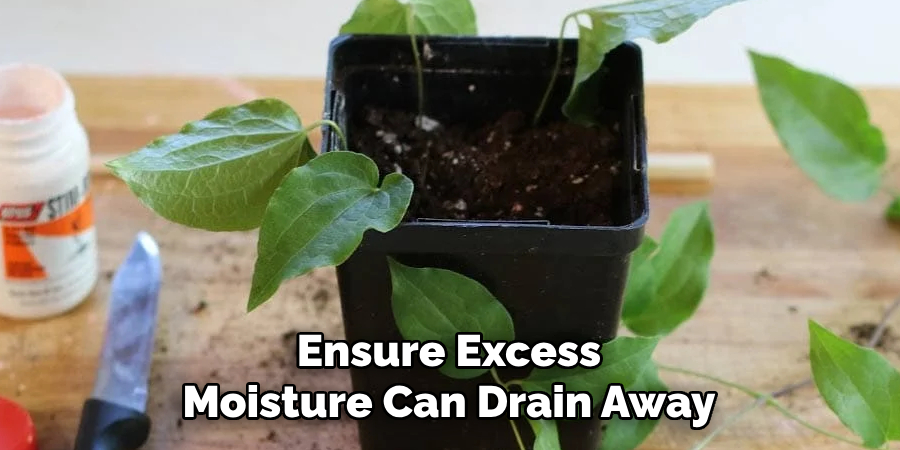
- Consistent Moisture: Water thoroughly, but ensure excess moisture can drain away. Avoid letting the cuttings dry out, but don’t flood them.
- Gradual Acclimatization: Keep humidity high for the first week, slowly introducing more air by opening the plastic dome slightly each day.
Light Adjustment
- Increase Sunlight Gradually: Over one to two weeks, move the pots into brighter, filtered sunlight.
- Avoid Direct Sun at First: Too much intense sun can scorch tender foliage.
By providing a steady, nurturing environment, these early care steps help your cuttings become sturdy, independent plants.
Common Issues and Troubleshooting
Occasionally, cuttings may struggle or fail to thrive, but there are practical solutions for nearly every issue.
Wilting or Yellowing Cuttings
Wilting is often a sign of underwatering, excessive heat, or low humidity. Increase misting and shade the cuttings if exposed to sunlight. Yellowing leaves might indicate overwatering or poor drainage.
Failed Rooting
If roots do not develop after a reasonable period (6–8 weeks), the cutting may be from an unsuitable stem. Review your preparation steps or try with a fresher, more vigorous shoot.
Disease and Pest Management
- Fungal Problems: Avoid overcrowding and ensure plenty of air circulation.
- Pest Prevention: Inspect regularly for aphids or spider mites; use insecticidal soap if necessary.
Knowing When to Start Over
If a cutting becomes mushy or moldy, discard it to protect others. Don’t be discouraged—successful propagation sometimes takes a few tries.
Transitioning Clematis to the Garden
Once your cuttings have grown strong roots and vigorous new growth, it’s time for the transition outdoors.
Preparing the Garden Site
Choose a sheltered position with fertile, well-draining soil. Clematis roots prefer a cool base, so consider mulching or planting low groundcovers.
Safe Transplanting Steps
- Acclimate First: Gradually expose cuttings to outdoor conditions for about a week.
- Planting Depth: Set the rooted cutting at the same depth it grew in the pot, firming soil around the base.
Staking and Early Support
Install a small trellis or support nearby, allowing new stems to begin climbing as soon as possible.
Caring attention now ensures your propagated clematis will establish quickly in its permanent home.
Long-Term Care for Propagated Clematis
Regular care will help your new plants grow strong and produce abundant flowers.
Pruning and Training
- Trim away weak or tangled growth each year to direct energy into strong, healthy stems.
- Use gentle ties or supports to encourage upward growth along trellises or arches.
Watering and Feeding
- Keep soil evenly moist, especially in dry spells.
- Apply a balanced, slow-release fertilizer in spring to promote lush foliage and blooms.
Flower Promotion
Consistent care, timely pruning, and mulch around the roots will ensure your clematis delights with fabulous flowers every season.
Conclusion
Once you’ve mastered how to take cuttings from clematis, growing beautiful, healthy vines for your garden becomes a rewarding and budget-friendly tradition. The process is straightforward: start with the right plant, gather your tools, and follow each step for strong root development and growth. Before you know it, you’ll have a flourishing display—and perhaps a whole new generation of gardeners inspired by your success.
Try these methods for yourself, and don’t hesitate to share the journey and results with fellow clematis enthusiasts, spreading the joy of propagation even further.