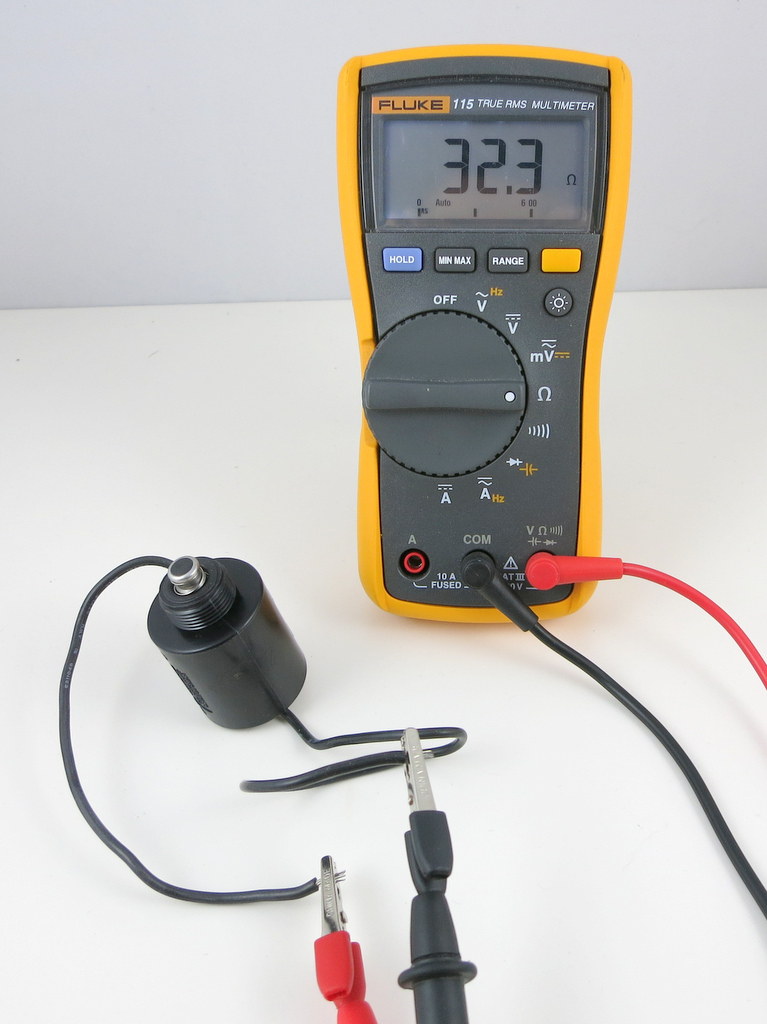
To test a sprinkler solenoid with a multimeter, set the multimeter to the resistance or ohms setting and touch the probes to the solenoid’s terminals. A reading of zero indicates a short circuit, while a reading of infinity means an open circuit.
Sprinkler systems play an essential role in maintaining the health and appearance of lawns and gardens. Understanding how to test a sprinkler solenoid with a multimeter is crucial for troubleshooting issues and ensuring proper functioning. By following a simple process, you can easily determine if the solenoid is functioning correctly or if it needs to be replaced.
We will guide you through the steps to test a sprinkler solenoid using a multimeter. This method will help you identify any electrical issues and enable you to make the necessary repairs or replacements for a fully operational sprinkler system.

Credit: www.youtube.com
How to Test Sprinkler Solenoid With Multimeter: Step by Step Guide
Checking The Continuity Of The Solenoid Coil
Testing the continuity of the sprinkler solenoid coil is crucial for ensuring proper functioning. Understanding the basics of a solenoid coil helps in grasping the significance of this test. By checking the continuity, you can determine if there are any breaks or faults in the coil.
To initiate the process, gather the necessary tools and equipment, including a multimeter. Prepare the multimeter by setting it to the appropriate continuity mode. Connect the multimeter leads to the solenoid terminals and observe the readings on the multimeter. If the readings indicate continuity, it means the solenoid coil is intact.
However, if there is no continuity, the coil may need to be replaced or repaired. Properly interpreting the multimeter readings is key in determining the condition of the sprinkler solenoid.
Testing The Voltage Of The Solenoid Coil
Testing the voltage of the solenoid coil is crucial in ensuring its proper functioning. To perform this test, you will need a multimeter. Start by preparing the multimeter for voltage testing by selecting the appropriate setting. Next, connect the multimeter to the solenoid, making sure to follow the correct polarity.
Once connected, you can read and interpret the voltage values displayed on the multimeter. This will help you determine if the solenoid is receiving the required voltage. If there are any issues, troubleshooting common voltage problems can help identify and resolve the underlying cause.
By testing the voltage of the solenoid coil, you can ensure that it is functioning optimally and avoid potential malfunctions or failures.
Analyzing The Resistance Of The Sprinkler Solenoid
Testing the sprinkler solenoid with a multimeter is a crucial step in maintaining a well-functioning irrigation system. The resistance of the solenoid plays a significant role in its performance. To conduct this test, you will need a multimeter and follow a step-by-step guide.
Start by preparing the multimeter for resistance testing and then connect it to the solenoid. The multimeter will provide readings that need to be analyzed. Understanding the implications of these resistance values is essential in determining the solenoid’s health. By checking the resistance, you can identify any potential issues early on and take necessary actions to ensure optimal performance.

Regularly testing the sprinkler solenoid will help in preventing costly repairs and keeping your irrigation system in good working order.
Frequently Asked Questions On How To Test Sprinkler Solenoid With Multimeter
How Do I Know If My Sprinkler Solenoid Is Bad?
A bad sprinkler solenoid can cause various issues with your sprinkler system. To determine if your solenoid is bad, follow these steps: 1. Check if the sprinkler zone is not turning on: if one of your sprinkler zones is not working, it could be due to a faulty solenoid.
2. Inspect the solenoid for damage: look for any visible signs of damage, such as broken wires or cracks in the casing. 3. Test the solenoid with a multimeter: disconnect the solenoid wires and use a multimeter to measure the resistance across the terminals.

If the reading is significantly different from the recommended range, the solenoid is likely bad. 4. Listen for a clicking sound: when the sprinkler system is running, you should hear a distinct clicking sound coming from the solenoid. If you don’t hear anything, it could indicate a faulty solenoid.
If you suspect a bad solenoid, it’s best to replace it to ensure proper functioning of your sprinkler system.
How Many Ohms Should An Irrigation Solenoid Have?
The specified resistance for an irrigation solenoid is typically between 20 and 60 ohms.
How Do You Test A Sprinkler Solenoid?
To test a sprinkler solenoid, follow these steps: 1. Start by turning off the water supply to the sprinkler system. 2. Locate the solenoid valve, usually found near the control box or the sprinkler head. 3. Disconnect the wires connected to the solenoid valve.
4. Use a multimeter set to the ohms or resistance mode. 5. Touch the multimeter probes to the wires or terminals of the solenoid valve. 6. A working solenoid will display a resistance reading between 20-60 ohms. 7. If the reading is zero or infinite, the solenoid is faulty and needs to be replaced.
8. After testing, reconnect the wires and turn on the water supply to continue using the sprinkler system. Remember to consistently check and maintain your sprinkler system to ensure efficient watering of your lawn or garden.
Can You Test A Sprinkler Solenoid With A Battery?
Yes, you can test a sprinkler solenoid with a battery. Connect the solenoid’s wires to the positive and negative terminals of a 9-volt battery. If the solenoid is working properly, you should hear a click sound and feel a vibration.
This indicates that the solenoid is receiving power and activating the valve. However, it is important to note that this test may not indicate if the solenoid is working at full capacity, as it only checks for basic functionality. For a comprehensive assessment, it is advisable to use a multimeter to measure the resistance across the solenoid’s terminals.
This will provide a more accurate measurement of the solenoid’s condition. Regular maintenance and testing can help identify any issues with the solenoid and ensure the smooth operation of your sprinkler system.
Conclusion
To conclude, testing a sprinkler solenoid with a multimeter is a simple and efficient process that can help you identify any issues and ensure the proper functioning of your sprinkler system. By following the step-by-step guide mentioned in this blog post, you can easily test the continuity and resistance of your solenoid coil, helping you determine whether it requires replacement or repair.
Remember to take necessary precautions and use the appropriate tools for a safe and accurate testing process. Regularly testing your sprinkler solenoid can save you time, money, and water in the long run. It allows you to detect problems early on, preventing any potential damage to your system and ensuring efficient irrigation of your lawn or garden.
So, don’t neglect this essential maintenance step and make it a part of your routine to keep your sprinkler system running smoothly all year round. We hope this guide has provided you with valuable insights and confidence in testing your sprinkler solenoid using a multimeter.
Happy testing and happy gardening!