Transplanting a peace lily into water is done by carefully removing it from the soil and placing it in a water-filled container. Peace lilies can thrive in water alone, making this a simple and effective method.
Peace lilies are beautiful and popular houseplants known for their shiny dark green leaves and lovely white blooms. If you’re considering transplanting your peace lily into water, you’re in luck – it’s a relatively easy process that can lead to a thriving and healthy plant.
Water propagation offers numerous benefits, including easy maintenance and reduced risk of soil-related issues. We’ll guide you through the steps of transplanting your peace lily into water, providing you with all the necessary information and tips to ensure success. So, whether you’re a novice plant enthusiast or an experienced gardener looking for an alternative propagation method, read on to discover how to transplant your peace lily into water.

Credit: m.youtube.com
Benefits Of Transplanting A Peace Lily Into Water
The benefits of transplanting a Peace Lily into water are numerous. Firstly, it reduces the maintenance and watering requirements of the plant, making it more convenient to care for. With a water-based transplant, the plant can extract the necessary nutrients directly from the water, eliminating the need for regular fertilization.
Furthermore, transplanting a Peace Lily into water promotes enhanced growth and health. The plant is able to absorb water and nutrients more efficiently, leading to stronger roots, lush foliage, and vibrant flowers. This method provides an ideal environment for the plant to thrive, increasing its overall longevity.
Additionally, the aesthetic appeal of a Peace Lily in water is undeniable. The transparent glass container showcases the elegant roots, adding a unique and visually pleasing element to any space. It creates a stunning focal point, whether it’s placed in a living room, office, or even a bathroom.
Preparing The Peace Lily For Transplantation
To successfully transplant a peace lily into water, it’s important to properly prepare the plant and choose the right container. First, select a suitable container that is clean and large enough to accommodate the root system. A transparent glass container is ideal for monitoring water levels. Before proceeding, clean the container thoroughly to remove any dirt or debris that may contaminate the water.
Next, gather all the necessary materials, including distilled water, as tap water can contain chemicals that may harm the plant. Additionally, you’ll need a balanced liquid fertilizer to provide essential nutrients. Once you have everything ready, carefully remove the peace lily from its current pot and gently shake off excess soil from the roots. Avoid damaging the delicate roots in the process. With the peace lily properly prepared, it’s now ready for transplantation into water.
How to Transplant a Peace Lily into Water: Step by Step Guide
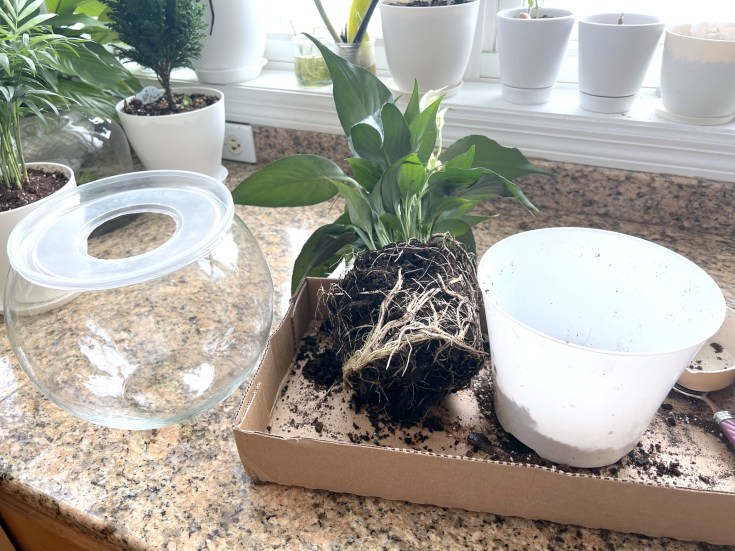
Step 1: Removing The Peace Lily From Soil
Loosening the soil around the plant’s roots is a crucial step when transplanting a peace lily into water. This should be done carefully to avoid damaging the roots. Gently lift the plant from its pot, taking care not to harm any of the foliage or stems. Once the plant is out of the pot, remove excess soil from the roots.
By removing excess soil, you make it easier for the peace lily to adapt to its new water-based environment. The plant will rely on its roots to absorb nutrients and oxygen from the water, so it’s important to have clean and healthy roots.
Remember to take your time and handle the peace lily with care. This will increase the chances of successful transplantation and ensure the plant continues to thrive in its new water-filled home.
Step 2: Preparing The Water Transplantation Container
In the second step of transplanting a peace lily into water, it is important to prepare the transplantation container. First, fill the container with distilled water, which provides the best conditions for the peace lily’s growth. Distilled water is free from chemicals and pollutants that could harm the plant.
Additionally, adding a suitable fertilizer or plant food to the water can provide the necessary nutrients for the peace lily to thrive. The fertilizer should be specifically formulated for water-grown plants to ensure optimal absorption. By taking these steps, you can create an ideal environment for your peace lily and ensure its successful transplantation into water.
Step 3: Placing The Peace Lily Into Water
To transplant a peace lily into water, you need to submerge the plant’s roots into the water. Make sure the roots are completely submerged, but be careful to keep the foliage out of the water. This will help prevent rot and other issues. Once you have placed the plant in water, position it in a well-lit area to ensure it gets enough light for growth.
Finding a suitable spot near a window or artificial light source can help the plant thrive. Remember to regularly change the water and maintain proper hygiene to prevent the growth of bacteria or algae. With proper care, your peace lily will adapt to its new aquatic environment and continue to thrive.
Step 4: Maintaining The Transplanted Peace Lily
Monitoring the water level regularly: After transplanting your peace lily into water, it’s crucial to monitor the water level on a regular basis. Check the water level daily to ensure it is adequate for the plant’s needs. If the water level has significantly dropped, add more water to maintain the desired level.
Changing the water periodically: To keep your transplanted peace lily healthy, it is important to change the water periodically. Every two to three weeks, replace the old water with fresh, clean water. This helps prevent the growth of algae or bacteria that can harm the plant.
Providing additional nutrients if necessary: While peace lilies can thrive in water alone, providing additional nutrients can help support their growth. Consider adding a diluted liquid fertilizer specifically formulated for houseplants once a month. Follow the instructions on the fertilizer label for the correct dilution ratio.
Remember, proper care and maintenance are essential for the successful transplantation of your peace lily into water. By monitoring the water level, changing the water periodically, and providing additional nutrients if necessary, you can ensure your transplanted peace lily remains healthy and vibrant.
Issue 1: Root Rot
Root rot is a common issue with peace lilies when they are transplanted into water. Understanding the causes of root rot is crucial in preventing this problem. Excessive watering is the primary cause, as it leads to poor drainage and creates a favorable environment for root rot to develop. To prevent root rot, it is essential to avoid overwatering the peace lily and ensure proper drainage. Additionally, using well-draining soil and providing adequate air circulation around the roots can help prevent the occurrence of root rot.
If your peace lily does develop root rot, there are treatment options available. One effective treatment is to remove the plant from water and gently wash away the affected roots. Trimming any black or rotten roots and repotting the plant in fresh soil can help promote healthy growth. It is also advisable to reduce watering frequency and monitor the moisture levels to prevent future root rot.
Issue 2: Leaf Yellowing
Transplanting a peace lily into water might lead to issues like leaf yellowing. Understanding the causes and prevention of this problem is crucial. One possible cause of leaf yellowing is overwatering, which leads to root rot. To prevent this, make sure to avoid overwatering. Allow the top inch of soil to dry out before watering the peace lily again. Another cause could be inadequate lighting.
Peace lilies thrive in bright, indirect light. If the plant is not receiving enough light, consider moving it to a brighter spot. Additionally, using the wrong type of water can also lead to leaf yellowing. Peace lilies prefer distilled or filtered water as tap water can contain chemicals that harm the plant. By following these guidelines, you can address the leaf yellowing issue and successfully transplant a peace lily into water.
Issue 3: Stunted Growth
A potential cause of stunted growth in transplanting a peace lily into water could be inadequate nourishment. Peace lilies require proper feeding to thrive and may not receive enough nutrients when grown in water. Another possibility is excessive direct sunlight exposure, which can lead to leaf burn and hinder growth. Overwatering can also impede the plant’s development. It is essential to provide the correct amount of water, allowing the soil to dry out slightly between watering sessions.
Furthermore, using water that contains excessive minerals or chemicals can be detrimental to peace lilies. Ensuring the water is purified or using rainwater can help address this issue. Lastly, inadequate drainage in the water container can result in root rot, hindering the plant’s growth. It is crucial to use a container with proper drainage to prevent waterlogging.
Tips For Caring For A Transplanted Peace Lily In Water
Transplanting a peace lily into water can be a rewarding way to care for this beautiful plant. To ensure its health and longevity, here are a few important tips to keep in mind:
Avoiding overwatering
Watering is crucial for a peace lily, but overzealous watering can be harmful. Only water the plant when the top inch of soil feels dry to the touch and avoid leaving it sitting in water for extended periods. This can lead to root rot and other issues.
Maintaining the proper lighting conditions
Peace lilies thrive in bright, indirect light. Place your transplanted peace lily near a window where it can receive adequate sunlight, but avoid direct sunlight which can scorch the leaves. Remember to rotate the plant occasionally to ensure even growth.
Pruning and removing dead foliage
Regularly inspect your peace lily for any yellow or brown leaves and promptly remove them. Pruning helps the plant focus its energy on healthy growth. Additionally, remove any dead flowers to encourage new blooms.
Frequently Asked Questions Of How To Transplant A Peace Lily Into Water
Can A Peace Lily Live In Just Water?
Yes, a peace lily can live in just water. It is capable of surviving without soil as long as the water is maintained properly. The roots should be submerged in water, and water should be changed every 1-2 weeks to ensure the plant stays healthy.
Can You Move Plant From Soil To Water?
Yes, it is possible to move a plant from soil to water. It is known as hydroponics and can be done by removing the plant from the soil and placing its roots in water with added nutrients for growth.
Should I Cut The Brown Tips Off My Peace Lily?
Yes, you should cut off the brown tips of your peace lily.
Why Is My Peace Lily Drooping After Transplanting?
Transplanting can cause stress to a peace lily, leading to drooping. Ensure you’re providing proper care, like watering when the soil is dry and placing it in a well-lit area with indirect sunlight. Give it time to adjust, and the drooping should improve.
Conclusion
Transplanting a peace lily into water is a rewarding and effective method of nurturing this beautiful plant. By following the step-by-step guide provided in this blog post, you can ensure a successful transplant. With the right care and attention, your peace lily will thrive in its new water environment, adding a touch of natural elegance to any space.
Remember to maintain the water levels and provide proper lighting to keep your peace lily healthy and thriving. Happy transplanting!