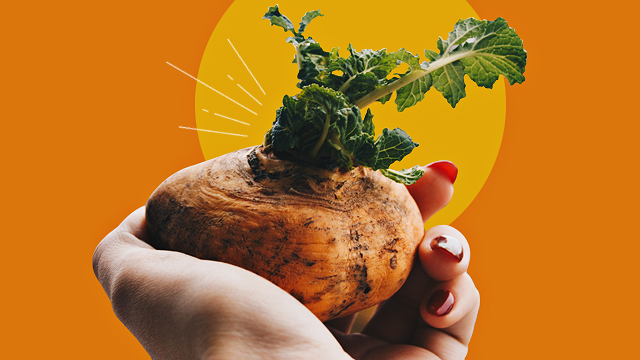
To transplant rutabaga from scraps, follow these steps: 1. Cut off around 2 inches of the top of the rutabaga.
2. Submerge the cut end in water for a couple of weeks until roots develop. Rutabagas, also known as swedes or neeps, are hearty root vegetables that can be easily grown from scraps. If you have a rutabaga on hand and want to propagate it, you can do so by transplanting it from scraps.
Credit: www.diyncrafts.com
This process involves cutting off a small section of the rutabaga and allowing it to develop roots before planting it in soil. We will guide you through the steps to successfully transplant rutabaga from scraps, allowing you to grow your own supply of this tasty vegetable. So let’s get started and learn how to transplant rutabaga from scraps.
Why Transplanting Rutabaga From Scraps Is Beneficial
Transplanting rutabaga from scraps is a beneficial practice for reducing food waste and saving money, while promoting sustainability in gardening.
By repurposing kitchen scraps, such as rutabaga tops or leftover roots, we can avoid throwing them in the trash and instead give them a new life in our gardens. This helps to minimize food waste and contribute to a more sustainable lifestyle.
Furthermore, transplanting rutabaga from scraps is a cost-effective alternative to purchasing new plants or seeds. It enables us to make the most of what we already have and save money in the process.
To transplant rutabaga from scraps, simply follow these steps:
- Choose a healthy rutabaga scrap with intact roots or tops.
- Prepare a well-draining container or plot in your garden.
- Plant the rutabaga scrap, ensuring the roots are covered in soil and the tops are exposed.
- Water the plant regularly, keeping the soil moist but not waterlogged.
- Provide adequate sunlight and protection from harsh weather conditions.
- Watch as your rutabaga grows and thrives, ready to be harvested in due time!
Transplanting rutabaga from scraps not only benefits us by reducing waste and saving money, but it also contributes to a greener and more sustainable environment. Give it a try and enjoy the rewards of your eco-friendly gardening efforts!
How to Transplant Rutabaga from Scraps : Step by Step Guide
Gathering And Preparing Rutabaga Scraps For Transplanting
When it comes to transplanting rutabaga from scraps, gathering and preparing the scraps properly is essential for successful growth. Start by selecting healthy rutabaga scraps, making sure they have no signs of disease or damage. This will help ensure that your new plants start off strong.
Once you have chosen your scraps, it’s important to properly prepare them for transplanting. Gently wash the scraps to remove any dirt or debris, taking care not to damage the fragile roots. Trim off any excess foliage and roots, ensuring that you have a clean and compact transplantable piece.
By following these steps and preparing your rutabaga scraps carefully, you can give your new plants the best chance for healthy growth and a successful transplant. Remember to provide proper care and maintenance as they continue to grow, and you’ll soon be enjoying fresh, home-grown rutabaga.
Transplanting Rutabaga Scraps Step By Step
Transplanting rutabaga scraps step by step involves choosing the right location, preparing the soil, planting the scraps with proper spacing, providing adequate water and sunlight, and maintaining the transplanted rutabaga scraps.
Location plays a crucial role in the successful transplantation of rutabaga scraps. Select an area with full sunlight exposure and well-drained soil to ensure healthy growth.
Before planting, prepare the soil by removing any weeds or debris. Loosen the soil to allow the roots to penetrate easily. Adding compost or organic matter can improve soil fertility and provide necessary nutrients for the growing plants.
When planting the rutabaga scraps, make sure to space them adequately, allowing enough room for the plants to grow. Providing at least 12 inches of spacing between each transplant is ideal.
Water the transplanted scraps regularly, ensuring the soil remains moist but not waterlogged. Rutabaga plants require consistent moisture to thrive. Additionally, ensure they receive sufficient sunlight, as they prefer full sun exposure.
Maintaining the transplanted rutabaga scraps involves regular watering, monitoring for pests or diseases, and providing proper nutrition. Applying organic fertilizers or compost tea during the growing season can help promote healthy growth.
Tips For Enhancing Rutabaga Growth After Transplantation
When transplanting rutabaga from scraps, there are several tips that can enhance its growth. One important aspect is applying organic fertilizers. Organic fertilizers provide essential nutrients and improve soil quality, resulting in healthier plants. Additionally, protecting against common pests and diseases is crucial. Routinely inspect the plants for signs of pests or diseases, and take necessary measures to prevent their spread. This may include using organic pest control methods or introducing beneficial insects. Lastly, monitoring soil moisture levels is vital to ensure optimal growth. Rutabaga plants require consistent moisture, so check the soil regularly and water as needed. By following these tips, you can help your transplanted rutabaga thrive and yield a bountiful harvest.
Harvesting And Enjoying Homegrown Rutabaga
Harvesting rutabaga at the right time is crucial for a successful transplant. The ideal harvest time is when the rutabaga roots are around 3-4 inches in diameter, which usually occurs after 90-100 days of growth. To determine if they’re ready, gently dig around the base of the plant to check the size.
When harvesting rutabaga, use a garden fork to loosen the soil around the roots and lift them out carefully. Trim off the leaves and store the roots in a cool, dark place to maximize shelf life.
Once you’ve harvested your rutabaga, it’s time to savor its delicious flavors. Try roasted rutabaga cubes tossed with olive oil, salt, and pepper for a delectable side dish. You can also mash cooked rutabaga with butter and nutmeg for a comforting alternative to mashed potatoes. For a refreshing twist, grate raw rutabaga into a slaw or add it to soups and stews for an extra punch of flavor.
Frequently Asked Questions On How To Transplant Rutabaga From Scraps
How Do You Grow Rutabagas From Scraps?
To grow rutabagas from scraps, place the top of the rutabaga in shallow water. Change water every few days until roots form. Plant in soil, water regularly, and harvest when ready.
Do Rutabagas Transplant Well?
Yes, rutabagas transplant well and adapt easily to new environments. They are resilient and thrive after transplanting.
Can You Regrow A Rutabaga?
No, you cannot regrow a rutabaga as it is an annual vegetable that needs to be replanted each year.
Can You Grow Rutabaga From A Sprouted Rutabaga?
Yes, you can grow rutabaga from a sprouted rutabaga.
Conclusion
To successfully transplant rutabaga from scraps, follow these simple steps. First, select a healthy rutabaga with a few leaves remaining. Then, cut off the top inch of the tuber and place it in a container with water, ensuring the cut end is submerged.
After a few days, roots will start to form. Once the roots are about an inch long, transplant the rutabaga into a pot with well-draining soil. Remember to water the plant regularly and place it in a sunny spot. In a few weeks, you will see new growth emerging from the tuber.
With proper care, your rutabaga plant will flourish and provide you with delicious homegrown vegetables. So, don’t discard those rutabaga scraps; instead, give them a new lease on life by transplanting them and enjoy the satisfaction of growing your own vegetables.