To use a hose mender, cut the damaged part of the hose, slide the hose mender onto the ends, and tighten the clamps. A hose mender is a simple and effective tool for fixing a damaged or broken hose.
Whether you have a garden hose or a water hose for your washing machine, a hose mender can extend the life of your hose and save you money. By following these steps and ensuring a secure connection, you can quickly repair your hose and get back to using it for watering plants, washing cars, or any other task that requires a reliable water source.
So, don’t toss out that damaged hose just yet – try using a hose mender instead!
Credit: www.faithfulltools.com
Tools And Materials Required
To successfully use a hose mender, you will need a few essential tools and materials. First, gather the tools required for the job: pliers, a screwdriver, and a hose clamp. These tools will help you handle any repairs or replacements needed.
As for the materials, make sure to have a hose mender kit, which typically includes a mender, barbed couplings, and clamps. Additionally, keep a pair of scissors or a utility knife handy for trimming the damaged section of the hose.
With these tools and materials in hand, you’ll be ready to efficiently mend your hose and ensure it functions properly once again. So, gather all the necessary items before starting the hose mending process.
How to Use a Hose Mender: Step by Step Guide
Choosing The Right Hose Mender
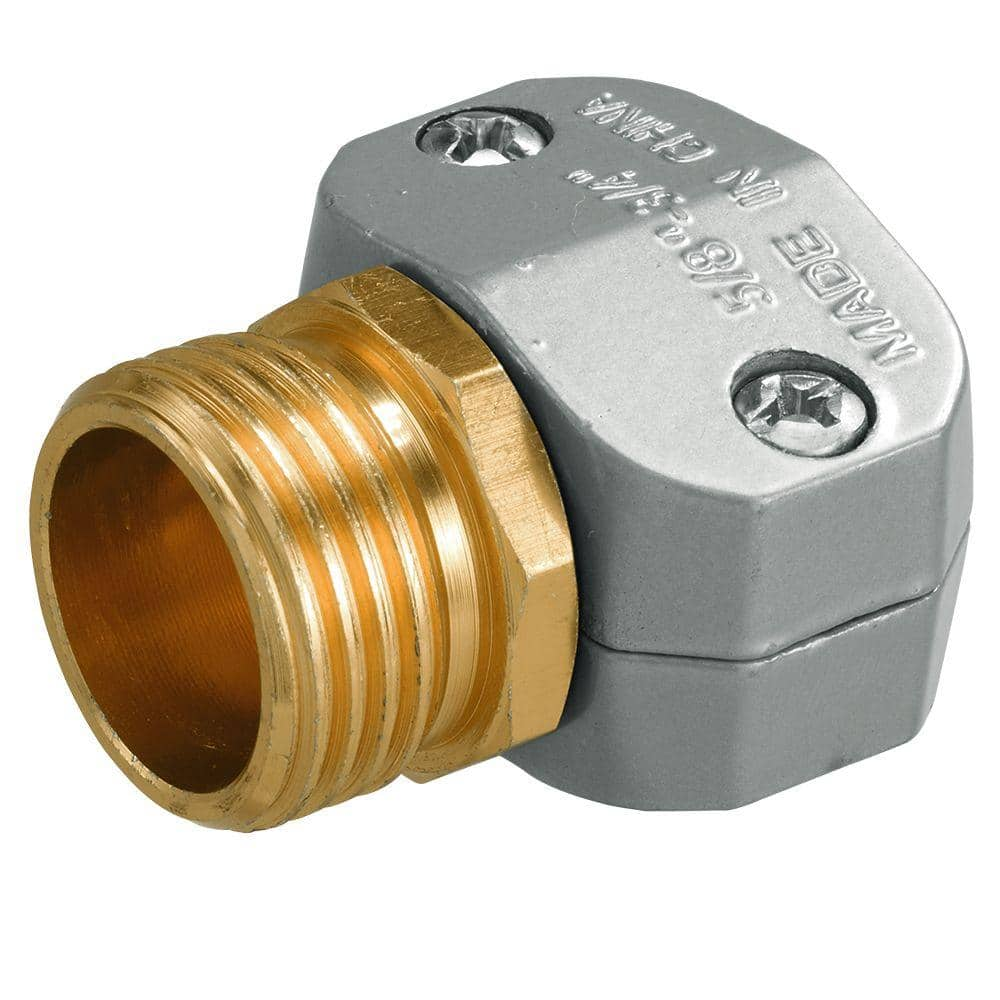
Selecting the right hose mender is crucial. Consider key factors like durability, compatibility, and material. Evaluate the types available in the market, such as brass, stainless steel, and plastic menders. Each type has its own advantages and disadvantages. Brass menders are sturdy and long-lasting but can be expensive.
Stainless steel menders are resistant to corrosion but may not be as affordable. Plastic menders are lightweight and affordable but may not be as durable. Assess the specific needs of your hose and choose a mender that meets those requirements.
Ensure that you select the correct size and fitting for your hose. By carefully considering these factors, you can find the right hose mender that will extend the life of your hose and prevent leaks or damage.
Identifying The Damaged Hose
A damaged hose can cause leaks and reduce its efficiency. To identify the exact location of the damage, check for signs such as cracks, splits, or bulges on the hose. Look for any signs of water dripping or spraying while the hose is in use.
Another indicator of a damaged hose is reduced water pressure or irregular flow. Additionally, pay attention to any hissing sounds coming from the hose, as this could indicate a puncture or hole. To locate the specific area of damage, run your hand along the hose while feeling for any abnormalities.
Once you have identified the damaged section, you can proceed with using a hose mender to fix it. By properly identifying the damaged hose, you can easily mend it and ensure smooth and efficient water flow for your gardening or cleaning needs.
Preparing The Hose
To prepare the hose for mending, start by cleaning the damaged area thoroughly. Use a brush or cloth to remove any dirt or debris. Next, carefully trim off the damaged section of the hose using sharp scissors or a utility knife.
Make sure to create a clean, straight cut. Once the damaged part is removed, you can proceed with the hose mending process. Remember to follow the instructions provided with your hose mender kit for the best results. Preparing the hose properly ensures that the mending process goes smoothly and the repaired hose remains efficient and leak-free.
Applying The Hose Mender
Applying a hose mender requires careful positioning and secure attachment to the hose. Begin by cleaning the damaged area and removing any debris. Cut the hose at the damaged spot, ensuring a clean, even cut. Slide one end of the mender onto the hose, pushing it firmly until it reaches the midpoint of the cut section.
Secure the mender using hose clamps or other appropriate fasteners. Make sure the clamps are tightened securely to prevent leaks. Repeat the process for the other end of the mender, ensuring a tight fit. Check for any potential leaks before using the hose.
Following these instructions will ensure successful application of the hose mender and help maintain the functionality of your hose.
Securing The Connection
Securing the connection between hose sections is crucial to avoid leaks and maintain effective water flow. To ensure a tight and leak-free connection, here are a few tips. Firstly, make sure both hose ends are clean and free from dirt or debris.
Secondly, apply a hose clamp over the joined sections and tighten it securely with a screwdriver. Thirdly, turn the water on and check for any leaks. If you notice any, reposition and tighten the connections as necessary. Next, avoid over-tightening the clamp, as this may cause damage.
Additionally, double-check the compatibility of the hose mender and the hose size to ensure a proper fit. Finally, regularly inspect and maintain the hose mender to prevent any future issues. By following these guidelines, you can effectively use a hose mender and enjoy a hassle-free watering experience.
Testing The Repaired Hose
After repairing a hose using a hose mender, it’s important to test whether the repair worked. Begin by turning on the water source and checking for any leaks. Inspect the mended area thoroughly, feeling for any signs of moisture or dripping.
If there are no leaks, proceed to run water through the hose at different pressures to ensure it holds up. Also, check the water flow to make sure it is consistent and without any blockages. If the mended hose exhibits any issues, troubleshoot by examining the connection points and tightening them if necessary.
Ensure that the hose mender is securely attached and hasn’t come loose. Overall, by following these steps, you can determine whether the repaired hose is in good working condition or if further adjustments are needed.
Cleaning And Storing
When it comes to cleaning and storing your hose, proper maintenance is essential. After use, be sure to thoroughly clean the hose to remove any dirt or debris. Begin by disconnecting it from the water source and emptying out any remaining water.
Use a hose mender to repair any leaks or damage. Avoid bending the hose tightly when storing it, as this can lead to kinks and damage. Instead, coil it loosely and secure it with a hose reel or storage bin.
Store the hose in a cool, dry place to prevent mold or mildew growth. By following these guidelines, you can ensure that your hose remains in good condition and ready for use whenever you need it.
Regular Inspections
Regular inspections are essential for maintaining the integrity of your hose. By performing thorough inspections, you can prevent potential issues and ensure its proper functioning. Start by visually examining the hose for any signs of wear or damage. Check for cracks, holes, or weak spots along the length of the hose.
Next, inspect the fittings to ensure they are securely attached and not leaking. Test the hose by turning on the water and checking for any leaks or irregular water flow. Additionally, make sure the hose is properly stored and protected when not in use.
Regular inspections help identify problems early and allow for timely repairs or replacements, saving you from inconvenience and potential water damage. By following these guidelines, you can maintain your hose’s longevity and ensure efficient use whenever needed.
Proper Handling And Usage
Using a hose mender correctly is crucial to avoid unnecessary damage. To ensure proper handling and usage, it is important to follow a few key best practices. Firstly, always inspect the hose for any signs of wear or damage before connecting it to the mender.
Secondly, make sure the connection is secure by tightening the clamps or fittings properly. Additionally, avoid placing excessive strain on the hose by avoiding sharp bends or kinks. This can weaken the hose and lead to leaks or bursts. Another common mistake to avoid is leaving the hose exposed to extreme temperatures or harsh weather conditions for long periods.
Lastly, properly store the hose after use to prevent it from being damaged by the elements or tripping hazards. By adhering to these guidelines, you can ensure the longevity and effectiveness of your hose mender and avoid unnecessary repairs or replacements.
Frequently Asked Questions For How To Use A Hose Mender
Do Hose Menders Work?
Yes, hose menders are effective in fixing damaged hoses. These devices are specifically designed to repair tears, punctures, or leaks in your garden hose. Hose menders work by joining the damaged ends of the hose together, creating a secure and watertight connection.
They are typically made of durable materials like brass, aluminum, or plastic, ensuring a long-lasting repair. To use a hose mender, simply cut off the damaged portion of the hose and insert each end into the corresponding sides of the mender.
Tighten the clamps or screws to secure the connection. With hose menders, you can quickly and easily fix your hose, saving you time and money. Whether you have a small leak or a significant tear, hose menders provide a reliable solution to restore your hose’s functionality.
So, if you’re dealing with a damaged hose, hose menders are definitely worth considering as a repair option.
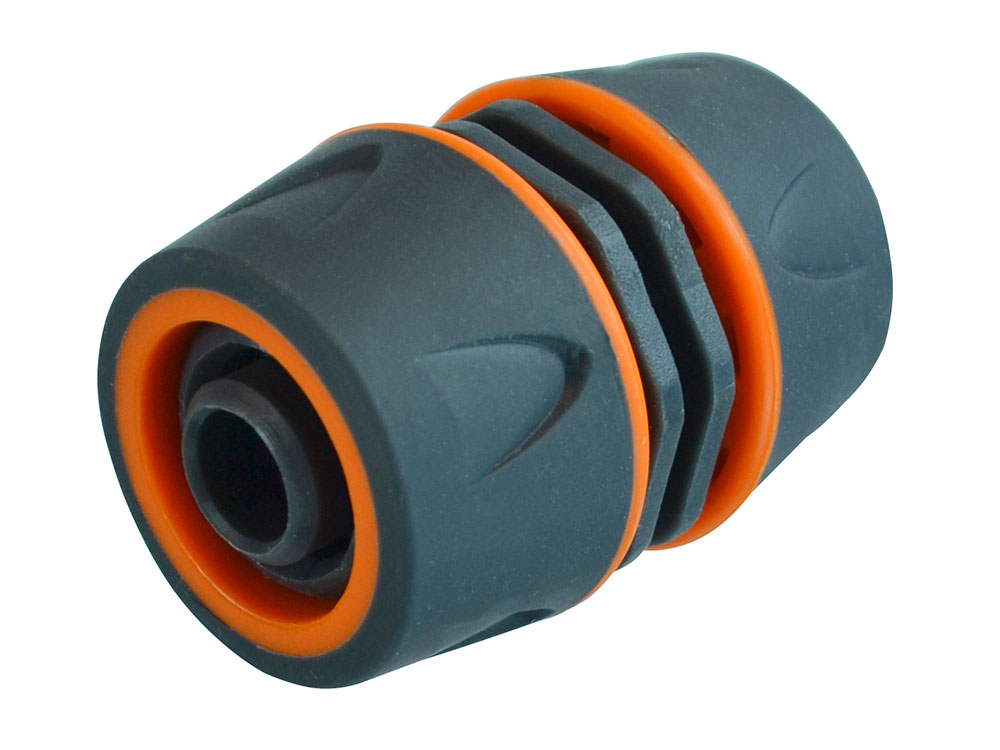
What Is A Push Fit Female Hose Mender?
A push fit female hose mender is a device used to repair or connect hoses easily. It is designed to push onto the end of a hose without the need for clamps or tools. The mender has a female connector on one end, which allows it to connect to a male hose end.
It also has barbs or ridges on the other end, which grip the hose securely and create a tight seal. To use a push fit female hose mender, simply push it onto the hose until it is fully seated. The mender is commonly used in gardening, irrigation, and other applications where hoses are frequently connected and disconnected.
It provides a quick and convenient solution for hose repairs, saving time and effort.
How Do You Use A Hose Repair Clamp?
To use a hose repair clamp, follow these steps: 1. Turn off the water supply to the damaged hose. 2. Clean the damaged area thoroughly, removing any dirt or debris. 3. Place the hose repair clamp over the damaged section, ensuring it covers the hole or crack.
4. Tighten the clamp using a screwdriver or wrench, securing it firmly in place. 5. Turn on the water supply and check for any leaks. If necessary, adjust the clamp’s tightness. 6. Monitor the repaired hose, ensuring it remains leak-free during use.
By using a hose repair clamp, you can quickly and effectively fix a damaged hose, allowing it to be used again. It’s a simple and convenient solution that prevents water wastage and helps extend the lifespan of your hose.
How Do You Use A Hose Quick Connect?
To use a hose quick connect: 1. Make sure the hose and quick connect fittings are compatible. 2. Push the quick connect fitting onto the end of the hose firmly. 3. Slide the collar on the quick connect fitting back. 4.
Insert the male end of the hose into the quick connect fitting. 5. Release the collar to secure the connection. 6. Pull on the hose to check if the connection is secure. 7. To disconnect, slide the collar back and pull the hose out.
Remember, check compatibility, push, slide, insert, release, and pull to connect or disconnect your hose using a quick connect system. Always inspect the connection to prevent leaks and ensure a tight fit. Happy watering!
Conclusion
Overall, using a hose mender is a simple and effective solution for repairing your garden hose. By following the step-by-step process outlined in this blog post, you can easily mend any leaks or damages, saving you both time and money.
Remember to take proper safety precautions and ensure that you have all the necessary tools and materials before starting the repair process. Regular maintenance and inspections of your garden hose can also help prevent future damages and leaks. Whether you are a seasoned gardener or a beginner, learning how to use a hose mender is a valuable skill that will benefit you in the long run.
So, next time you notice a leak in your hose, don’t panic! Just grab your hose mender and fix it yourself. Your plants will thank you, and you’ll feel a sense of accomplishment knowing that you can tackle any hose repair with confidence.