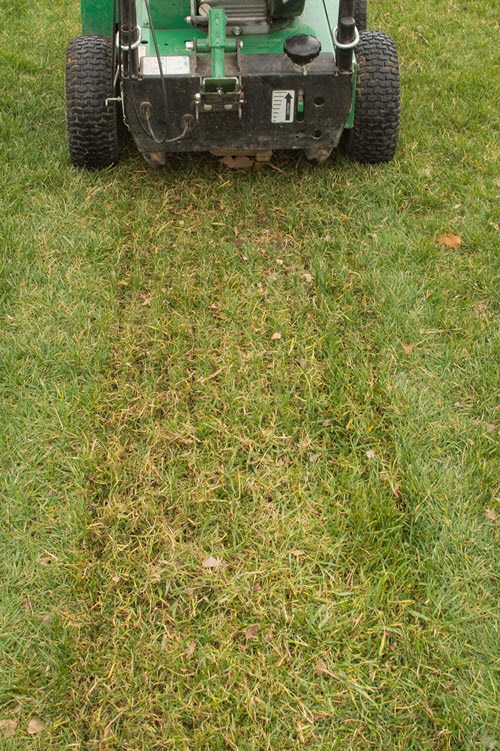
To use a slit seeder, first, adjust the seed drop rate and depth settings. Then, push or pull the slit seeder in straight rows across the lawn, ensuring even coverage.
For optimal results, water the seeded area regularly until the seeds germinate. Welcome to our guide on how to use a slit seeder. If you’re looking to achieve a healthy and lush lawn, a slit seeder can be an invaluable tool.
This efficient device allows you to sow seeds directly into the soil, ensuring maximum contact and better germination rates. We will provide you with step-by-step instructions on how to use a slit seeder effectively. By following these simple guidelines, you can transform your lawn and enjoy a vibrant and thriving outdoor space. So, let’s dive in and learn how to unleash the full potential of your slit seeder.

Credit: prolawn.com
Factors To Consider
Factors to consider when using a slit seeder include the size of your lawn, the type of seed, and the time and effort required. Firstly, assess the size of your lawn to determine the appropriate slit seeder for the job.
Secondly, consider the type of seed you’ll be using and ensure it is compatible with the seeder. Additionally, keep in mind the time and effort involved in using a slit seeder. Depending on the size of your lawn, it may require a significant amount of time and physical exertion.
It’s important to be prepared for this before starting the seeding process. By taking these factors into account, you can successfully use a slit seeder to achieve a lush and healthy lawn.
How to Use a Slit Seeder: Step by Step Guide
Clearing Debris
Clearing debris is an essential step before using a slit seeder. Start by raking the area thoroughly, removing any loose materials such as leaves, branches, or grass clippings. This will ensure a clean surface for the slit seeder to operate effectively.
Additionally, be sure to remove any rocks or large obstacles that could potentially damage the machine or interfere with the seed distribution process. Taking the time to clear the area properly will result in a more successful seeding experience and promote better overall growth and establishment of your lawn or garden.
Remember to be thorough and diligent in this step to avoid any future complications.
Leveling The Ground
Leveling the ground is an essential step before using a slit seeder. Topsoil amendments play a crucial role in achieving a smooth surface. By carefully selecting the right amendments and applying them evenly, you can ensure an optimal seedbed. Start by removing any debris, rocks, or existing vegetation from the area.
Then, spread a layer of topsoil amendment, such as compost or peat moss, across the ground. Use a rake or leveling tool to distribute it evenly, filling in any low spots or irregularities. Afterward, compact the soil slightly, being careful not to overdo it.
This will create a firm yet loose surface for efficient seed penetration. Finally, take the time to inspect and adjust the ground to eliminate any remaining bumps or inconsistencies before proceeding with the slit seeder. Following these steps will help you achieve a level ground ideal for successful seeding.
Setting The Depth
When using a slit seeder, it is important to set the depth correctly. This can be done by adjusting the knobs on the machine. By turning the knobs, you can control how deep the seeder will go into the soil.
It is crucial to find the right depth for optimal seed placement. Setting the depth too shallow may result in poor germination, while setting it too deep may bury the seeds too far down. By carefully adjusting the knobs, you can ensure that the seeder is set to the ideal depth for the specific type of seed you are using.
This will help to promote healthy seed growth and a successful planting process.
Loading The Seed
Loading the seed into a slit seeder requires choosing the right type and filling the hopper accordingly. Selecting the appropriate seed is vital for achieving desired results. Ensure that the seed matches your specific needs and the growing conditions of your lawn or garden.
Once you have chosen the right seed, carefully fill the hopper of the slit seeder. Be sure to follow the manufacturer’s instructions to avoid damaging the equipment or causing uneven distribution of the seed. Take your time and ensure that the hopper is filled evenly, allowing for a consistent and effective seeding process.
Proper loading of the seed sets the foundation for a successful slit seeding experience.
Proper Operation Techniques
To effectively use a slit seeder, it is crucial to understand proper operation techniques. One key aspect is following a specific walking pattern while using the machine. Begin by walking parallel to the first row, ensuring consistent and even coverage.
Maintain a steady pace and avoid rushing. Adjust the speed control accordingly to achieve the desired results. It is recommended to go over the seeded area multiple times, changing the direction of each pass. This walking pattern will ensure thorough seeding and prevent any missed spots.
By adhering to these guidelines, you can maximize the efficiency and effectiveness of the slit seeder, resulting in healthy and well-established lawns or fields.
Watering
Proper irrigation techniques are crucial when it comes to using a slit seeder effectively. To optimize growth, frequency and duration are key considerations. It is important to water the area thoroughly but without causing excessive soaking. This can be achieved by providing regular, light watering sessions rather than infrequent heavy ones.
Daily watering for shorter durations is preferable to once-a-week deep watering. By doing so, you ensure that the seeds receive the necessary moisture for germination and establishment without creating waterlogged conditions that could hinder their growth. Additionally, monitoring the moisture levels and adjusting the watering frequency accordingly is essential to avoid under or over-watering.
Remember, striking the right balance is critical for successful slit seeding.
Post-Seeding Fertilization
Applying fertilizer after using a slit seeder is an essential step in post-seeding fertilization. It is crucial to follow the label instructions for the specific fertilizer product you are using. The label provides important details about the application rate, timing, and any special considerations.
By adhering to these instructions, you can ensure that the fertilizer is applied correctly and at the right time for optimal results. Following the label instructions also helps to avoid any potential negative effects or damage to the newly seeded area.
Take care to evenly distribute the fertilizer across the seeded area, using a spreader or other suitable equipment. This step will provide the necessary nutrients for the newly germinated seeds to grow strong and healthy, promoting a lush and vibrant lawn or garden.
Cleaning And Storing The Slit Seeder
Cleaning and storing the slit seeder is essential for its longevity and optimal performance. To remove excess seed after use, brush or blow away any leftover seeds from the machine. Ensure that all seed containers and hopper are emptied completely.
Next, clean the machine with a mild detergent and water solution, using a brush or sponge to remove any remaining dirt or debris. Once cleaned, dry the slit seeder thoroughly to prevent rust formation. Apply a lubricant to all moving parts, especially the rotor and blade assembly, to prevent rust and keep the machine functioning smoothly.
Lastly, store the slit seeder in a clean, dry area to protect it from moisture and other potential damage. Following these cleaning and storage guidelines will ensure the slit seeder’s longevity and continued effectiveness.
Frequently Asked Questions On How To Use A Slit Seeder
How Does A Slit Seeder Work?
A slit seeder works by cutting precise grooves into the soil, which creates a perfect environment for seed germination. It simultaneously deposits seeds into these grooves, ensuring optimal seed-to-soil contact for better results. This innovative machine saves time and effort while promoting healthier, lusher lawns.
What Are The Benefits Of Using A Slit Seeder?
Using a slit seeder comes with several benefits. It guarantees better seed placement, reduces seed wastage, and ensures proper seedling growth. The machine also helps to control weeds by creating microclimates for seeds, promoting an even, thick, and durable lawn.
With a slit seeder, you can achieve professional results without the hassle.
Is A Slit Seeder Suitable For All Types Of Lawns?
Yes, a slit seeder is suitable for all types of lawns. Whether you have a residential or commercial lawn, a slit seeder can be used to repair damaged areas, reseed thin spots, or establish new lawns. Its versatility allows for customization based on specific lawn conditions, ensuring success regardless of the grass type or soil condition.
Conclusion
To wrap up, mastering the use of a slit seeder is essential for achieving a lush and healthy lawn. The proper techniques discussed in this blog post, such as preparing the soil, calibrating the machine, and following the recommended seeding rate, will ensure successful results.
Remember to choose the right type of grass seed for your specific lawn needs, whether it’s fixing bare spots or overseeding for thicker coverage. Regular maintenance, including watering and fertilizing, will further enhance the growth of your newly seeded lawn.
By incorporating these tips into your lawn care routine, you’ll be able to enjoy the benefits of a beautiful and vibrant lawn year after year. So go ahead, grab your slit seeder, and get ready to transform your yard into a green oasis.
Happy seeding!