To waterproof the inside of a planter box, apply waterproof sealant or liner to the interior surface. A well-sealed planter box prevents water damage and extends its lifespan.
Additionally, waterproofing helps protect the plants and soil from excess moisture, preventing rot or water-related issues. By taking the time to waterproof your planter box, you create a durable and long-lasting container for your plants. Whether you are using a wooden, plastic, or concrete planter box, waterproofing is essential to ensure its functionality and aesthetics.
We will discuss various methods you can use to effectively waterproof the inside of your planter box.

Credit: www.ronhazelton.com
How to Waterproof the Inside of a Planter Box: Step by Step Guide
Choosing The Right Planter For Waterproofing
When it comes to creating a beautiful and functional planter box that will withstand the test of time, waterproofing is an essential step. One of the key factors in successfully waterproofing a planter box is choosing the right type of planter to begin with. In this article, we will explore the material considerations and factors to keep in mind when selecting a planter box for waterproofing.
Material Considerations For Planter Boxes
Before diving into the factors for selecting a planter box for waterproofing, it’s important to understand the different materials available. Each material has its own unique qualities and characteristics that may impact its ability to be waterproofed effectively.
Here are common materials used for planter boxes:
| Material | Pros | Cons |
|---|---|---|
| Wood | Easily customizable and aesthetically pleasing. | Susceptible to rot and requires regular maintenance. |
| Plastic | Durable, lightweight, and resistant to rot. | Not as aesthetically pleasing as natural materials. |
| Metal | Strong and durable, suitable for various weather conditions. | May rust or corrode if not properly treated or coated. |
| Concrete | Sturdy and long-lasting, ideal for large planters. | Heavy and difficult to move once in place. |
Considering these material options and their pros and cons will help you make an informed decision when choosing a planter box for waterproofing.
Factors To Consider When Selecting A Planter For Waterproofing
When it comes to waterproofing a planter, there are several crucial factors to keep in mind. By considering these factors, you can ensure that your planter is not only visually appealing but also effectively waterproofed.
- Size and depth: Ensure that the planter has sufficient depth and size to accommodate the root system of your plants. Adequate space allows for proper drainage, preventing water buildup that can lead to waterlogged soil and root rot.
- Drainage holes: Opt for a planter box that already has drainage holes or select one that can be easily modified to include them. Effective drainage holes allow excess water to flow out, preventing water accumulation and potential damage to the plants.
- Sealing material: Consider the type of sealing material that will be used to waterproof the planter. Depending on the material of the planter box, different types of sealants may be required, such as waterproof paint, epoxy coatings, or sealant sprays.
- Maintenance: Evaluate the maintenance requirements of the chosen planter box material. Some materials may require frequent sealing or reapplications to ensure long-term waterproofing.
- Style and aesthetics: While functionality is key, don’t forget to choose a planter box that complements your overall design and style preferences. With a wide range of colors, shapes, and finishes available, you can find a planter that not only serves its purpose but also enhances the look of your space.
Considering these factors will guide you towards choosing the right planter box for waterproofing. It will ensure that your plants thrive in a well-drained and protected environment, adding beauty to your indoor or outdoor space.
Preparing The Planter Box For Waterproofing
Prepare your planter box for waterproofing with these essential steps. Ensure a watertight seal by following expert guidelines, making it easy to protect the inside of your planter box from water damage.
Cleaning The Planter Box
One of the essential steps in preparing a planter box for waterproofing is thoroughly cleaning it. Removing dirt, debris, and any previous coatings will ensure that the waterproofing material properly adheres to the surface. Here’s how you can clean your planter box effectively:
- Remove any plants or soil from the planter box and set them aside.
- Use a stiff-bristle brush to scrub away loose dirt and debris from the box’s interior and exterior surfaces.
- Rinse the planter box with water to remove any remaining dirt.
- To remove any trace of previous coatings, sand the surfaces using sandpaper or an electric sander. This step helps in achieving better adhesion for the waterproofing material.
Sanding And Smoothing The Surfaces
After cleaning the planter box, it’s important to sand and smooth its surfaces to ensure an even application of the waterproofing material. Here’s how you can do it:
- Start by inspecting the planter box for rough spots, splinters, or any uneven areas.
- Use coarse-grit sandpaper to smooth out rough spots and remove splinters. Sand in the direction of the wood grain for better results.
- Switch to fine-grit sandpaper to achieve a smoother finish. Sand the entire surface of the planter box, including its edges and corners.
- Wipe away any dust or debris from sanding using a damp cloth or tack cloth.
- Inspect the box again for any remaining imperfections. If necessary, repeat the sanding process until the surfaces are uniformly smooth.
Filling Any Cracks Or Holes
To ensure optimal waterproofing, it’s crucial to address any cracks or holes in the planter box. Filling these gaps will prevent water from seeping through and damaging the box or its contents. Here’s how you can fill cracks and holes effectively:
- Inspect the planter box thoroughly, paying close attention to corners, joints, and any visible cracks or holes.
- Choose an appropriate filler material based on the planter box’s material (such as wood filler for wooden boxes or epoxy putty for plastic or metal boxes).
- Follow the manufacturer’s instructions for preparing and applying the filler.
- Fill the cracks and holes, ensuring the material is evenly distributed and flush with the surrounding surface.
- Allow the filler to dry or cure completely according to the manufacturer’s recommendations.
- Once the filler is dry, lightly sand the filled areas to achieve a smooth finish.
- Wipe away any dust or debris using a damp cloth or tack cloth.
By properly cleaning, sanding, and filling any imperfections, you’ll be well on your way to effectively waterproofing the inside of your planter box. These steps set a solid foundation for applying the waterproofing material, ensuring maximum protection for your plants and the longevity of your planter box.
Applying The Waterproofing Sealant
To waterproof the inside of a planter box, apply a waterproofing sealant to protect it from moisture damage. Coat the entire interior with the sealant using a brush, ensuring coverage of all surfaces. Allow it to dry completely before planting to create a water-resistant barrier.
Selecting The Appropriate Sealant For Your Planter Box Material
When it comes to waterproofing the inside of your planter box, selecting the right sealant is crucial. The type of material your planter box is made of will determine the best sealant to use. Here are some popular planter box materials and the recommended sealants:
| Planter Box Material | Recommended Sealant |
|---|---|
| Wood | Marine-grade polyurethane sealer |
| Metal | Rust-preventive paint or epoxy sealant |
| Plastic | Flexible epoxy or latex sealant |
| Cement or concrete | Concrete sealer or waterproofing paint |
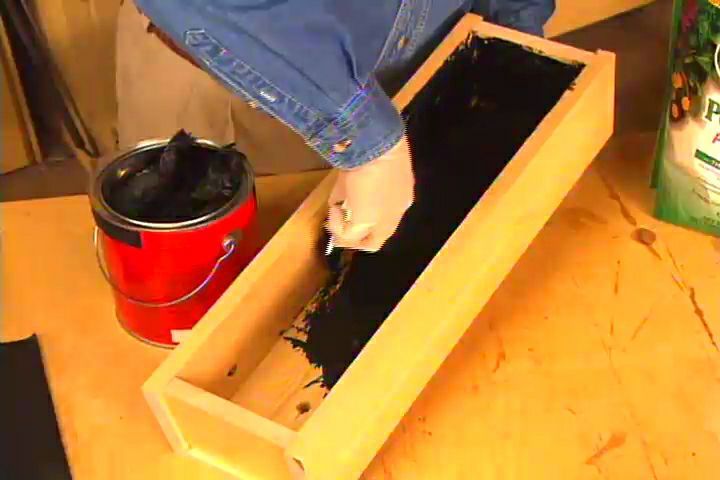
Applying The Sealant To The Inside Surfaces Of The Planter Box
- Clean and dry the inside of the planter box: Before applying the sealant, make sure the inside surfaces are clean and free from any dirt, dust, or debris. Use a brush or a damp cloth to remove any particles. Allow the planter box to dry completely before proceeding.
- Prepare the sealant: Follow the manufacturer’s instructions to prepare the sealant. This may involve mixing different components or diluting the sealant with water. Ensure that you wear protective gloves and work in a well-ventilated area.
- Apply the sealant: Using a brush or a roller, apply the sealant evenly to the inside surfaces of the planter box. Start from the bottom and work your way up to ensure complete coverage. Pay extra attention to the corners and edges where water may seep through.
- Allow it to dry: Give the sealant enough time to dry according to the manufacturer’s instructions. This may take several hours or even days, depending on the type of sealant used. Avoid placing any soil or plants in the planter box until the sealant is fully cured.
- Inspect and reapply if necessary: Once the first coat of sealant has dried, inspect the inside of the planter box for any missed spots or areas that need additional coverage. If needed, apply a second coat of sealant following the same steps as before.
Following these simple steps will help you effectively waterproof the inside of your planter box, ensuring that it lasts for years to come. Remember to regularly inspect the sealant and reapply it as needed to maintain the waterproofing.
Curing And Drying The Waterproofing Sealant
Once you have successfully applied the waterproofing sealant to the inside of your planter box, the next crucial step is to let it cure and dry properly. This will ensure a long-lasting and effective protective barrier that keeps water from seeping into the wood and causing damage. Here are two important considerations to keep in mind: allowing sufficient time for the sealant to cure and properly drying the planter box after applying the sealant.
Allowing Sufficient Time For The Sealant To Cure
After applying the waterproofing sealant, it’s essential to allow sufficient time for it to cure. The cure time can vary depending on the specific product you’re using, so be sure to follow the manufacturer’s instructions. Typically, it can take anywhere from a few hours to several days for the sealant to fully cure.
During this curing period, it’s important to keep the planter box in a well-ventilated area, away from direct sunlight and excessive moisture. This will help facilitate the curing process and ensure that the sealant adheres properly to the wood.
Properly Drying The Planter Box After Applying The Sealant
Once the sealant has cured, it’s time to properly dry the planter box. This step is crucial to remove any excess moisture and ensure that the planter box is ready for planting.
To start, use a clean cloth or sponge to remove any excess sealant from the surface of the planter box. Take care not to apply too much pressure, as this could cause the sealant to peel or chip.
Next, place the planter box in a well-ventilated area and allow it to air dry completely. This may take a few hours or even overnight, depending on the humidity levels in your environment.
If you’re in a hurry and need to speed up the drying process, you can use a fan or a hairdryer on a low heat setting. However, be cautious not to expose the planter box to excessive heat, as it can damage the wood or cause the sealant to bubble or crack.
Once the planter box is completely dry, give it a thorough inspection to ensure that there are no areas of trapped moisture or uncured sealant. If you notice any issues, you may need to reapply the sealant or seek professional assistance.
Remember, taking the time to properly cure and dry the waterproofing sealant will greatly enhance the longevity of your planter box and provide lasting protection against water damage. So, be patient and diligent in this crucial step.
Testing The Waterproofing Of The Planter Box
Testing the waterproofing of a planter box is crucial to ensure that it can effectively protect the plant and surrounding surfaces from water damage. There are various methods you can use to test the effectiveness of the waterproofing and identify any areas that may need additional sealing or repairs. By undertaking these tests, you can ensure that your planter box is fully waterproof and ready to withstand any weather conditions.
Methods For Testing The Effectiveness Of The Waterproofing:
-
- Water Retention Test: One way to evaluate the waterproofing of your planter box is by conducting a water retention test. Fill the planter box with water and observe if any leakage occurs. Leave it filled for a few hours and check for any signs of water seepage. If you notice any water escaping from the planter box, it indicates that the waterproofing needs improvement.
-
- Moisture Barrier Test: Another effective method is to test the planter box’s moisture barrier. Cover the inside of the planter box with a plastic sheet or a moisture barrier, ensuring it covers all the surfaces thoroughly. Fill the planter with water and let it sit for a few hours. Afterward, carefully remove the plastic sheet and check for any signs of moisture trapped between the sheet and the planter box. If there is no moisture present, it means the waterproofing is intact.
- Pressure Test: One more approach you can undertake is a pressure test. Place your planter box in a larger container such as a bathtub or a basin. Fill the surrounding container with water, ensuring it covers the planter box up to a certain height. Observe the planter box for several hours to determine if any water penetrates through the walls or if there are any leaks. This test helps you identify any weak points in the waterproofing and allows you to focus on those areas for necessary repairs.
Addressing Any Areas That May Need Additional Sealing Or Repairs:
If you find any areas of concern during the testing process, it is important to address them promptly to ensure the planter box’s waterproofing is effective. Here are a few steps you can follow:
-
- Identify the problem areas: Carefully examine the planter box to determine the specific areas where the waterproofing is inadequate. Look for cracks, gaps, or any signs of water seepage.
-
- Apply a sealant: Once you have identified the problem areas, use a suitable sealant such as silicone caulk or epoxy to seal any cracks or gaps in the planter box. Apply the sealant generously and ensure it covers the entire problem area.
-
- Allow the sealant to dry: After applying the sealant, allow it to dry completely according to the manufacturer’s instructions. Giving it sufficient time to cure will ensure a durable and long-lasting waterproofing solution.
- Re-test the waterproofing: Once the sealant has dried, re-conduct the water retention, moisture barrier, or pressure test to check if the repairs have successfully addressed the areas that needed additional sealing. Repeat the tests until you are satisfied with the waterproofing performance of the planter box.
By using these testing methods and addressing any areas that may need additional sealing or repairs, you can ensure that your planter box is effectively waterproofed. Taking the time to evaluate and reinforce the waterproofing will help protect your plants and prevent any damage to surfaces or structures.
Frequently Asked Questions On How To Waterproof The Inside Of A Planter Box
Can You Use Flex Seal In A Planter Box?
Yes, you can use Flex Seal in a planter box. It is ideal for sealing and protecting various surfaces, including planters. Its waterproof and durable properties ensure that your planter box remains leak-free and protected from water damage.
Should You Waterproof Planter Boxes?
Yes, it is recommended to waterproof planter boxes. Waterproofing helps protect the boxes from water damage, preventing rot and prolonging their lifespan. By sealing the wood or using a waterproof liner, you can ensure that the planter boxes remain in good condition and retain their functionality for longer.
What Do You Put On The Inside Of A Planter Box?
Fill your planter box with a mix of nutrient-rich soil and compost, ensuring good drainage. Plant flowers, herbs, or vegetables based on your preference and the amount of sunlight the area receives. Proper soil preparation and plant selection are key for successful growth.
How Do You Waterproof Garden Planters?
To waterproof garden planters, apply a waterproof sealant or liner on the inside surface. This helps prevent water damage and extends the planter’s lifespan. Choose a suitable waterproofing product and follow the manufacturer’s instructions for application.
Conclusion
To ensure the long-term durability of your planter box, waterproofing its interior is essential. By following the steps outlined in this blog post, you can effectively protect your plants and prevent water damage. Remember to choose the right sealant, apply multiple layers, and pay attention to the drainage holes.
With these tips, you’ll be able to enjoy a beautiful and functional planter box for years to come. Happy gardening!