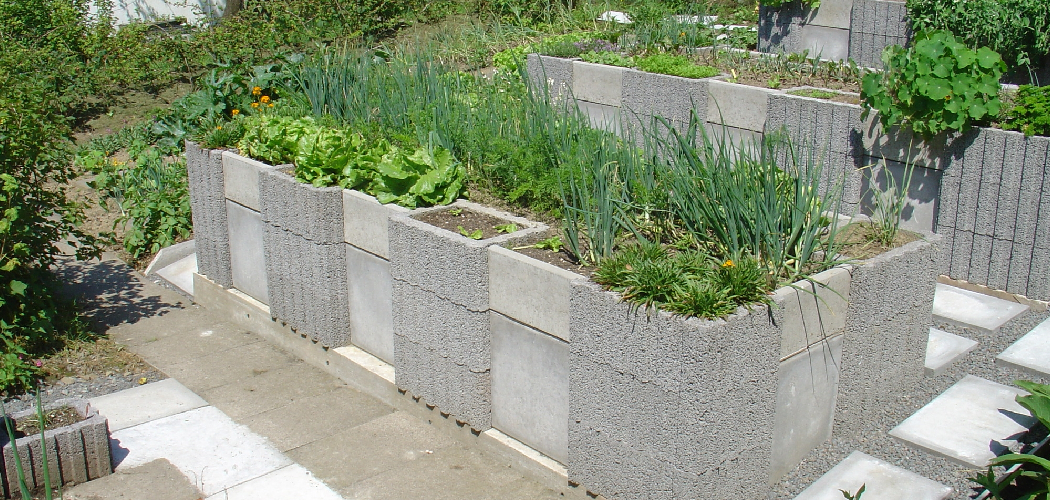
If you’re interested in learning how to build a raised garden bed with concrete blocks, you’re in the right place. To begin, select a suitable location for your garden bed and mark the area accordingly. Next, lay the first row of concrete blocks in the desired shape, ensuring they are level and aligned.
This will serve as the foundation for your raised bed. From there, you can proceed with stacking additional rows of concrete blocks, ensuring they are sturdy and secure. By following these steps, you can successfully construct a raised garden bed using concrete blocks, providing a durable and customizable solution for your gardening needs.
Finally, stack additional rows, alternating the alignment of the blocks for stability. This method provides a durable and easy-to-maintain raised garden bed that allows for better drainage and soil retention, promoting healthier plant growth. By following these steps, you can create an attractive and functional garden bed using concrete blocks.
Creating a raised garden bed is an excellent way to enhance your gardening experience. Not only does it offer better drainage and soil quality, but it also makes gardening more accessible, especially for those with limited mobility. Among the various materials available for constructing a raised garden bed, concrete blocks provide durability and affordability. With their simple interlocking design, they make the building process relatively straightforward even for beginners. In this guide, we will walk you through the necessary steps to build a raised garden bed using concrete blocks. By the end, you’ll have a sturdy and long-lasting garden bed that will make your plants thrive.

Choosing The Right Location For Your Raised Garden Bed
Choosing the right location for your raised garden bed is crucial for its success. Consider factors such as sunlight requirements and soil quality assessment.
Preparing The Ground For Your Raised Garden Bed
Preparing the ground for your raised garden bed is essential for its success. Clear the area and remove any weeds and grass to create a clean base. Level the ground carefully to ensure even placement of the concrete blocks. This will help prevent any shifting or instability in your garden bed.
Take your time to properly clear and level the area, as it will make the construction process much easier. By following these steps, you will have a solid foundation for your raised garden bed and ensure its longevity. So, roll up your sleeves, grab your tools, and let’s get started on building your own raised garden bed with concrete blocks!
Gathering Materials For Your Raised Garden Bed
To build a raised garden bed with concrete blocks, the first step is gathering the necessary materials. Begin by calculating the number of concrete blocks you’ll need for the desired bed size. Next, select the appropriate size and type of concrete blocks for your project.
Consider factors such as strength, durability, and aesthetic appeal. In addition to the blocks, gather additional materials required for the garden bed, including soil, compost, and mulch. These elements will provide the necessary nutrients and moisture retention for your plants.
With all the materials gathered and ready, you can begin constructing your raised garden bed with confidence. By following these steps, you’ll be well on your way to enjoying a thriving garden in no time.
How to Build a Raised Garden Bed With Concrete Blocks: Step-by-Step Guidelines
1. Lay The Foundation Of Your Raised Garden Bed
To build a raised garden bed with concrete blocks, you need to follow these simple steps. Start by marking the dimensions of your desired garden bed. Next, excavate the ground to create a level and stable foundation. This step is crucial for ensuring your garden bed is properly aligned.
Once the ground is prepared, install a weed barrier to prevent unwanted growth. This will help keep your plants healthy and minimize maintenance. By implementing these steps, you can lay a strong foundation for your raised garden bed and create a beautiful and productive space for growing your favorite plants.
2. Assembling The Concrete Blocks For Your Raised Garden Bed
Assembling the concrete blocks for your raised garden bed is a straightforward process. Arrange the first layer of concrete blocks ensuring they are aligned properly. Level them carefully to ensure stability and prevent any unevenness. Once the first layer is set, stack subsequent layers securely on top, interlocking the blocks for added strength.
This will create a solid foundation for your raised garden bed. Make sure each layer is level before moving on to the next one. The use of concrete blocks makes it easy to build a durable and long-lasting raised garden bed.
With these simple steps, you’ll have a sturdy structure ready to be filled with soil and plants, providing a beautiful and functional addition to your garden.
3. Filling And Preparing The Raised Garden Bed
To fill and prepare your raised garden bed, start by adding soil and compost in layers. Mix and level the soil evenly to provide a balanced growing environment. Remember to water the bed thoroughly and allow it to settle. Avoid overusing various phrases and be mindful of starting sentences in a repetitive manner.
By following these instructions, you can create a raised garden bed with concrete blocks that is ready for planting.
4. Maintaining And Caring For Your Raised Garden Bed
Maintaining and caring for your raised garden bed requires regular watering and irrigation to provide adequate moisture. Implementing a consistent watering schedule helps ensure the health and growth of your plants. Additionally, weed control and prevention are crucial to maintaining the aesthetics and productivity of your garden.
Regularly removing unwanted vegetation and utilizing weed prevention measures, such as mulching, can help keep your raised garden bed free from invasive plants. In addition to these practices, pest management strategies should be implemented to protect your plants from harmful insects and pests.
Utilizing organic pest control methods or introducing beneficial insects can help keep pest populations in check. By implementing these essential practices, you can enjoy a flourishing and productive raised garden bed.
5. Planting In Your Raised Garden Bed
Planting in your raised garden bed requires careful consideration of suitable plants, proper spacing, arrangement, mulching, and fertilizing. When selecting plants, choose ones that thrive in raised beds and consider factors like sunlight and soil conditions. Remember to space them adequately to allow for proper growth and prevent overcrowding.
Arrange the plants strategically to ensure they complement each other and maximize space. Adding mulch helps retain moisture, suppress weeds, and maintain soil temperature. Apply organic fertilizers to provide necessary nutrients for healthy plant growth. By following these steps, you can create a thriving raised garden bed and enjoy a bountiful harvest.
6. Monitoring And Troubleshooting In Your Raised Garden Bed
Building a raised garden bed with concrete blocks is a great way to create a productive and attractive garden space. When it comes to monitoring and troubleshooting, there are a few key aspects to consider. Firstly, detecting and resolving nutrient deficiencies is essential for the health and growth of your plants.
Regularly testing the soil and providing the necessary nutrients can prevent issues. Secondly, identifying and controlling common garden pests is crucial to ensure your plants thrive. Practice integrated pest management techniques to minimize damage. Lastly, address potential drainage issues that may arise.
Adequate drainage is essential to prevent waterlogged soil and root rot. By following these guidelines and taking necessary actions, you can maintain a flourishing raised garden bed with concrete blocks.
7. Harvesting And Extending The Growing Season In Your Raised Garden Bed
Harvest your vegetables and fruits at the right time to ensure maximum flavor and nutrient content. Extend the growing season in your raised garden bed by implementing various strategies. Consider utilizing row covers, cold frames, or greenhouses to protect plants from frost and cold temperatures.
Fall and winter gardening techniques, such as planting cold-hardy vegetables and using mulch, can also help you continue growing fresh produce. Experiment with companion planting to optimize space and promote healthier crops. Additionally, try succession planting for a continuous harvest throughout the season.
By following these tips, you can enjoy homegrown fruits and veggies for a longer period and make the most of your raised garden bed. Remember, timing and proper care are key to a successful harvest.
Frequently Asked Questions For How To Build A Raised Garden Bed With Concrete Blocks
Can I Use Concrete Blocks To Build A Raised Garden Bed?
Yes, concrete blocks are a popular and durable choice for building raised garden beds. They provide a sturdy structure, are easy to find and assemble, and can withstand outdoor conditions for years to come. Just make sure to choose blocks without any harmful chemicals that could leach into the soil.
How Do I Build A Raised Garden Bed With Concrete Blocks?
To build a raised garden bed with concrete blocks, start by clearing the area and leveling the ground. Arrange the blocks in the desired shape, ensuring they are firmly stacked and leveled. Fill the bed with high-quality soil, and you’re ready to start planting your favorite veggies and flowers.
Are There Any Benefits To Using Concrete Blocks For A Raised Garden Bed?
Certainly! Concrete blocks offer various advantages. They provide excellent stability and longevity compared to other materials. Additionally, they create a clear boundary for your garden and help retain moisture in the soil, which can improve plant growth. Concrete blocks also allow for creative designs and can be painted to complement your outdoor space.
Is It Necessary To Use Mortar When Building A Raised Garden Bed With Concrete Blocks?
While using mortar is not always necessary, it can provide added stability. If you intend to build a taller raised garden bed or desire extra durability, using mortar between the concrete blocks can help them stay in place for a longer time.
However, it’s completely optional, and you can achieve a strong structure without mortar as well.
How Do I Protect The Soil And Plants In A Concrete Block Raised Garden Bed?
To protect the soil and plants in a concrete block raised garden bed, you can add a layer of landscape fabric or cardboard at the bottom before filling it with soil. This barrier prevents weeds from growing up into the bed.
Additionally, applying a natural mulch like straw or wood chips on top helps retain moisture and suppresses weed growth.
Conclusion
Building a raised garden bed with concrete blocks offers numerous advantages, from affordability to durability. By following the step-by-step instructions discussed in this blog post, you can create a functional and aesthetically pleasing raised garden bed within a short period.
The versatility of concrete blocks allows you to customize the dimensions and design according to your specific needs and preferences. Moreover, the raised height of the bed allows for easier access and reduced strain on your back and knees. Additionally, concrete blocks provide excellent insulation, promoting healthy plant growth throughout the seasons.
The inclusion of a protective liner ensures proper drainage and prevents water retention, eliminating the risk of root rot. So, whether you’re a seasoned gardener or a beginner, constructing a raised garden bed with concrete blocks is a rewarding and practical solution that will enable you to enjoy a thriving garden and bountiful harvests.