To make a potato box, you will need a wooden crate or box, some soil, and potato seeds or old potatoes. First, choose a suitable location for your potato box and ensure it has proper drainage.
Then, fill the box with soil and plant your potato seeds or cut-up potatoes. Water the box regularly, ensuring the soil remains moist but not waterlogged. As the potato plants grow, continue adding soil to cover the stems, leaving only the top leaves exposed.
Harvest the potatoes once the plants have died back and the skins have hardened.

Credit: www.pinterest.com
Materials Needed For Making A Potato Box
When it comes to making a potato box, you’ll need a few essential materials to get started. From choosing the right wood to measuring and cutting the boards, these steps are crucial for building a sturdy and functional potato box. In addition, you’ll need nails or screws for assembly, as well as some optional tools and accessories that can make the process easier and more efficient.
H3choosing The Right Wood/h3
Choosing the right wood is an important step in the construction of a potato box. You’ll want to select a type of wood that is durable and resistant to rot, as well as one that is safe for growing crops. Cedar and cypress are popular choices due to their natural resistance to moisture and insects. If these options are not available, you can also use pressure-treated lumber, which has been treated with chemicals to withstand the elements.
H3measuring And Cutting The Boards/h3
Measuring and cutting the boards accurately is essential for ensuring that your potato box is the right size and shape. Before you start cutting, measure the dimensions you want for your box, considering the length, width, and height. Use a tape measure and a square to make precise measurements and ensure that all the boards are cut to the correct size. A circular saw or a miter saw can be used to make straight and clean cuts.
H3nails Or Screws For Assembly/h3
Nails or screws for assembly are the next important consideration for building your potato box. Both options have their pros and cons – nails are easier and quicker to use, while screws provide better stability and durability. Whichever method you choose, make sure to select nails or screws that are appropriate in length and thickness for the type of wood you are using. Additionally, using a drill or a hammer will make the assembly process smoother and more efficient.
H3optional Tools And Accessories/h3
Although not necessary, there are some optional tools and accessories that you may find useful when making a potato box. These can include a carpenter’s square for ensuring 90-degree angles, a power drill with a drill bit for pre-drilling holes, and a level for making sure the box is even. Additionally, you may want to consider adding handles or casters to make the box more portable and easy to move around your garden.
To summarize, when making a potato box, make sure to choose the right wood, accurately measure and cut the boards, select the appropriate nails or screws for assembly, and consider using optional tools and accessories to simplify the process. By following these steps, you’ll be well on your way to constructing a functional and efficient potato box for your gardening needs.
How to Make a Potato Box: Step by Step Guide
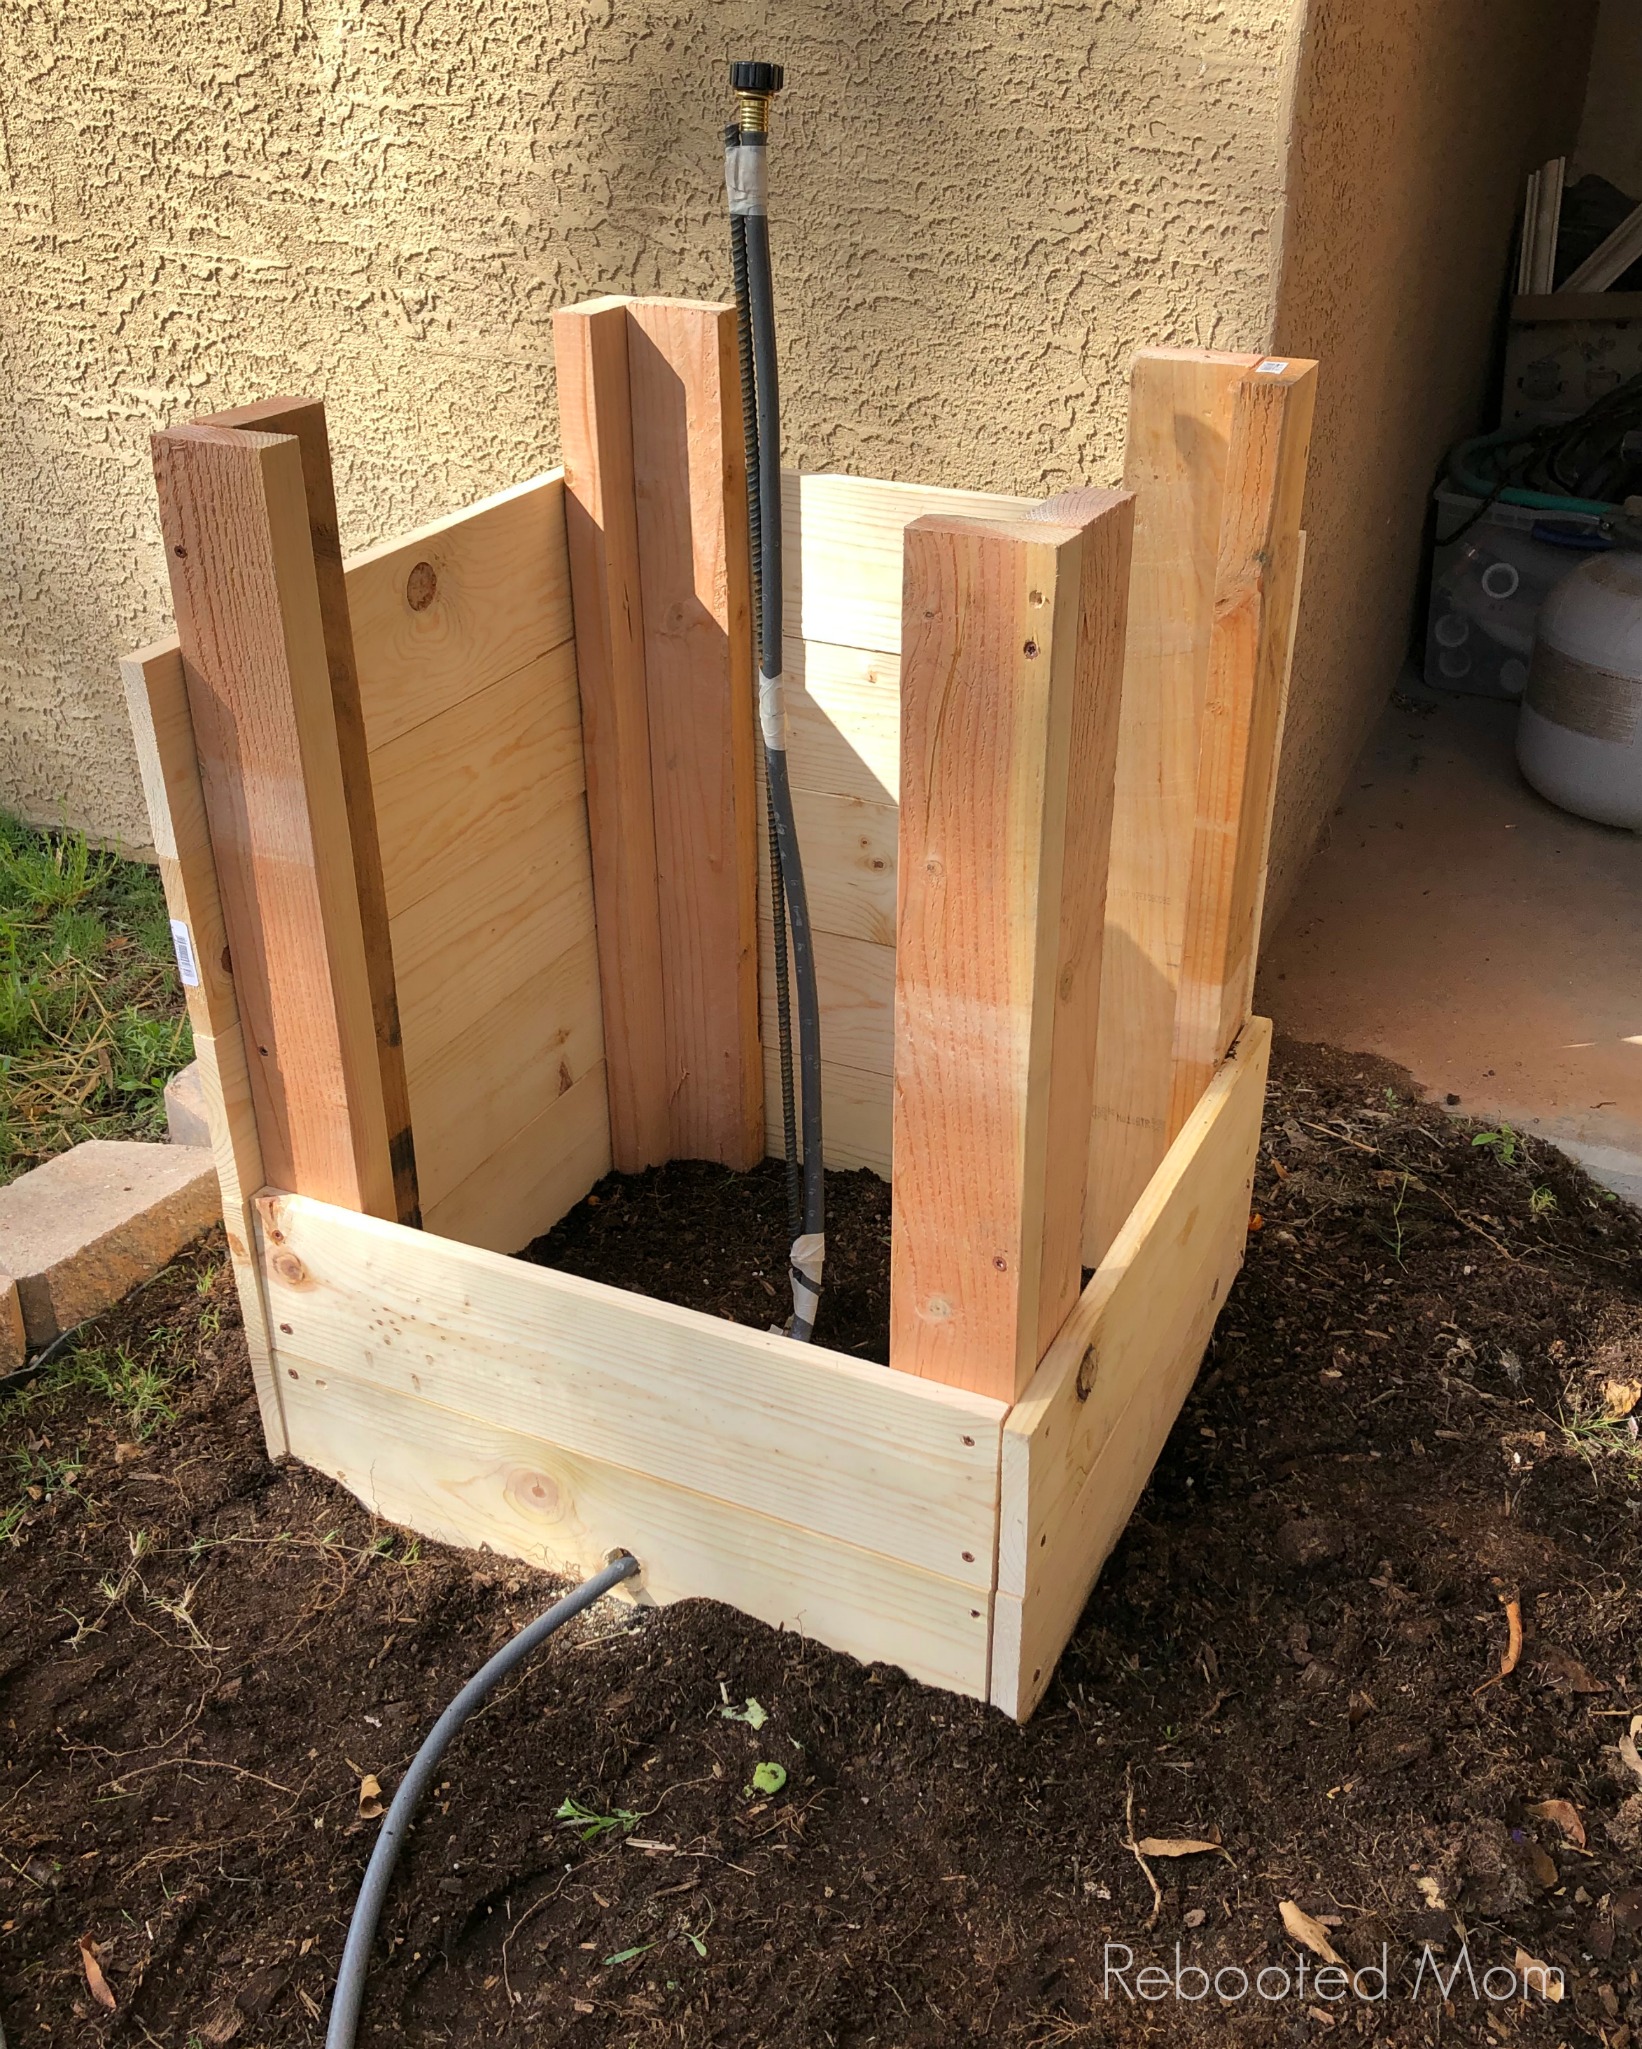
Building The Base Of The Potato Box
When it comes to building a potato box, the first step is to create a sturdy base. The base provides the foundation for the entire structure and plays a crucial role in ensuring the stability and durability of the potato box. In this section, we will discuss the steps involved in building the base of the potato box.
Positioning The Boards For The Base
The first step in building the base is to position the boards in the desired layout. For a standard potato box, you will need four wooden boards, each measuring 2 feet in length. Carefully place two boards parallel to each other, leaving a gap of about 2 feet between them. Then, position the remaining two boards perpendicular to the first two boards, creating a rectangular shape.
Securing The Corners Of The Base
Once the boards are properly positioned, the next step is to secure the corners of the base. Start by using a power drill to create pilot holes at each corner of the base, approximately 2 inches away from the edges. These pilot holes will prevent the wood from splitting when you insert the screws.
Next, take 3-inch wood screws and insert them through the pilot holes, securing the boards together. Make sure to tighten the screws securely, ensuring that the corners of the base are rigid and stable.
Reinforcing The Base For Stability
To enhance the stability of the base, it’s recommended to reinforce it further. This step helps prevent any sagging or bending under the weight of the soil and potatoes. You can achieve this by adding additional support braces along the length of the base.
To create support braces, cut two wooden boards to a length of 1 foot each. Position these boards diagonally across the base, from one corner to the opposite corner, forming an ‘X’ shape. Attach the support braces to the base using 2-inch wood screws, securely fastening them to the base and ensuring they are flush with the boards.
By following these steps, you will have a strong and stable base for your potato box. The base serves as a solid foundation for the rest of the structure, ensuring that your potato plants grow well and thrive within the box.
Creating The Sides And Ends Of The Potato Box
To create the sides and ends of a potato box, follow these simple steps. Cut plywood to desired dimensions and assemble using screws. Ensure proper reinforcement for stability and durability.
Measuring and cutting the boards for the sides and ends
To start building your potato box, you’ll need to measure and cut the boards that will serve as the sides and ends of the box. This step is crucial to ensure that the box is the right size and shape to accommodate your potatoes. To do this, gather the necessary tools such as a measuring tape, a pencil, and a saw.
Here’s how you can measure and cut the boards for the sides and ends of your potato box:
1. Take your measuring tape and measure the desired length and width for the sides of the box. Consider the amount of space you have available and the number of potatoes you plan to grow. Use a pencil to mark the measurements on the boards.
2. Once you have measured and marked the lengths and widths, use a saw to carefully cut the boards to these dimensions. Make sure to follow the marked lines accurately to achieve precise cuts.
Attaching the side boards to the base
After you have measured and cut the boards for the sides of your potato box, it’s time to attach them to the base. This step will help create the structure and stability of the box, ensuring it can hold the weight of the soil and potatoes.
Follow these steps to attach the side boards to the base:
1. Place the base board on a flat surface, such as a workbench or the ground. Make sure it is positioned correctly, with the top side facing up.
2. Take one of the side boards and align it vertically with the edge of the base board. Ensure that it is flush and perpendicular to the base board. You can use clamps to hold the side board in place temporarily.
3. With the side board in position, use screws or nails to secure it to the base board. Place them at regular intervals along the length of the side board, ensuring they penetrate both the side board and the base board. Repeat this process for all the side boards.
Installing the end boards to complete the box structure
With the side boards securely attached to the base, the next step is to install the end boards. These boards will enclose the box, creating a complete structure for your potato-growing endeavor.
Follow these steps to install the end boards and complete the potato box structure:
1. Take the measurements for the end boards in the same way as you did for the side boards. Remember to account for the thickness of the side boards when determining the length of the end boards.
2. Cut the end boards to the desired dimensions using a saw, following the marked measurements. Ensure that the cuts are precise and align with the measured lengths.
3. Position one end board vertically against the edge of the side board, making sure it is flush and perpendicular. Use screws or nails to attach the end board to both the side board and the base board. Repeat this process for the other end of the box.
By following these steps, you will successfully create the sides and ends of your potato box. This structure provides the necessary support and enclosure for your potato plants to grow and thrive.
Adding Ventilation And Drainage
To ensure proper ventilation and drainage, incorporate small holes in your potato box. This will allow sufficient airflow and prevent waterlogging, creating optimal conditions for potato growth.
Creating Ventilation Holes For Proper Airflow
One of the key aspects of making a potato box is ensuring proper ventilation. Adequate airflow within the box is essential for preventing the growth of mold and ensuring the potatoes remain fresh. To achieve this, you need to create ventilation holes that allow air to circulate.
To start, choose an appropriate size for the ventilation holes based on the dimensions of your potato box. Generally, holes with a diameter of around 1 inch are recommended. Use a drill with a bit of the same size to create the holes. Make sure to evenly space out these holes along the sides and bottom of the box to ensure proper airflow throughout.
Remember: Good ventilation is crucial not only for preventing mold but also for preventing the potatoes from sprouting prematurely. Potatoes need proper airflow to stay fresh for as long as possible.
Ensuring Proper Drainage To Prevent Waterlogging
Another crucial element to consider when making a potato box is ensuring adequate drainage. Proper drainage prevents waterlogging, which can lead to rotting potatoes and an unpleasant odor.
To achieve proper drainage, you need to create holes at the bottom of the potato box. These drainage holes will allow any excess water to escape, keeping the potatoes dry and preventing water buildup.
Here’s a simple step-by-step guide to creating drainage holes:
- Flip the potato box upside down to work on the bottom part.
- Using a drill with a bit slightly larger than the ventilation holes, start creating drainage holes in the center and corners of the bottom panel.
- Make sure the holes are evenly spaced and have a diameter of about 1/4 inch for effective drainage.
- Once you have created the necessary drainage holes, take a moment to clean up any wood shavings or debris.
Tip: If you want to be extra cautious, you can line the bottom of the potato box with a layer of small pebbles or stones. This will assist in drainage without obstructing the airflow.
By adding ventilation holes and ensuring proper drainage in your potato box, you are creating optimal conditions for your potatoes to stay fresh and healthy. With these vital steps in place, your potato box will provide the ideal environment for storing a bountiful harvest.
Optional Modifications And Enhancements
While a basic potato box can already provide an efficient and space-saving way to grow your own potatoes, there are several optional modifications and enhancements that you can consider to further optimize your setup. These modifications can make it easier to access your potatoes, protect against pests, and increase the longevity of your potato box.
Adding A Hinged Lid For Easy Access
One modification you may want to consider is adding a hinged lid to your potato box. This simple addition can make it much easier to access your potatoes without having to disassemble the entire box. With a hinged lid, you can simply lift it up to check on the progress of your potatoes or harvest them when they are ready.
To add a hinged lid, you will need a sturdy piece of plywood or similar material that is slightly larger than the dimensions of your potato box. Attach hinges to one side of the lid and the corresponding side of the box, ensuring that the lid can open and close smoothly. You can also add a latch or lock mechanism to keep the lid securely closed when not in use.
Installing A Mesh Screen To Protect Against Pests
Pests such as insects and rodents can be a common problem when growing potatoes. To protect your precious potato crop, consider installing a mesh screen on your potato box. The mesh screen can prevent pests from entering the box and damaging your potatoes.
To install a mesh screen, measure the dimensions of your potato box and cut a piece of mesh screen that matches these dimensions. Attach the screen to the sides of the box using staples or similar fasteners. Make sure the mesh screen is securely attached and that there are no gaps where pests can squeeze through.
Applying A Protective Finish For Longevity
To ensure the longevity of your potato box, applying a protective finish can be a worthwhile enhancement. This finish can help protect the wood from moisture, UV rays, and other environmental factors that may cause it to deteriorate over time.
Before applying the protective finish, make sure to thoroughly clean and dry the potato box. You can choose a suitable finish such as outdoor wood sealant, varnish, or paint. Apply the finish according to the manufacturer’s instructions, ensuring that all surfaces are adequately coated. This protective layer will help extend the lifespan of your potato box and keep it looking great for years to come.
Frequently Asked Questions On How To Make A Potato Box
What Kind Of Wood Do You Use For Potato Boxes?
Potato boxes are typically made from durable and rot-resistant wood, such as cedar or cypress, to ensure longevity and protect the potatoes from moisture and pests. These woods also offer natural protection against decay, making them ideal for storing potatoes.
How Big Should A Potato Box Be?
A potato box should be big enough to accommodate the quantity of potatoes you intend to store. Consider the space needed for proper airflow and a depth of about 12 inches to allow for optimal growth.
What Is The Purpose Of A Potato Box?
A potato box is used to store potatoes and keep them fresh for a longer period. It provides proper ventilation to prevent rotting and sprouting. The purpose of a potato box is to maintain the quality and extend the shelf life of potatoes.
How Do I Build A Potato Box?
To build a potato box, start by cutting four pieces of wood to the desired dimensions. Assemble the pieces into a rectangular box shape, ensuring the corners are securely connected. Next, line the box with a breathable fabric to prevent soil from escaping.
Finally, fill the box with soil, plant your potatoes, and water regularly.
Conclusion
To sum up, constructing a potato box is a simple and cost-effective solution for growing potatoes at home. By following the step-by-step instructions outlined in this blog post, you can create a sturdy and functional container that will provide optimal conditions for your potato plants to flourish.
Remember to choose the right location, use quality materials, and maintain proper care throughout the growing season. With a potato box, you can enjoy a bountiful harvest of fresh, homegrown potatoes right at your doorstep. Happy gardening!