To make oyster mushrooms grow in a bucket, you need to create a substrate mixture and provide the right growing conditions. Start by layering a mix of straw, water, and oyster mushroom spawn in a bucket.
Then, maintain a temperature between 60-75°F with indirect sunlight and regular misting. In approximately 10-14 days, you should see the mushrooms start to grow.

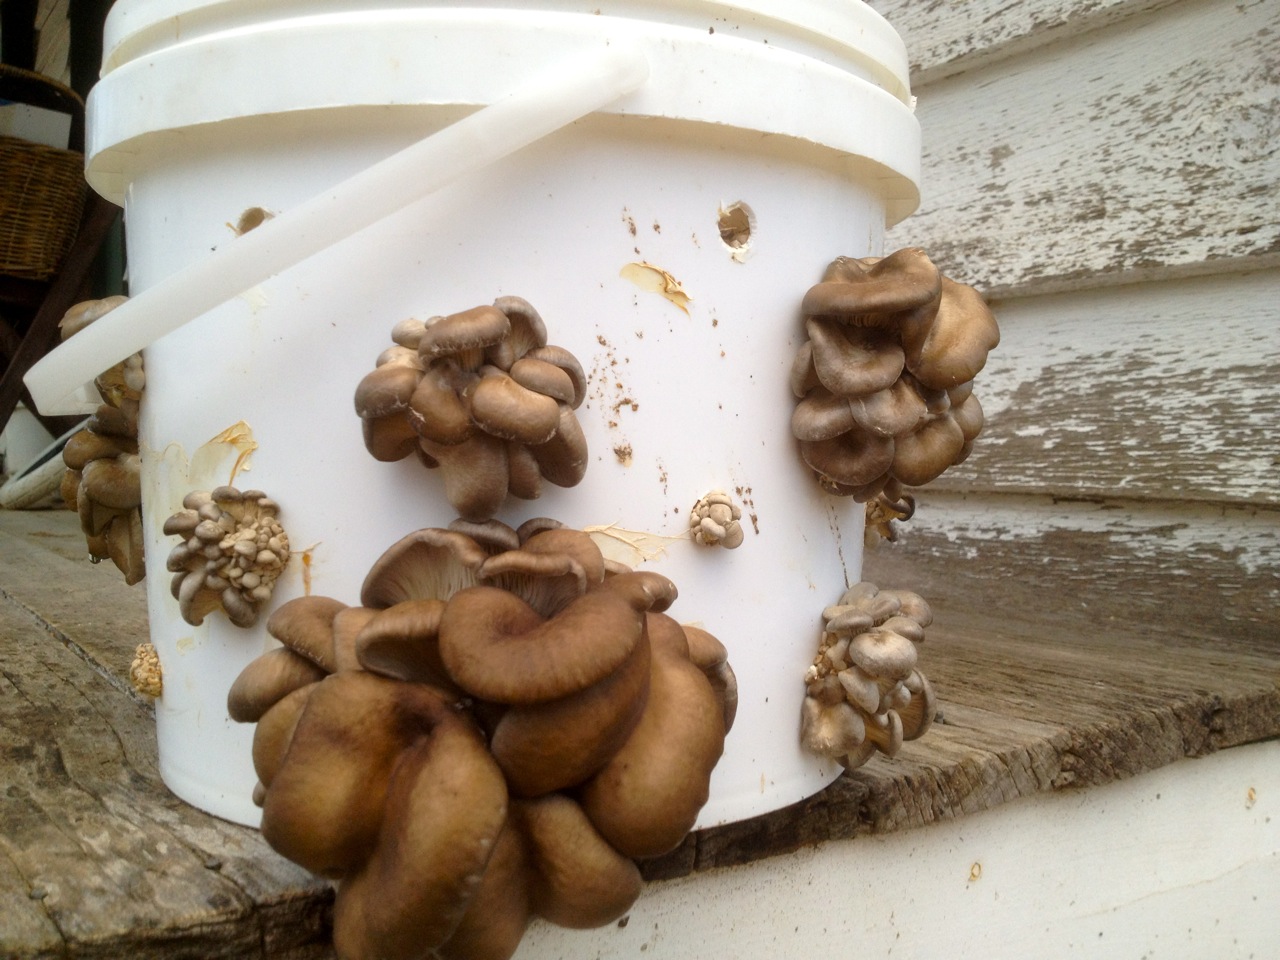
Credit: m.youtube.com
How to Make Oyster Mushrooms Grow in a Bucket: Step by Step Guide
Choosing The Right Bucket For Oyster Mushroom Cultivation
When it comes to choosing the right bucket for oyster mushroom cultivation, it is important to consider the size and material of the bucket. The size of the bucket should be large enough to accommodate the growing mushrooms, allowing them to spread out and grow properly. Additionally, the material of the bucket is also important as it should be durable and able to withstand the moisture and weight of the growing mushrooms.
Another important consideration is ensuring proper drainage and ventilation. Oyster mushrooms thrive in moist environments, but they also require good air circulation to prevent mold and mildew growth. The bucket should have holes or gaps at the bottom to allow excess water to drain out, preventing waterlogging. Additionally, the bucket should have small openings or gaps on the sides or lid to ensure proper airflow.
Preparing The Bucket For Mushroom Cultivation
When growing oyster mushrooms in a bucket, it is important to properly prepare the bucket to ensure successful cultivation. The first step is to sterilize the bucket to prevent contamination. This can be done by thoroughly cleaning the bucket with a mixture of bleach and water. Once sterilized, create holes in the bottom of the bucket to allow for proper drainage. These holes will help prevent water accumulation, which can lead to fungal growth and mold.
Additionally, it is important to create holes or slots in the sides of the bucket to promote airflow. Proper airflow is essential for the mushrooms to receive adequate oxygen and prevent the buildup of carbon dioxide. By following these steps, you can create an ideal environment for oyster mushrooms to thrive in a bucket.
Creating The Ideal Growing Environment For Oyster Mushrooms
To make oyster mushrooms thrive in a bucket, it is crucial to create the ideal growing environment. This starts with selecting the right substrate for mushroom growth. Oyster mushrooms prefer substrates like straw, sawdust, or coffee grounds that are rich in nutrients. It is important to choose a substrate that is free from contaminants to ensure successful growth.
Another key factor in creating the ideal growing environment is controlling temperature and humidity levels. Oyster mushrooms thrive in temperatures around 70-75°F (20-24°C) and humidity levels between 85-95%. Maintaining these conditions will stimulate mycelium growth and ensure robust fruiting.
| Key Points |
|---|
| Select a substrate rich in nutrients |
| Ensure substrate is contaminant-free |
| Maintain temperature of 70-75°F (20-24°C) |
| Keep humidity levels between 85-95% |
Choosing The Substrate For Oyster Mushroom Cultivation
When it comes to cultivating oyster mushrooms in a bucket, choosing the right substrate is crucial. Let’s explore different substrate options that work well for oyster mushroom cultivation:
| Sawdust | Sawdust is a popular substrate choice for oyster mushrooms. It is easily available, affordable, and provides a good balance of nutrients. |
| Straw | Straw is another commonly used substrate for oyster mushroom cultivation. It is readily available and provides a suitable environment for mushroom growth. |
| Wood chips | Wood chips can also serve as a substrate for oyster mushrooms. They provide a stable and nutrient-rich environment for the mushrooms to grow. |
Once you have chosen your substrate, the next step is to prepare it for inoculation:
- Sanitization: It is crucial to sanitize the substrate to eliminate any competing organisms that may hinder mushroom growth. This can be done through pasteurization or sterilization methods.
- Moistening: The substrate should be moistened to the desired water content. This can be achieved by soaking, boiling, or steaming the substrate, depending on the chosen method.
- Inoculation: After the substrate has been prepared, it is ready for inoculation with oyster mushroom spawn. The spawn can be mixed or layered onto the substrate, ensuring even distribution.
Following these steps will help you successfully grow oyster mushrooms in a bucket. Happy mushroom cultivation!
Controlling Temperature And Humidity For Mushrooms
Understanding the ideal temperature range for oyster mushrooms: Oyster mushrooms thrive in temperatures between 55-65 degrees Fahrenheit. This temperature range is crucial for their growth and development. It is important to maintain a consistent temperature within this range throughout the growing process to ensure optimal results.
Managing humidity levels in the growing area: Oyster mushrooms require high humidity levels to flourish. The ideal humidity range for oyster mushrooms is around 85-95%. This can be achieved by misting the growing area regularly with water or using a humidifier. It is important to monitor and adjust the humidity levels regularly to prevent the mushrooms from drying out or becoming too damp, as this can lead to disease or mold growth.
Inoculating Oyster Mushroom Spawn In The Bucket
Acquiring high-quality oyster mushroom spawn is essential for successfully inoculating the substrate in a bucket. It is important to find a reliable supplier or source that offers certified mushroom spawn. The spawn should be fresh, free from contaminants, and of the right strain suitable for oyster mushrooms.
Once you have acquired the spawn, you can proceed to inoculate the substrate. Start by preparing the bucket with suitable material such as pasteurized straw, sawdust, or a combination of both. Ensure the substrate is at the right moisture content by misting it lightly with water. Then, evenly distribute the oyster mushroom spawn on top of the substrate and mix it thoroughly.
After inoculation, cover the bucket with a breathable lid or plastic wrap with small holes to allow air circulation and prevent contamination. Place it in a suitable environment with controlled temperature and humidity. Regularly monitor and maintain the moisture level to support the growth of oyster mushrooms. With proper techniques and care, you can enjoy a bountiful harvest of oyster mushrooms from your bucket.
Selecting And Purchasing Oyster Mushroom Spawn
Evaluating different types of oyster mushroom spawn is an important step in successfully growing oyster mushrooms in a bucket. When selecting and purchasing spawn, it is crucial to find a reliable supplier that offers high-quality spawn. Look for a supplier that has a good reputation and positive customer reviews. Additionally, consider the type of spawn available and choose the one that best suits your needs and preferences.
There are several different types of oyster mushroom spawn to choose from, including grain spawn, sawdust spawn, and plug spawn. Grain spawn is commonly used for indoor cultivation and is easy to handle. Sawdust spawn, on the other hand, is ideal for outdoor cultivation in straw, logs, or wood chips. Plug spawn is convenient for inoculating logs and stumps. Consider the growing environment and the resources you have available to determine the most suitable type of spawn for your needs.
By carefully evaluating different types of oyster mushroom spawn and finding a reliable supplier, you can ensure the success of your oyster mushroom cultivation project. Take the time to research and make an informed decision to set yourself up for a successful growing experience.
Inoculating The Substrate With Oyster Mushroom Spawn
Oyster mushrooms are a great option for growing in a bucket as they are easy to cultivate and have a delicious flavor. To start, you’ll need to inoculate the substrate with oyster mushroom spawn, which can be purchased online or from a local supplier. Before preparing the spawn for inoculation, make sure to gather all the necessary materials, including clean buckets, a drill with a 1/4 inch drill bit, and a sterilized mixing container.
Once you have everything ready, distribute the spawn evenly in the bucket, ensuring that every part of the substrate is covered. This will allow the mycelium to grow and spread throughout the substrate. After inoculation, cover the bucket with a breathable lid or plastic bag with small holes for air circulation. Keep the bucket in a cool, dark place and mist it daily to maintain humidity. With proper care and monitoring, you’ll soon have a bucket full of oyster mushrooms ready for harvest.
Maintaining And Caring For Oyster Mushroom Cultivation
Regular monitoring for signs of contamination or pests is essential for maintaining and caring for oyster mushroom cultivation. This involves observing the mushroom growth closely and inspecting for any signs of bacterial or fungal contamination, as well as any insect or pest infestations.
In addition to monitoring, proper watering and care are crucial for the success of your mushroom cultivation. Oyster mushrooms require a consistent level of moisture, but overwatering can lead to the growth of molds and other unwanted organisms. It is important to keep the substrate damp but not overly saturated.
Additionally, maintaining appropriate temperature and humidity levels is vital for the healthy growth of oyster mushrooms. These mushrooms thrive in cool and humid conditions, so it is important to provide suitable environmental conditions to ensure optimal growth.
Identifying And Addressing Contamination And Pest Issues
Common contaminants and pests in oyster mushroom cultivation:
| Contaminants | Pests |
|---|---|
| Bacterial contamination | Fruit flies |
| Mold contamination | Springtails |
| Viral contamination | Slugs |
| Yeasts contamination | Millipedes |
Oyster mushroom cultivation may face various contamination and pest issues. Common contaminants include bacterial, mold, viral, and yeasts. These contaminants can negatively impact the growth and yield of mushroom crops. Additionally, pests such as fruit flies, springtails, slugs, and millipedes can also pose significant problems. Identifying and addressing these issues is crucial to successful mushroom cultivation. To prevent contamination, it is essential to maintain clean and sterile growing conditions throughout the cultivation process. Regular monitoring and early detection of contamination and pests is key. Treatments may vary depending on the specific issue, but some general measures include removing contaminated or infested materials, improving ventilation, reducing humidity levels, and using organic pest control methods when necessary.
Watering And Maintaining The Mushrooms
Understanding the water needs of oyster mushrooms is crucial for their successful growth. These mushrooms require a consistent supply of moisture to thrive. Ideally, the substrate should feel damp but not soaking wet. Over-watering can lead to stagnant water, which can cause the growth of harmful bacteria and molds. On the other hand, insufficient watering can result in dry and stunted mushrooms. It is important to maintain a proper balance of moisture and humidity in the environment.
Regularly check the moisture levels of the substrate by gently pressing it with your fingers. If it feels too dry, lightly mist the mushrooms to provide additional moisture. However, avoid spraying water directly onto the caps, as this can cause them to rot. To maintain the necessary humidity, cover the bucket with a plastic bag or use a humidity dome. This will help create a microclimate that promotes healthy mushroom growth.
Harvesting And Storing Oyster Mushrooms In Buckets
Once your oyster mushrooms are ready for harvest, there are a few signs to recognize. Look for fully opened caps with firm texture and a color that matches the specific variety. The gills underneath the caps should also be visible and mature, with dark spores. To harvest the mushrooms, gently twist each stem at the base until it separates from the substrate. Use a sharp knife or scissors if required. Remember to handle them delicately to avoid damage.
After harvesting, remove any excess dirt or debris by brushing or wiping them gently. To store the mushrooms, choose a clean container, like a bucket, and line it with a clean cloth or paper towel. Place the harvested mushrooms in the container and cover it with another cloth or paper towel. Avoid sealing the container tightly, as mushrooms require some airflow. Store the bucket in a cool and dark place, like the refrigerator, to maintain their freshness for a week or two.
Determining The Right Time To Harvest Oyster Mushrooms
Observe visual cues for mushroom maturity: Before harvesting oyster mushrooms, it is crucial to understand the visual signs indicating their maturity. Look for fully opened caps and the appearance of tiny droplets on the mushroom surface. These droplets, known as guttation, signal that the mushrooms are ready to be harvested and are at their prime.
Proper techniques for harvesting mushrooms: To harvest oyster mushrooms, gently twist and pull the mature mushrooms from the substrate, avoiding any unnecessary damage to the surrounding mycelium. It is essential to handle the mushrooms delicately to prevent bruising or tearing. Remember to use a clean knife or shears to remove any remaining stems.
By following these guidelines for determining mushroom maturity and employing proper harvesting techniques, you can enjoy a bountiful harvest of oyster mushrooms grown in a bucket.
Storing Oyster Mushrooms For Longevity
Storing harvested oyster mushrooms properly is crucial for their longevity and preserving their flavor and quality. Here are some best practices to follow:
| 1. | Keep them fresh. After harvesting, gently brush off any dirt or debris from the mushrooms without washing them. Washing can negatively affect their texture and flavor. |
| 2. | Use breathable containers. Opt for paper bags or perforated plastic bags to allow the mushrooms to breathe and prevent moisture buildup. |
| 3. | Keep them cool and dry. Store the mushrooms in the refrigerator at temperatures between 34°F to 36°F (1°C to 2°C). Avoid storing them in plastic bags, as they can become slimy. |
| 4. | Don’t stack them. Place the mushrooms in a single layer in a container and avoid stacking them to prevent crushing and moisture accumulation. |
| 5. | Check them regularly. Inspect the mushrooms for any signs of spoiled or moldy parts. Remove any damaged mushrooms to prevent contamination. |
By following these tips, you can ensure that your oyster mushrooms stay fresh and delicious for longer periods of time.
Frequently Asked Questions For How To Make Oyster Mushrooms Grow In A Bucket
How Do You Grow Oyster Mushrooms In A Bucket?
To grow oyster mushrooms in a bucket, start by drilling holes for ventilation and drainage. Layer the bucket with sterilized straw and spawn, mist regularly to maintain moisture, and place it in a dark area with controlled temperature. Harvest the mushrooms when they fully develop and enjoy your homegrown delicacies.
What Is The Best Substrate For Oyster Mushrooms In A Bucket?
The best substrate for oyster mushrooms in a bucket is a mixture of pasteurized straw and sawdust. This combination provides the right balance of nutrients, moisture, and structure for the mushrooms to grow efficiently. Make sure to sterilize the substrate properly to prevent contamination and promote healthy mushroom growth.
How Long Does It Take For Oyster Mushrooms To Grow In A Bucket?
The growth of oyster mushrooms in a bucket varies depending on various factors such as temperature, humidity, and spawn quality. However, on average, it takes about 2 to 3 weeks for oyster mushrooms to fully develop and be ready for harvest.
Regularly monitor the bucket and adjust conditions if needed to ensure optimal growth.
Conclusion
Growing oyster mushrooms in a bucket is a convenient and rewarding way to enjoy these delicious fungi. By following the step-by-step process outlined in this blog post, you can easily set up your own mushroom-growing system at home. Remember to choose the right substrate, maintain optimal conditions, and provide proper care to ensure successful cultivation.
Happy mushroom growing!