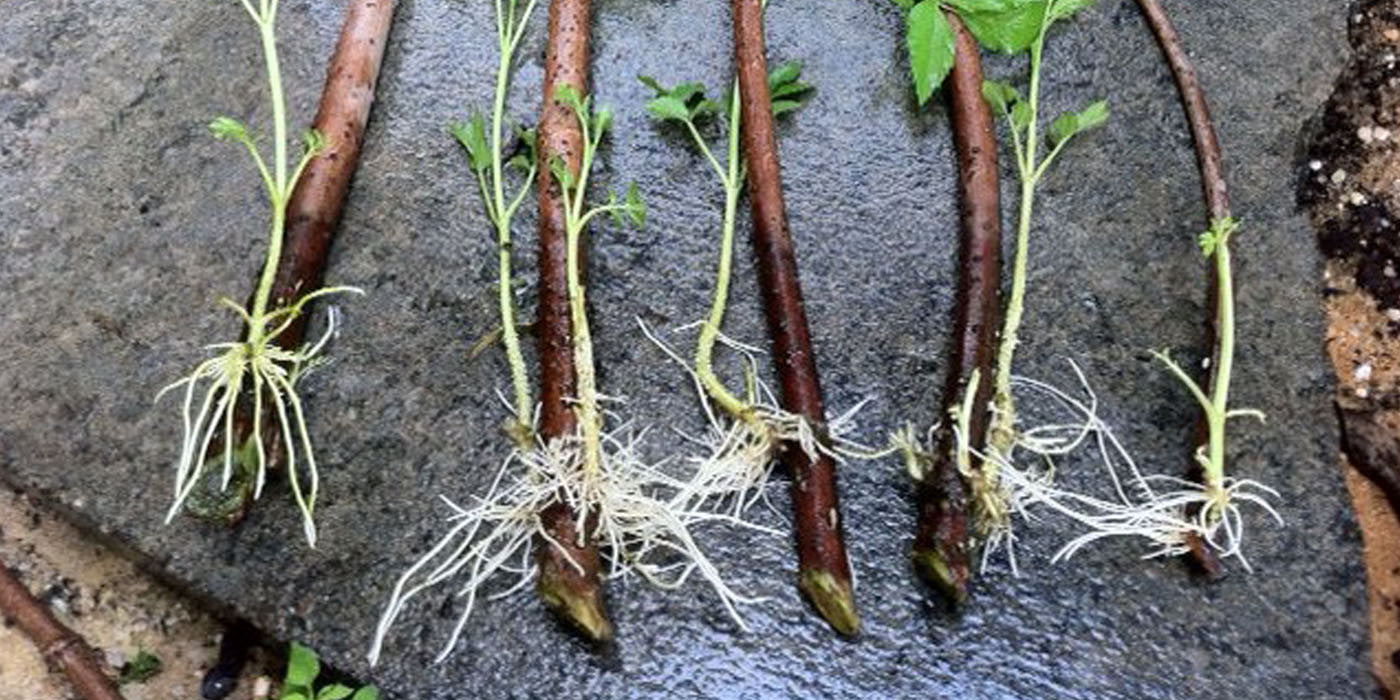
To start elderberry cuttings, ensure you have healthy, disease-free branches measuring 12-18 inches long.

Credit: gardenerspath.com
How to Start Elderberry Cuttings: Step by Step Guide
Choosing Healthy Elderberry Cuttings
When propagating elderberry plants, it is crucial to start with healthy cuttings for a successful outcome. Here are some characteristics to look for when choosing elderberry cuttings:
- Strong and sturdy stems: Opt for cuttings with thick and robust stems, which indicate plant vigor.
- Flexible branches: Look for branches that are still flexible and not woody, as they are more likely to root.
- Healthy leaves: Choose cuttings with vibrant, green leaves that are free from any signs of disease or pests.
- Evidence of buds: Select cuttings that have dormant buds, as they indicate the potential for new growth and successful rooting.
The best time to take elderberry cuttings is during late winter or early spring when the plants are still dormant. This allows the cuttings to have a higher chance of rooting successfully. Once you have chosen healthy cuttings, follow the necessary propagation techniques to ensure their successful establishment and growth in the new location.
Preparing The Materials And Tools
- Garden pruners or sharp scissors
- Rooting hormone powder
- Potting medium (such as a mix of peat moss and perlite)
- Small pots or containers
- Clear plastic bags or propagation domes
- Misting spray bottle
- Watering can or spray bottle
Before you begin taking elderberry cuttings, it’s important to ensure that your tools and equipment are properly sanitized. This helps prevent the spread of diseases and ensures the success of your cuttings.
- Clean the garden pruners or scissors with rubbing alcohol or a mixture of bleach and water.
- Rinse the pruners or scissors with clean water to remove any residue.
- Dry the tools thoroughly with a clean cloth.
- Wash the pots or containers with warm soapy water.
- Rinse the pots or containers with clean water.
- Disinfect the pots or containers by soaking them in a solution of bleach and water for 10-15 minutes.
- Rinse the pots or containers with clean water again.
- Allow the pots or containers to air dry before use.
Propagation Methods For Elderberry Cuttings
Propagating elderberry cuttings is an effective way to grow more plants and expand your garden. There are two main methods for propagating elderberries: softwood cuttings and hardwood cuttings.
| Softwood Cuttings | Hardwood Cuttings |
|---|---|
| To propagate elderberries using softwood cuttings, select young, flexible stems in early summer. Make sure the stems are not too woody or too green. Cut a 4-6 inch section from the tip of the stem, just below a leaf node. Remove the lower leaves and dip the cut end in rooting hormone. Plant the cutting in well-draining soil or a seed-starting mix. Place it in a location with bright, indirect light and keep the soil consistently moist. | For hardwood cuttings, select stems that have hardened off in late fall or early winter. Cut a 12-18 inch section from the tip of the stem. Make a straight cut above a leaf node and an angled cut below a leaf node. Remove any side branches and buds. Dip the cut end in rooting hormone. Plant the cutting in a well-draining soil mix, leaving only the top bud above the soil line. Place it in a cool, bright location and keep the soil slightly moist. |
Both methods require patience and care, as elderberries can take several weeks or months to root and establish. By following these propagation methods, you can successfully start elderberry cuttings and enjoy a bountiful harvest in the future.
Taking Elderberry Cuttings
Learn how to start elderberry cuttings with these simple steps that are easy to follow. With proper care and attention, you can successfully propagate elderberries and expand your garden.
When propagating elderberries, taking cuttings is a popular method. Selecting and preparing the parent plant is the first step. Choose a healthy, disease-free plant with strong growth. Cuttings can be taken from both softwood and hardwood, each requiring different techniques.
| Cutting Technique | Cutting Type | Best Time to Take |
|---|---|---|
| Softwood Cuttings | Young, flexible growth | Early summer |
| Hardwood Cuttings | Mature, woody stems | Late winter to early spring |
To take softwood cuttings, select stems that are green and pliable. Cut a 4-6 inch section just below a node and remove the lower leaves. Dip the cut end in rooting hormone and plant in a well-draining medium. For hardwood cuttings, choose mature stems and make 8-12 inch cuts. Remove the leaves from the bottom two-thirds and plant in a similar manner.
With proper care and attention, elderberry cuttings have a high success rate, allowing you to expand your elderberry garden.
Rooting Elderberry Cuttings
Elderberry cuttings can be easily rooted by using various techniques to induce root growth. One effective method is mist propagation, which involves misting the cuttings regularly to provide optimal conditions for root development. Another important factor is choosing the right potting mix. For best results, use a well-draining mix that provides adequate moisture retention while preventing waterlogging.
| Choosing the Right Potting Mix: | A well-draining mix |
|
|
|
|
| Mist Propagation for Optimal Root Development: | Regular misting of cuttings |
|
By following these techniques, you can successfully root elderberry cuttings and promote healthy root growth. Remember to provide the necessary care and attention during the rooting process to ensure the success of your elderberry cuttings.
Transplanting And Caring For Elderberry Cuttings
Transplanting rooted cuttings is an important step in starting elderberry plants. Once the cuttings have developed a strong root system, they can be carefully transferred to their permanent growing location. Dig a hole that is wide and deep enough to accommodate the roots without bending or crowding. Place the cutting in the hole and backfill with soil, gently firming it around the base. Proper watering is crucial for the initial establishment of the plants.
Give the newly transplanted cuttings a good soak immediately after planting, making sure the water reaches the root zone. Monitor the moisture level regularly and water as needed to keep the soil consistently moist but not waterlogged. Fertilize the elderberry cuttings with a balanced fertilizer to promote healthy growth. Apply the fertilizer according to the manufacturer’s instructions, typically in early spring and again in mid-summer. With proper care, your elderberry cuttings will thrive and grow into mature, productive plants.
Common Mistakes When Starting Elderberry Cuttings
Common Mistakes when Starting Elderberry Cuttings
One of the most common mistakes when starting elderberry cuttings is overwatering. Elderberry plants prefer well-drained soil, so overwatering can lead to root rot and hinder the growth of the cuttings. It is important to strike a balance between providing enough water for the cuttings to establish roots and not overwatering them.
Another mistake to avoid is incorrect cutting techniques. When taking cuttings from an elderberry plant, it is crucial to use sharp, clean tools to make a clean cut just below a leaf node. This ensures that the cutting has the best chance of rooting successfully. Additionally, it is important to remove any leaves or flowers from the lower portion of the cutting to prevent moisture loss and encourage root development.
Troubleshooting Issues With Elderberry Cuttings
Identifying and treating diseases and pests is crucial for successful elderberry cutting propagation. Some common diseases include powdery mildew, leaf spot, and root rot. Powdery mildew appears as a white powdery coating on leaves and can be controlled by applying fungicides. Leaf spot causes dark spots on leaves and can be managed by pruning infected branches or using proper sanitation measures to remove fallen leaves. Root rot, caused by excessive moisture, can be prevented by ensuring well-draining soil.
Various pests, such as aphids and whiteflies, can attack elderberry cuttings. Aphids are small, green insects that suck plant sap and can be eliminated by applying insecticidal soap. Whiteflies are tiny, white insects that cluster on the undersides of leaves and can be controlled by using sticky traps or insecticidal sprays. Additionally, ensuring proper ventilation and spacing between plants can help prevent pest infestations.
Another issue faced during elderberry cutting propagation is rooting failure. To increase success rates, it is essential to use healthy and disease-free cuttings with at least two nodes. Applying a rooting hormone can stimulate root development and enhance rooting. Maintaining optimal moisture levels during the rooting process is crucial; neither excessive nor insufficient moisture is beneficial. Providing bright, indirect light and maintaining warm temperatures can also promote successful root growth.
| Common Diseases | Identifying Signs | Treatment |
|---|---|---|
| Powdery Mildew | White powdery coating on leaves | Apply fungicides |
| Leaf Spot | Dark spots on leaves | Prune infected branches, practice good sanitation |
| Root Rot | Excessive moisture, wilting plants | Ensure well-draining soil |
Frequently Asked Questions On How To Start Elderberry Cuttings
Can You Start Elderberry Cuttings In Water?
Yes, you can start elderberry cuttings in water. Simply place a fresh cutting in a glass of water, making sure that the bottom end is submerged. Change the water every few days to keep it fresh and within a few weeks, you will see roots forming.
Once the roots are well developed, you can transfer the cutting to a pot or directly to the ground.
When Is The Best Time To Take Elderberry Cuttings?
The best time to take elderberry cuttings is in early spring, just before new growth begins. During this time, the cuttings will have the best chance of developing roots and growing into healthy plants. Make sure to choose healthy, disease-free stems for your cuttings.
How Long Does It Take For Elderberry Cuttings To Root?
Elderberry cuttings usually take about 4 to 8 weeks to develop roots. However, the timing can vary depending on various factors such as environmental conditions and the health of the cutting. To improve the chances of successful rooting, make sure to keep the cutting in a warm and humid environment with consistent moisture levels.
Conclusion
Starting elderberry cuttings requires a simple step-by-step process that can be easily followed by beginners. By choosing healthy, mature wood and providing the right conditions, you can successfully propagate elderberry plants. Remember to keep the cuttings moist, provide adequate light and warmth, and be patient as the roots develop.
With proper care and attention, you’ll soon have a flourishing elderberry garden. Happy gardening!