To manually run a rain bird sprinkler system, locate the control panel and follow the manufacturer’s instructions. Here is a step-by-step guide to help you get started.
Whether you want to water your lawn or garden, running a rain bird sprinkler system manually can be an effective way to ensure healthy and lush vegetation. With just a few simple steps, you can effortlessly control the irrigation process.
By locating the control panel and following the manufacturer’s instructions, you’ll be able to manually run the system and adjust the water flow according to your watering needs. We will provide you with a concise guide on how to manually operate a rain bird sprinkler system and get the most out of your irrigation setup. So, let’s get started!

Credit: store.rainbird.com
What Is A Rain Bird Sprinkler System?
A rain bird sprinkler system is a manually operated irrigation system that helps to water lawns and gardens. It consists of a series of sprinkler heads connected by underground pipes. When the system is turned on, the sprinkler heads pop up and disperse water over a designated area.
These systems are easy to install and provide precise and efficient watering. They are typically used in residential and commercial settings but can also be found in parks and golf courses. Rain bird sprinkler systems offer several benefits, including water conservation, as they deliver water directly to the plants’ roots, reducing waste.
Additionally, they save time and effort as they can be set to run automatically according to a programmed schedule. Understanding the definition and basic functionality of a rain bird sprinkler system is essential for effectively using and maintaining the system.
Components Of A Rain Bird Sprinkler System
A rain bird sprinkler system consists of various components, including sprinkler heads and nozzles. These are responsible for distributing water evenly over the targeted area. Another crucial part is the control valves and wiring, which allow you to turn the system on and off as needed, and connect it to a power source.
Additionally, the system requires a controller and timer to set the watering schedule and duration. With these components in place, you can manually operate the rain bird sprinkler system to ensure your lawn and plants receive the right amount of water.
By understanding how each part works, you can effectively manage and maintain a healthy and vibrant landscape without relying solely on rainfall.
How to Manually Run Rain Bird Sprinkler System: Step by Step Guide
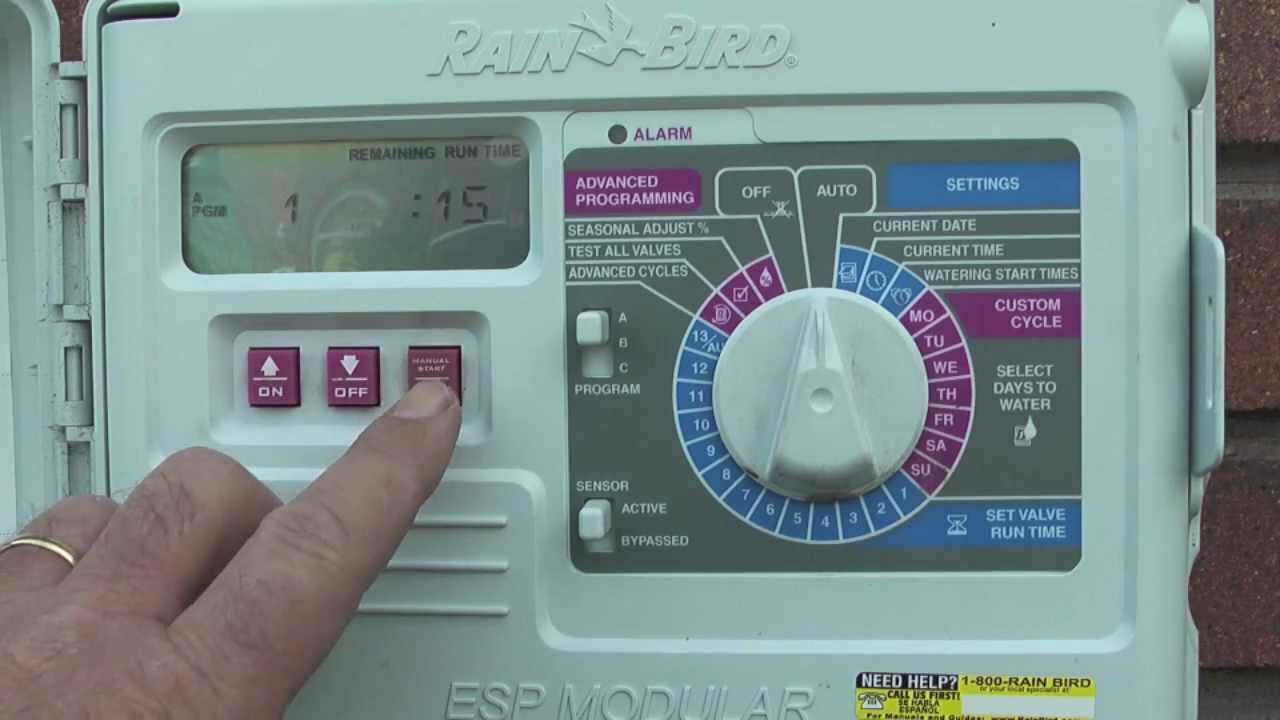
Locating The Controller
The first step in manually running a rain bird sprinkler system is to locate the controller. Look for the controller box, which is typically installed near the main water source. Once you’ve found the box, you need to identify its contents.
Take note of the display and buttons on the controller, as this is how you will interact with the system. Make sure you understand what each of the buttons do, as well as how to navigate the display. Familiarize yourself with the different settings and options that are available.
This way, you’ll be able to manually operate the rain bird sprinkler system efficiently and effectively.
Activating Manual Mode
Rain bird sprinkler systems can be manually operated, allowing you to have more control over your watering schedule. To activate manual mode, you’ll need to access the option on your sprinkler system. Look for the manual mode setting and select it to enable manual operation.
Once in manual mode, you can choose which zone or area of your yard you want to activate. This allows you to focus on specific areas that may need extra attention or that you want to water independently from the rest of your yard.
Simply select the zone you want to activate, and the rain bird sprinkler system will water that area according to your selected settings. Manual mode is a useful feature to have when you need to manually run your sprinkler system for any reason.
Adjusting Zone Settings
To manually run a rain bird sprinkler system, you can easily adjust the zone settings. By setting the run time and frequency, you can ensure your lawn or garden is properly watered. With manual override options, it becomes convenient to control the sprinklers.
You have the flexibility to customize the duration and interval between watering sessions. By following these steps, you can efficiently manage your irrigation system without relying on automatic programming. Adjusting the zone settings allows you to optimize the water distribution and cater to the specific needs of different areas within your landscape.
Taking control of your rain bird sprinkler system manually ensures your plants receive the right amount of water, promoting healthier growth and conserving water resources.
Inspecting Sprinkler Heads And Nozzles
Inspect your rain bird sprinkler system by checking for clogs or damages in the sprinkler heads and nozzles. Look for any blockages or debris that may hinder the proper functioning of your system. Adjust the spray patterns if necessary to optimize water distribution.
Make sure to thoroughly inspect each sprinkler head and nozzle to ensure they are in good condition. By regularly inspecting and maintaining your rain bird sprinkler system, you can ensure that it operates efficiently and effectively, providing adequate irrigation for your lawn or garden.
Stay proactive and keep your system running smoothly to enjoy a lush and healthy landscape.
Examining Control Valves And Wiring
Examining the control valves and wiring is crucial to manually run a rain bird sprinkler system. It is important to ensure proper connections for effective functioning. Test for any electrical issues that may hinder the system’s performance. Regularly inspect the control valves to identify any potential problems or leaks.
Verify that the wiring is securely connected and without any loose connections or frayed wires. Properly examining these components will help maintain the efficiency of the rain bird sprinkler system.
Assessing The Controller And Timer
Assessing the rain bird sprinkler system’s controller and timer is essential before manually running it. Start by verifying the power supply to ensure it is securely connected and providing adequate electricity. Once the power supply is confirmed, proceed to calibrate the settings.
Check the controller’s display for any error messages or abnormal readings. Adjust the timer according to your desired watering schedule, making sure to account for weather conditions and plant requirements. Take note of the various zones and their watering duration, ensuring that they are correctly programmed.
Finally, test the system by manually activating each zone and observing the sprinklers’ performance. By thoroughly assessing the controller and timer, you can ensure that the rain bird sprinkler system operates efficiently and effectively.
Benefits Of Manual Operation
Running a rain bird sprinkler system manually offers numerous benefits. One of the key advantages is the flexibility it provides. By manually operating the system, you have complete control over when and how long your lawn is watered. This allows you to adjust the watering schedule based on the specific needs of your yard.
Moreover, manual operation is highly efficient in terms of water usage, ensuring that you only water your lawn when necessary. This results in significant cost savings, as you are not wasting water unnecessarily. Running the rain bird sprinkler system manually also allows you to assess the current condition of your lawn and make any necessary adjustments in real time.
Overall, manual operation provides the utmost control and efficiency when it comes to watering your lawn.
Frequently Asked Questions Of How To Manually Run Rain Bird Sprinkler System
How Do I Manually Turn On My Sprinkler System?
To manually activate your sprinkler system, follow these steps: 1. Locate the main valve: find the water source for your sprinkler system and locate the main valve. 2. Turn on the water supply: rotate the valve handle counterclockwise to open the valve and allow water to flow into the system.
3. Turn on the controller: proceed to the controller or timer and switch it on. This will allow the system to receive power. 4. Activate the zones: depending on the configuration of your system, use the controller to activate individual zones.
This can usually be done by selecting the corresponding zone number or name on the controller. 5. Adjust watering duration: if needed, adjust the watering duration for each zone using the controller. Remember to turn off the sprinkler system after use to conserve water and prevent any potential damage.
How Do You Manually Test A Rain Bird?
To manually test a rain bird irrigation system, follow these steps: 1. Turn on the water supply to the system. 2. Activate each zone of the system one at a time to check if the sprinklers are working properly. 3. Inspect the coverage area of each sprinkler head to ensure it is adequately watering the intended area.
4. Look for any signs of leaks, such as water pooling or excessive water flow. 5. Check the spray pattern of each sprinkler head to ensure it is distributing water evenly. 6. Adjust the direction and height of the sprinkler heads if necessary to optimize coverage.
7. Monitor the system’s timer and ensure it is correctly programmed for the desired watering schedule. 8. Test the rain sensor, if applicable, to ensure it is functioning correctly and preventing watering during rainfall. 9. Take note of any issues or malfunctions and make the necessary repairs or adjustments to maintain optimal performance.
How Do You Bypass A Rainbird?
To bypass a rainbird, follow these steps: 1. Locate the rainbird controller and turn off its main power source. 2. Find the solenoid valve box for the specific zone you want to bypass. 3. Remove the wires connected to the solenoid valve in that zone.
4. Use a wire nut to connect the two wires from the controller together. 5. Turn on the power supply for the rainbird controller, and it will skip the zone you bypassed. 6. Remember to monitor the bypassed zone manually or reconnect the wires when you want the controller to resume control.
How Do You Manually Start A Rain Bird Esp 12 Lx Plus?
To manually start a rain bird esp 12 lx plus, follow these steps: 1. Locate the “manual start” button on the controller. 2. Press and hold the “manual start” button for a few seconds until the display shows the current date and time.
3. Use the arrow buttons to select the zone you want to activate. 4. Press the “enter” button to confirm the selection. 5. The controller will now activate the selected zone and display the remaining watering time. Remember to check that the water supply is turned on before starting the irrigation.
If any issues persist, refer to the user manual or contact rain bird customer support for further assistance.
Conclusion
To sum up, learning how to manually run your rain bird sprinkler system is an essential skill for any homeowner. By following the simple steps outlined in this blog post, you can easily control and manage the watering schedule of your lawn and garden.
Remember to check your watering needs, set your zones, adjust the run time, and activate manual watering when necessary. Regularly maintaining your sprinkler system will ensure its longevity and efficiency, saving you time and money in the long run. So take the time to familiarize yourself with your rain bird system, and enjoy the benefits of a lush and healthy outdoor space.
Happy watering!