
To test a lawn mower solenoid with a multimeter, set the multimeter to the resistance or continuity setting and touch the probes to the solenoid’s terminals.
Understanding The Function Of A Lawn Mower Solenoid
A lawn mower solenoid is a vital component that helps start the engine. It acts as an electromagnetic switch, converting electrical energy into mechanical energy. When the ignition key is turned, the solenoid receives an electrical signal and creates a magnetic field.
This attracts a metal plunger, which completes the circuit and allows the current to flow to the starter motor. As a result, the engine starts running smoothly. It’s crucial to test the solenoid using a multimeter to ensure it’s functioning correctly.
By checking the resistance and continuity readings, you can identify any faults or malfunctions. Regularly testing the solenoid can prevent starting issues and prolong the lifespan of your lawn mower. So, understanding how a solenoid works and its importance in the mower system is essential for proper maintenance.
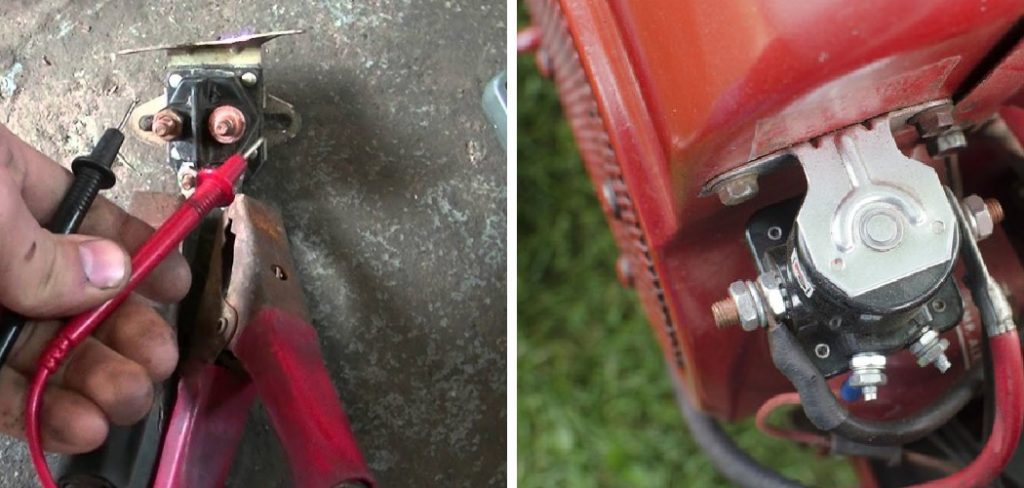
Tools Needed For Testing The Lawn Mower Solenoid
To test the lawn mower solenoid with a multimeter, you’ll need a few essential tools. One of them is a multimeter, which is used to measure electrical current and resistance. Additionally, it’s important to wear safety gear such as gloves and safety glasses while performing the test.
This will protect you from any potential hazards. Conducting the test is relatively simple. Begin by disconnecting the solenoid from the mower’s electrical system. Then, set your multimeter to the appropriate settings for measuring resistance. Connect the multimeter’s probes to the solenoid’s terminals and check the resistance reading.
If the reading is significantly higher or lower than the recommended range, it may indicate a faulty solenoid that needs to be replaced. Remember to always refer to the manufacturer’s instructions for specific testing procedures for your particular lawn mower model.
Step-By-Step Guide To Testing The Lawn Mower Solenoid With A Multimeter
When testing a lawn mower solenoid with a multimeter, it is important to prepare the mower properly. This includes disconnecting the battery or power source to ensure safety. Once that is done, locating the solenoid in the mower is the next step.
Using a multimeter, the solenoid can be tested by setting the multimeter to the appropriate settings for continuity testing. Checking for continuity across the solenoid terminals will provide valuable information. Interpreting the multimeter readings will help determine if the solenoid is functioning correctly.
Additionally, there are other tests that can be performed on the solenoid, such as checking for voltage drop across the terminals and testing the solenoid coil resistance. Following these steps will ensure an accurate assessment of the lawn mower solenoid’s condition.
Troubleshooting Common Issues With Lawn Mower Solenoids
Troubleshooting common issues with lawn mower solenoids involves identifying symptoms of a faulty solenoid. One symptom is when the starter motor does not engage, preventing the mower from starting. Another sign is a mower that either fails to start or stalls intermittently.
If you hear a clicking sound when turning the key, it could indicate a solenoid problem. Corrosion and dirt buildup, as well as wiring issues or loose connections, are potential causes of solenoid problems. To fix a faulty solenoid, you can start by cleaning the solenoid contacts and repairing or replacing any damaged wiring.
If necessary, you may need to install a new solenoid altogether. By troubleshooting and addressing solenoid issues, you can ensure proper functioning of your lawn mower.
Frequently Asked Questions On How To Test Lawn Mower Solenoid With Multimeter
How Do You Test A Solenoid With A Multimeter?
To test a solenoid with a multimeter, follow these steps: first, set the multimeter to the resistance or ohms mode. Then, disconnect the power supply to the solenoid. Next, connect one multimeter probe to one of the solenoid’s terminals and the other probe to the other terminal.
The multimeter should display a resistance reading within the solenoid’s specified range. If the reading is infinite or zero, it indicates a faulty solenoid. To further confirm, swap the multimeter probes and check for a consistent resistance reading. Ensure the solenoid’s terminals are clean and free from any obstruction.
If the solenoid fails the resistance test, it may need to be replaced. Remember to always refer to the manufacturer’s instructions for specific testing procedures for your solenoid model.
How Do I Know If My Lawn Mower Solenoid Is Bad?
To determine if your lawn mower solenoid is bad, follow these steps: 1. Start by checking if the engine fails to start when you turn the ignition key. 2. If you hear a clicking sound coming from the solenoid but the engine doesn’t turn over, it may indicate a faulty solenoid.
3. Test the solenoid using a multimeter by checking for continuity between its terminals. If there is no continuity, the solenoid is likely defective. 4. Another sign of a bad solenoid is if the engine starts but stalls immediately after releasing the key.
5. Inspect the solenoid for any visual damage, such as corrosion or loose connections. Remember, a malfunctioning solenoid can prevent your lawn mower from starting. If you encounter any of these issues, it’s recommended to replace the solenoid with a new one to ensure proper functioning of your mower.
How Do You Test A Solenoid With A Screwdriver?
To test a solenoid with a screwdriver, follow these steps: disconnect the solenoid’s power source. Place the screwdriver’s metal blade on the solenoid’s metallic casing. Listen for a clicking sound while turning the key or activating the solenoid. If you hear a click, the solenoid is functioning correctly.
If you don’t hear a click, use a multimeter to measure the solenoid’s resistance. Connect the multimeter’s probes to the solenoid’s terminals; a reading of zero indicates a good solenoid. If the multimeter shows infinite resistance, the solenoid may be faulty.
Another method is to apply battery voltage directly to the solenoid’s terminals. Connect the battery’s positive terminal to one solenoid terminal and the negative terminal to the other. If the solenoid moves or makes a clicking sound, it is likely functioning correctly.
How Many Ohms Should A Starter Solenoid Have?
A starter solenoid should typically have a resistance of around 12 to 15 ohms. These ohms help regulate the flow of electrical current through the solenoid. Proper resistance ensures that the solenoid functions correctly, allowing the starter motor to engage and start the engine.
If the resistance is too high, it can indicate a problem with the solenoid, such as worn-out coils or damaged wiring. On the other hand, if the resistance is too low, it can cause excessive heat build-up and potentially damage the solenoid.
It is important to check the resistance of the starter solenoid using a multimeter to ensure it falls within the recommended range. Remember, a properly functioning starter solenoid is crucial for the proper operation of the starting system in your vehicle.
Conclusion
To sum up, testing a lawn mower solenoid with a multimeter is a straightforward process that can help diagnose and fix electrical issues with your mower. By following the step-by-step instructions outlined you can determine whether your solenoid is functioning properly or if it needs to be replaced.
Remember to always prioritize safety and ensure that the mower is turned off before you begin testing. Taking the time to troubleshoot and test your solenoid can save you time and money in the long run by avoiding costly repairs or unnecessary part replacements.
So, the next time your lawn mower exhibits electrical problems, grab your trusty multimeter and tackle the issue with confidence. Happy testing!